


A common question that developers ask when they start their journey in the mobile development world is, "How do you carry out tests in a mobile project?" and more specifically, "How do you run tests on an attached device?"
The confusion is understandable, given that the notion of working in tandem with the actual device so early in the development stage is quite unique to mobile development—and maybe game development. However, the fact that test-driven development, or TDD, is so approachable in mobile development is not an accident. Building frameworks that enable and facilitate proper, robust testing systems has always been at the top of the priority lists for Apple and Google. It's in their DNA. And it's one of the reasons why so many developers love working on mobile projects.
There are many tools available for developers to carry out tests, just like there are many ways to test your codebase. For example, you can use MVC-based testing, UI top-layer testing, acceptance testing, and behavior testing, among others. Depending on your approach and how thorough you want to be, you might end up choosing one or multiple of these.
However, one that stands out among these is UI testing. UI testing is one of the most interesting ways to test your code, as it's the closest you can get to simulating how a real user would interact with your app.
To achieve this, Android developers can use UIAutomatorViewer, a very powerful tool to see and create tests that can ensure that your applications behave exactly as you want. And in this article, we will cover what UIAutomatorViewer is, how to install it in your development environment, and how to use its powerful tools.
Let's jump right into it.

What Is UIAutomatorViewer?
Alright, so what is UIAutomatorViewer, anyway?
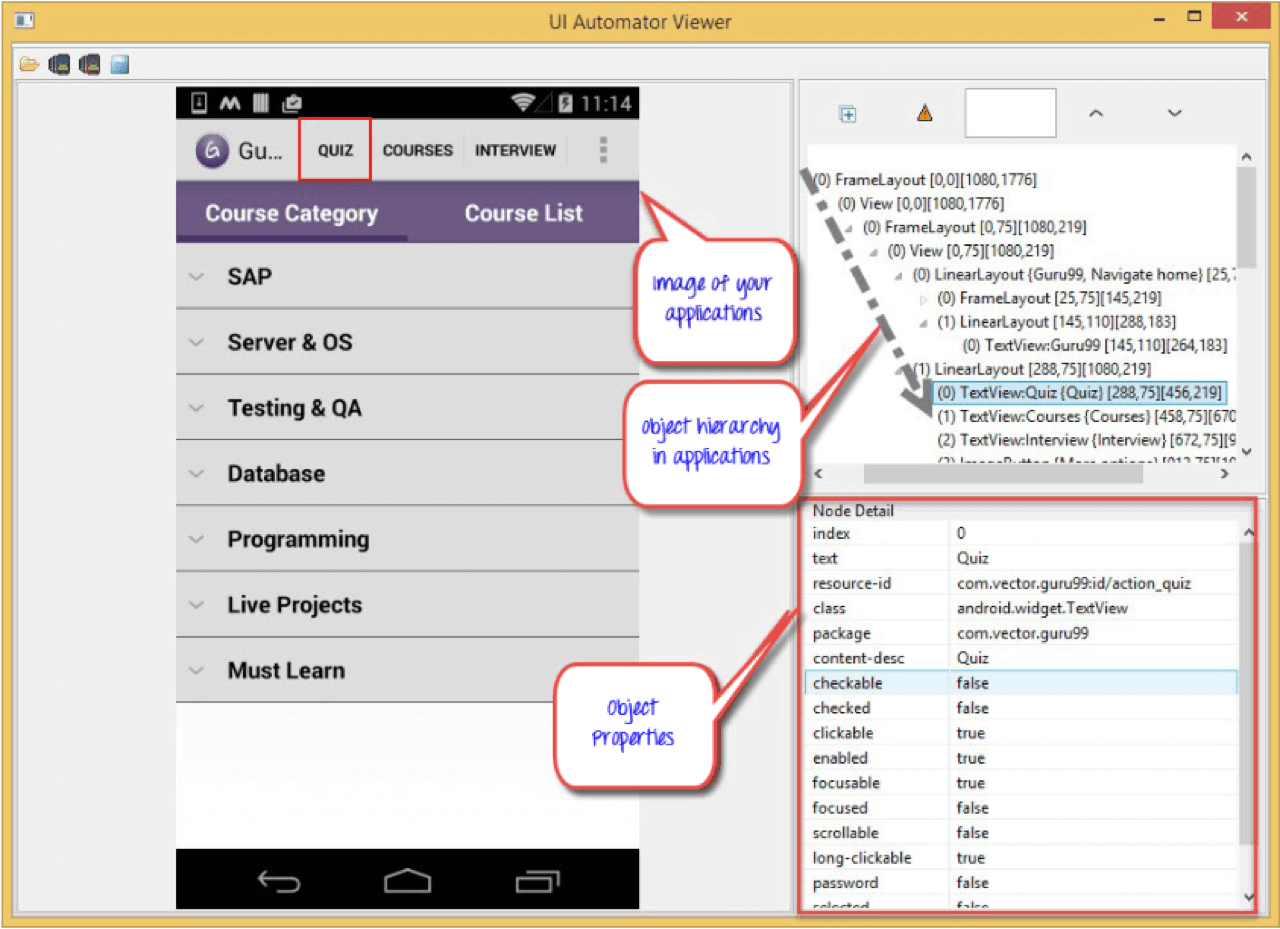
Well, in simple terms, the UIAutomatorViewer is a tool you can use to inspect and analyze the UI components of an Android application. It is a graphic interface that allows you to see the app that's running and dissect the hierarchy of views so you can identify elements that can be interacted with. This visual hierarchy lets you easily set up elements for testing with Android Studio or other tools like Appium.
The UIAutomatorViewer is especially good for seeing element properties and their values. With this information, you can unmask what's happening behind the scenes and diagnose issues with your code and the app's behavior.
In the example below, you can see how the hierarchy of views is structured in the system. UIAutomatorViewer lets you examine the object properties to see everything going on behind the scenes.
You might not have to do anything fancy to see this information. If you're working with the latest version of Android Studio IDE, you can access all the functionalities of the UIAutomatorViewer right in the project view itself.
At the bottom right of the Android Studio IDE window, there's a tab called Layout Inspector. This tab will show you the view currently displayed on the emulator or connected device and will contain all the rich information that the UIAutomatorViewer offers.
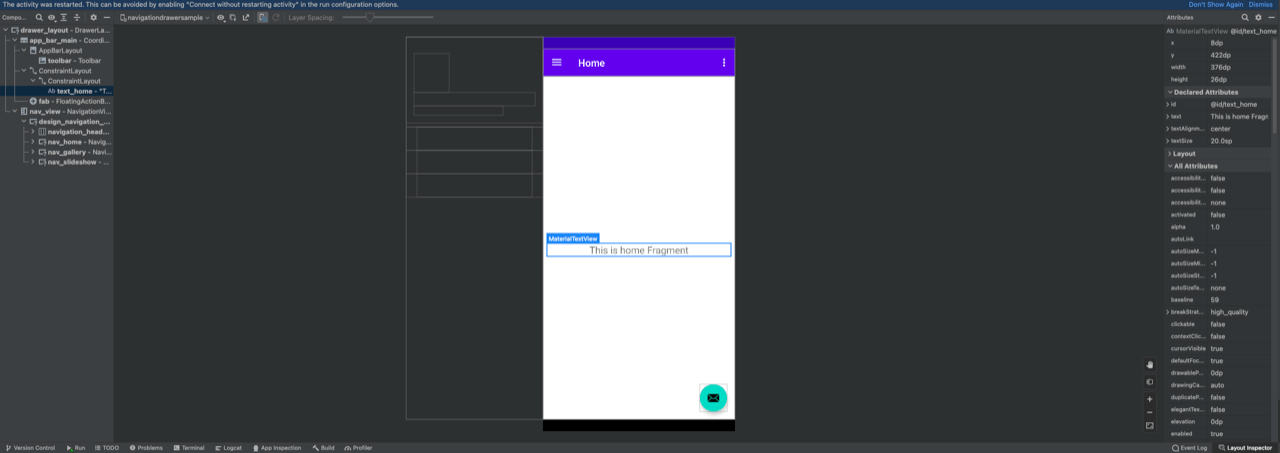
This feature is particularly advantageous for Mac users, who might find it challenging to get the UIAutomatorViewer running on their OS outside of the Android Studio suite.
Let's now explore how we can install the UIAutomatorViewer on our development environment.
How to Install the UIAutomatorViewer
Installing the UIAutomatorViewer is pretty simple, depending on how you embrace the Android development process. As we mentioned before, if you are working with the Android Studio suite and all its tools, well, you're in luck because you already have it ready to go. If that is your case, we recommend you stay with the Layout Inspector.
Now, if you happen to be working with Eclipse or JetBrains, or if you're a rockstar and work only with a text editor, then you can follow the installation steps below.
First, download the Android SDK manager if you don't already have it.
Next, download the command line tools based on your machine OS and run the installation. Additionally, download the platform-tools files from here.
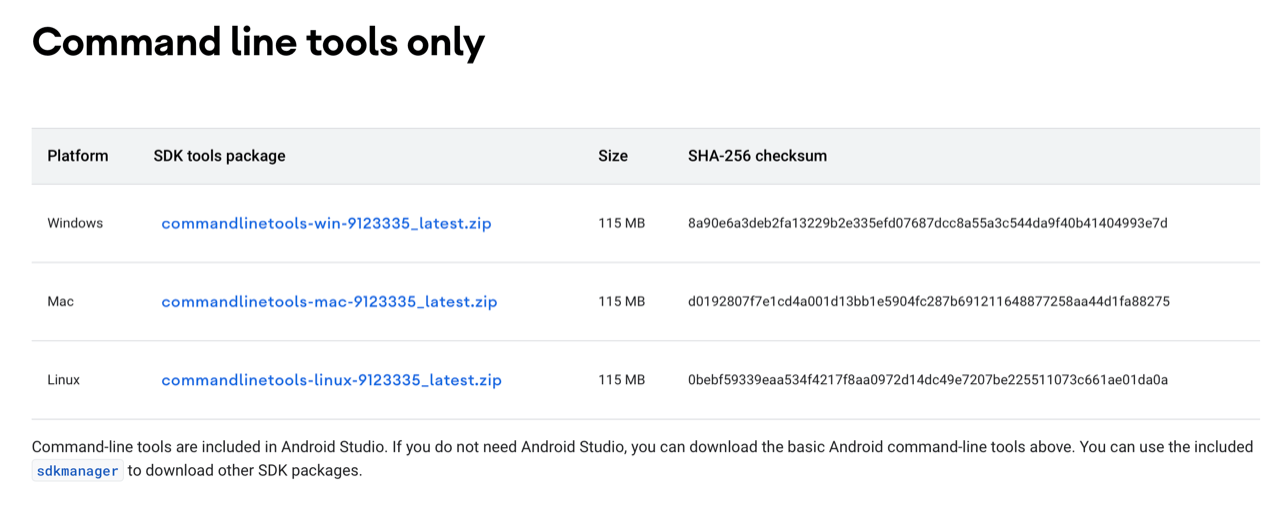
Once the download is completed, extract everything into a folder named AndroidSDK. Locate the sdkmanager file under the bin directory and execute it. Follow the installation process. Remember to select the platform and build tools for the Android API version you require.
Remember to make sure you have the environment variables set, and now you are ready to go.
You can find more information on the setup process here.
For the purpose of this article, we will continue writing an automated test using Android Studio.
How to Make Automated Tests
The first step to testing your mobile application is to create a test class. In this case, we will use the Android testing samples provided by the team at Google to illustrate how to implement the automated test properly. You can find the repository on GitHub.
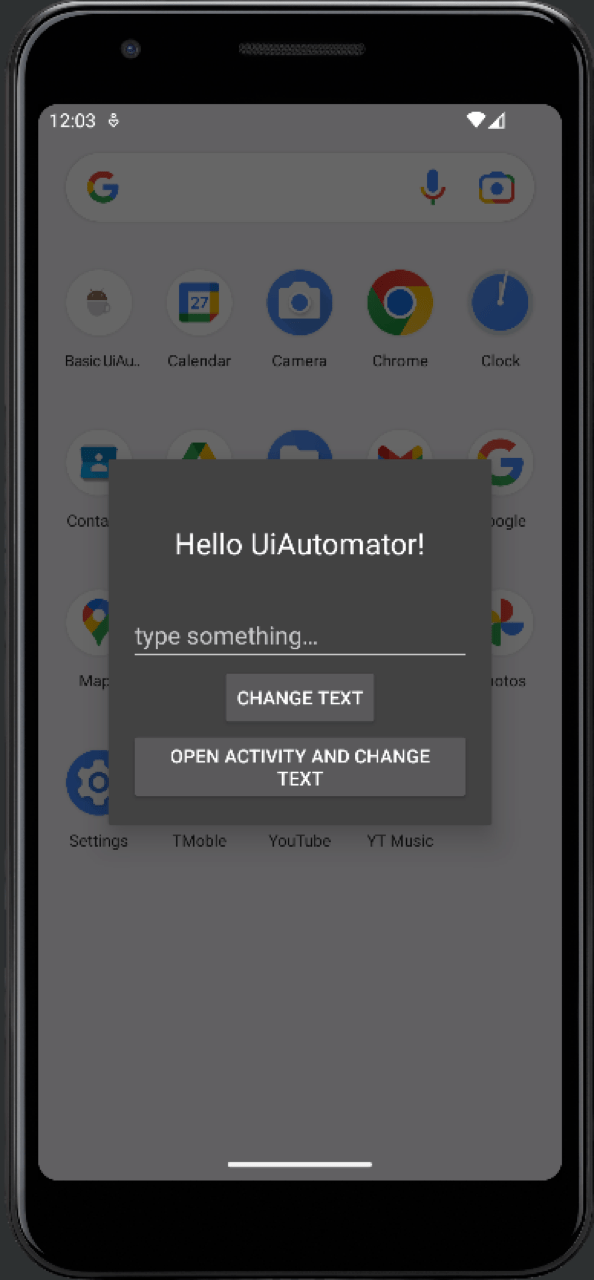
Once you have downloaded the project, go to the uiautomator directory and open it on Android Studio. Within this directory, there's a BasicSample project that contains a simple application that displays an alert popup with a textbox and two buttons to change the title of the popup.
You can run the application and see how it behaves.
Pretty simple, right?
Running the Test
Within the src directory, you can find the UI Automator test class. This class is basically the same as a JUnit test class and follows the same structure. Notice that it contains a @Before prefixed method, which serves as a setup for the test and makes sure that all tests run from the same context. In this case, that context is a clean start from the home screen.
The test cases are prefixed with the @Test label and contain units of tests. The test code must first get a reference to the elements displayed. For us, that means the textbox and buttons that can be interacted with on the screen.
Here is where you will make use of the UIAutomatorViewer, or the Layout Inspector, if you're using Android Studio IDE, to see the properties of the elements in the project.
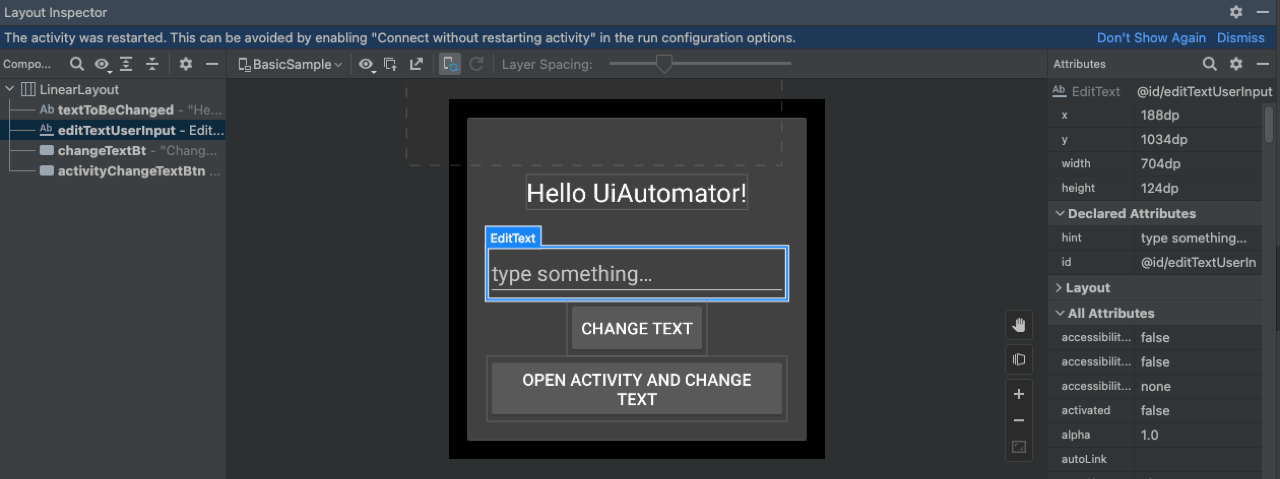
As you can see here, the ID of the textbox is editTextUserInput. We can then use this ID to retrieve the textbox and interact with it in our test case to validate its behavior.
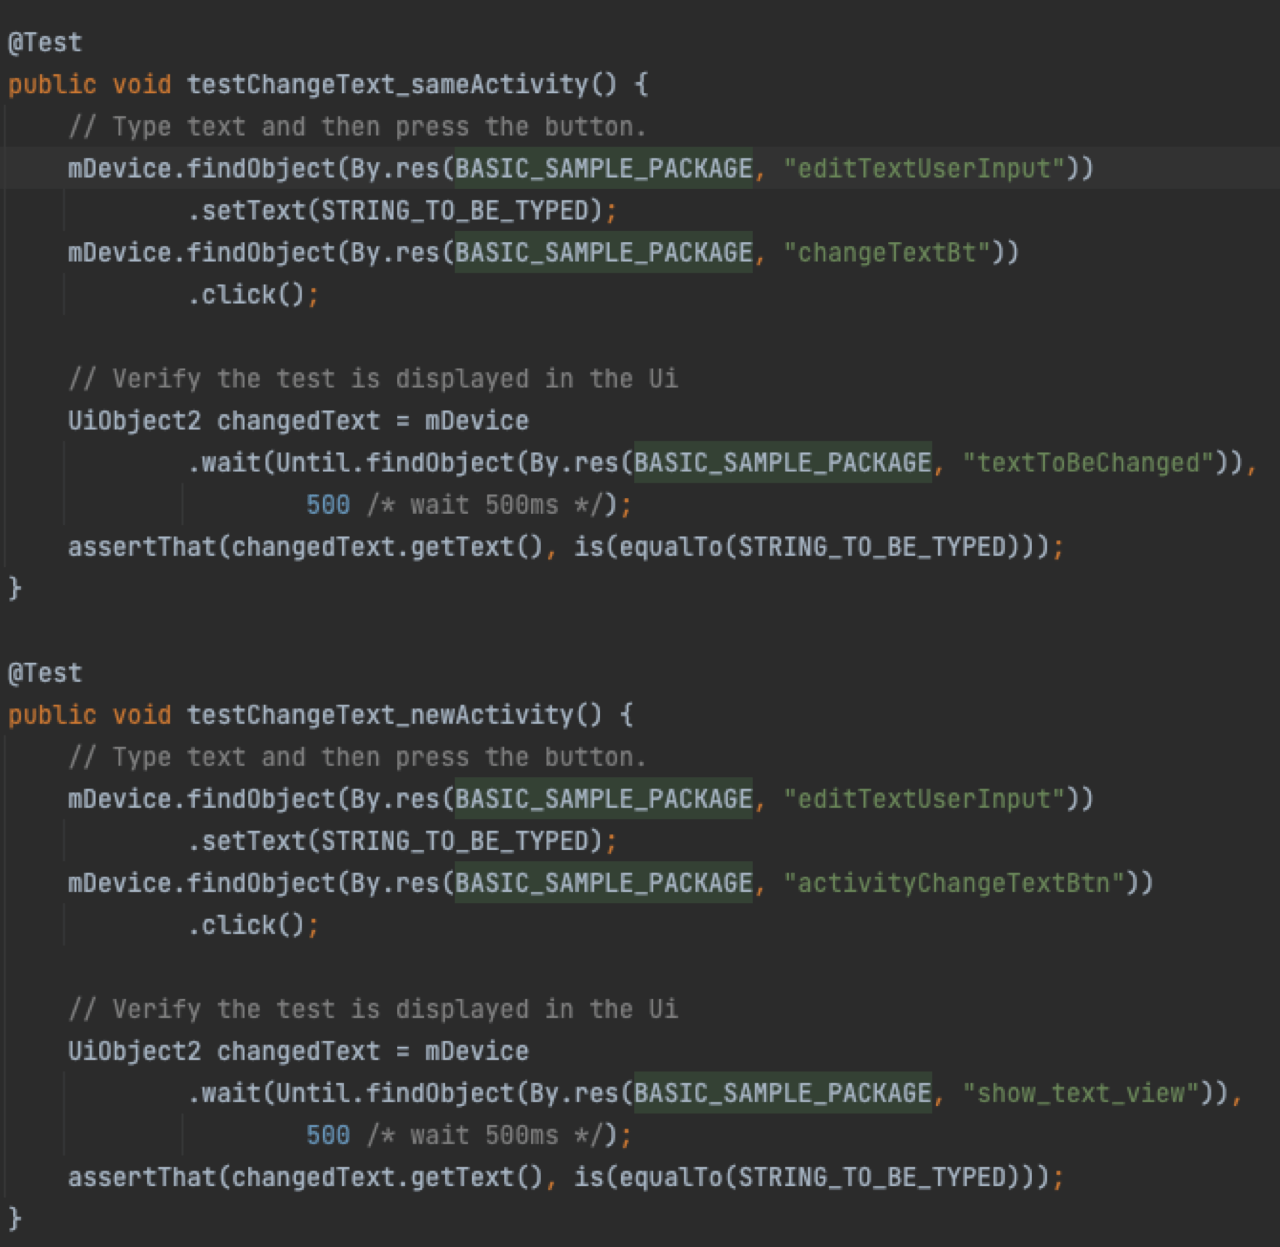
Now, this code contains just a simple example of setting a text on the textbox and validating the user inputs. Notice how easy it is to retrieve the textbox, the button, and the label in the alert popup.
To run the test, just run the following commands on the terminal:
Moving On
From here, you can build more complex tests and validate your code to ensure that the application behaves as expected. This method is an easy way to create test sets that emulate how a user would interact with your application. However, there are even easier ways to ensure that your work is in order.
We recommend that you explore Waldo's extensive toolset for UI testing. It requires no coding and is very approachable, even for non-developers.
Automated E2E tests for your mobile app
Get true E2E testing in minutes, not months.


