
iOS Unit Testing
.webp)
First, let's understand what unit testing in iOS is. Unit testing is the process of testing functionality in your projects. This is done by the developer, who tests the functions they have created. These unit tests help to prevent bugs in production. Nowadays, in a lot of projects, employers and companies want to see 80% test coverage or more. Unit testing in iOS is mostly done by the built-in test framework XCTest.
In this post, we'll first setup a simple iOS app for addition and multiplication operations. After that, we'll write unit tests using the built-in XCTest framework. Here, we'll first use XCTAssertEqual to write a simple test case for the addition. We'll also look at a case where the unit test fails. After that, we'll write some more unit tests for the multiplication function.
Initial Setup
We need to first fire up Xcode on a MacOS machine. You'll need to install it if it's not already installed. After that, click on the Create a new Xcode project link.
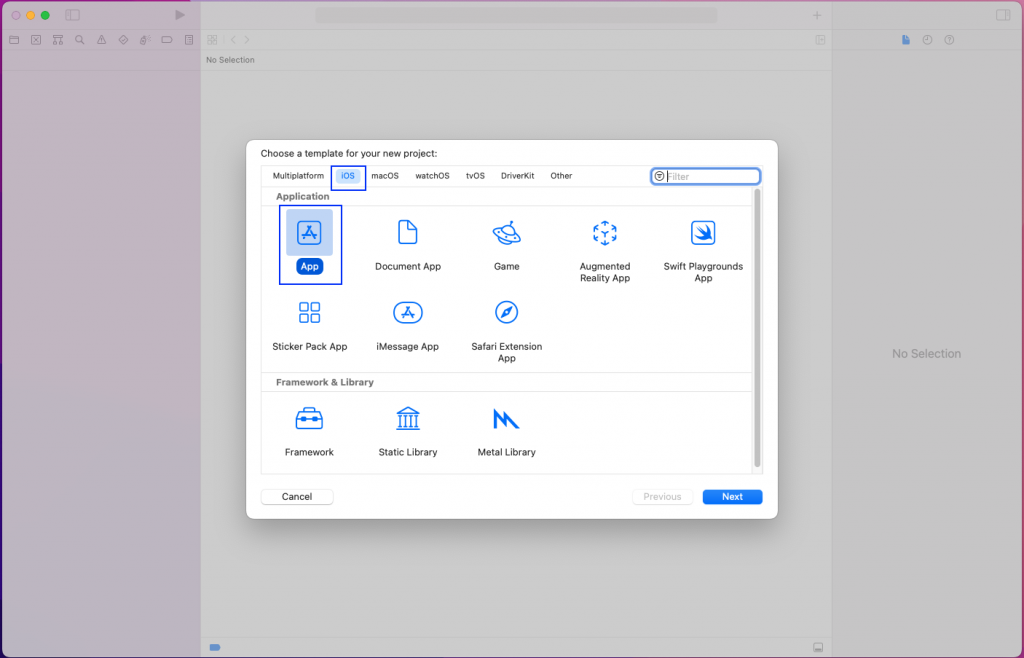
Next, click on the iOS tab and then App. After that, click on the Next button.
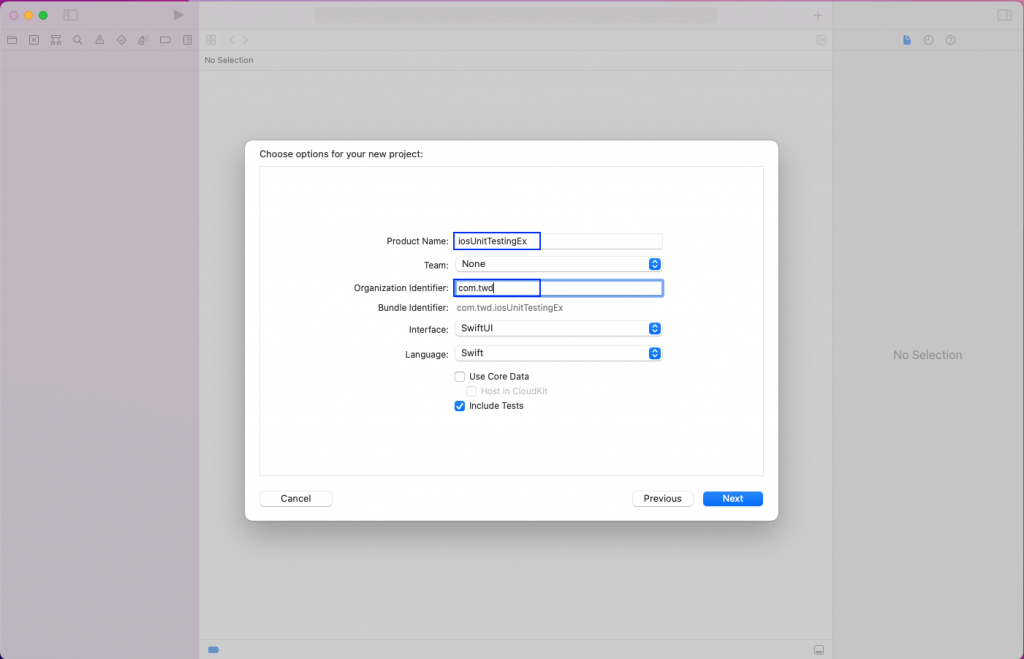
In the next pop-up, we'll give our project a name. Also, we'll need to give an Organization Identifier. We'll also need to make sure that the Include Tests checkbox is selected.
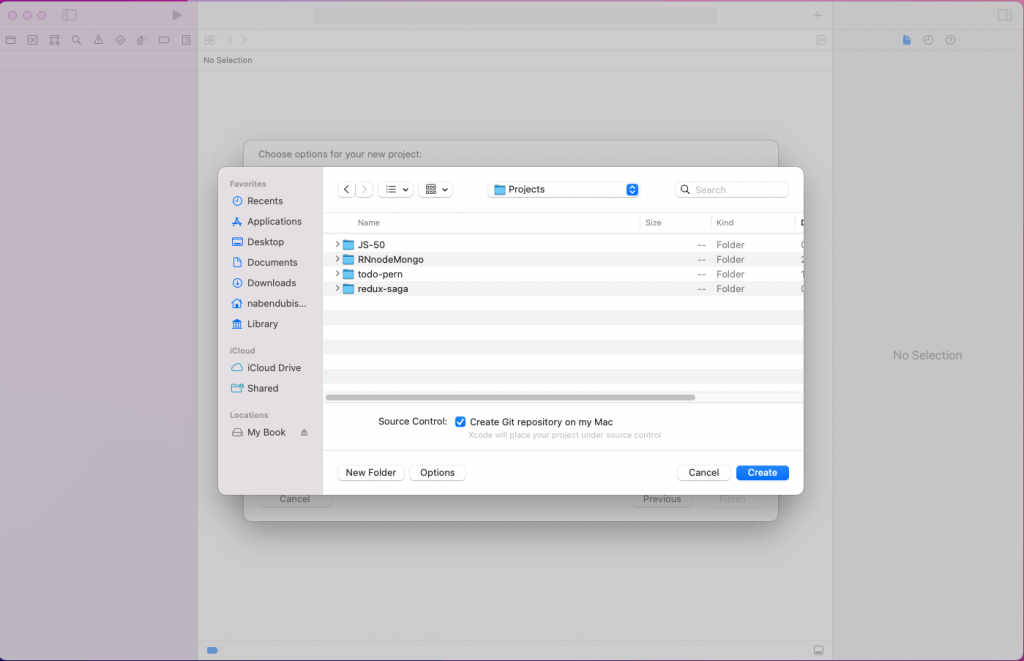
It'll ask us for a path to create the project. Here, you'll give an appropriate path and click on the Create button.
Creating a Simple App
We'll create a very simple app first, before we do the testing in the next section. After clicking on Create in the previous part, XCode should have opened your new project. Here, click on New in the menu, followed by File.
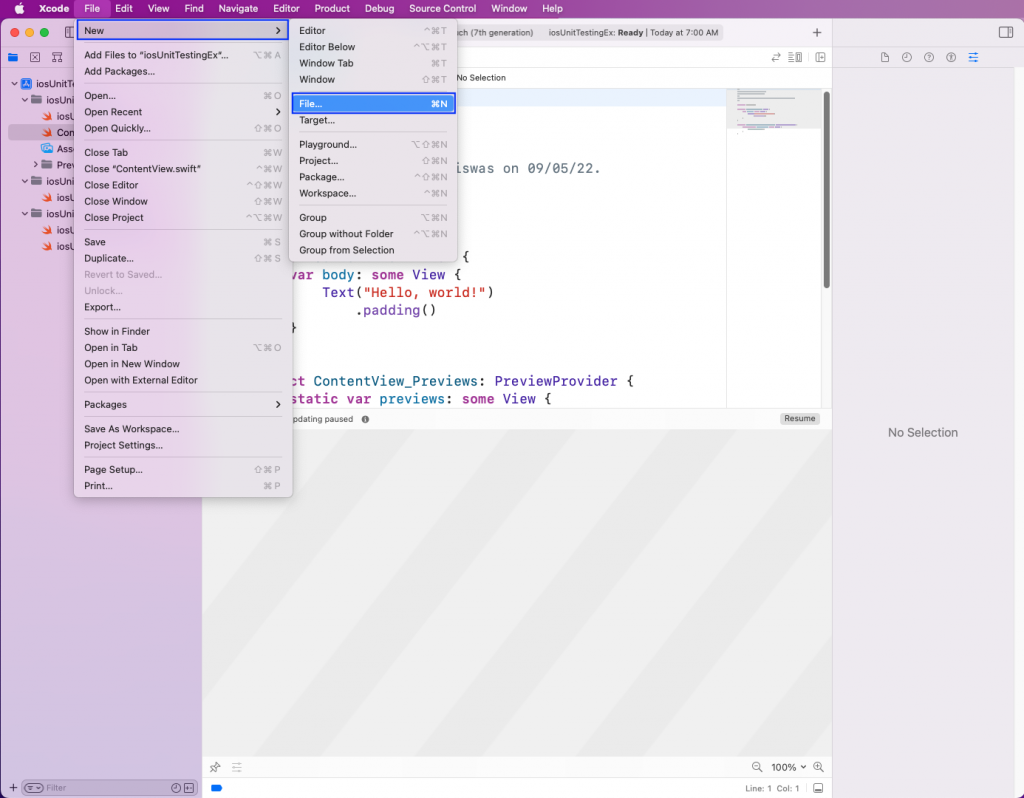
After that, select Swift File and click on the Next button.
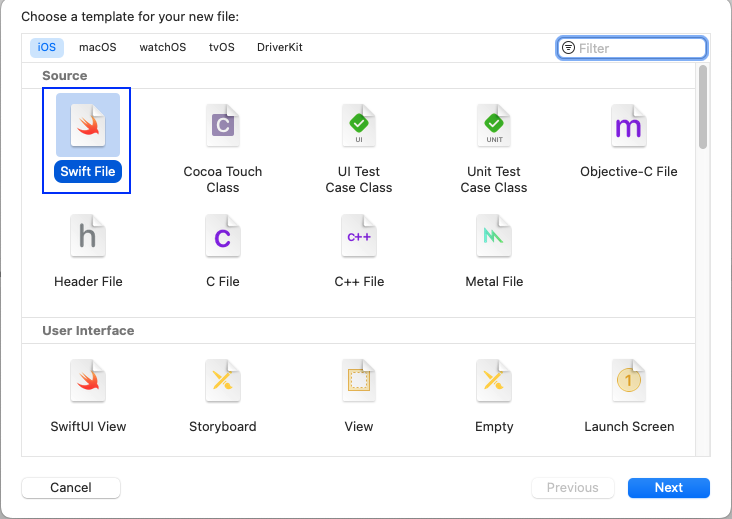
In the pop-up, we'll need to give the file a name. Here, we're giving it the name MathOperations.

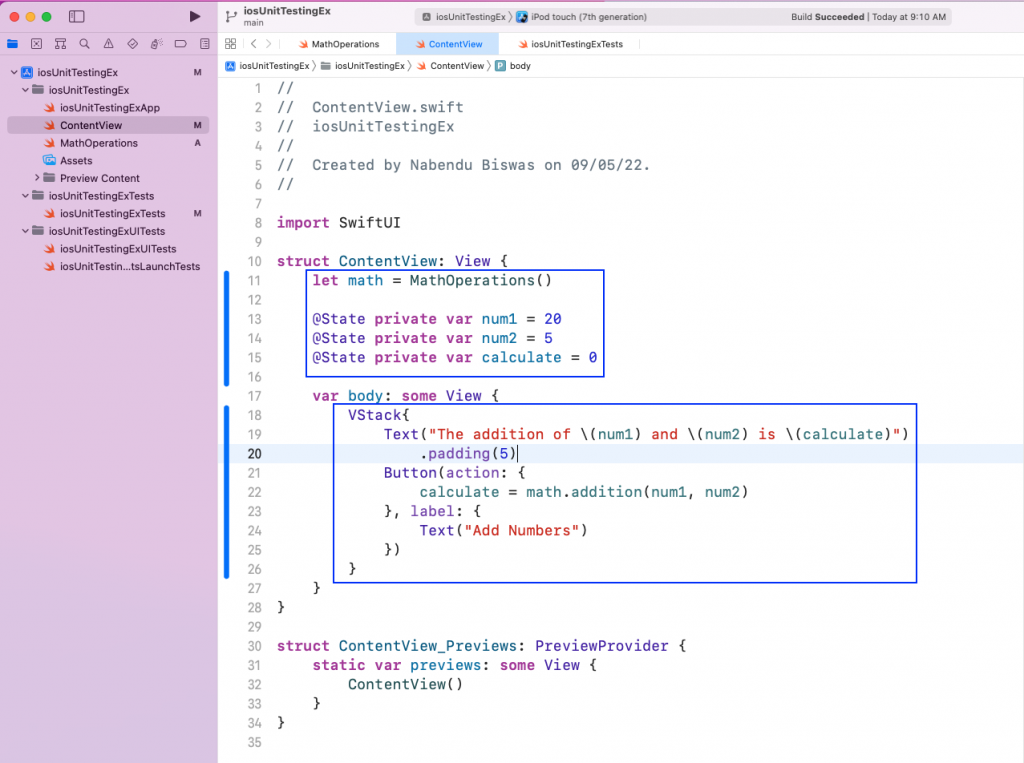
Now, in the MathsOperation.swift file, we'll add the below code. It contains the struct MathOperations, and inside it, a function called addition. The function addition is taking two numbers and returning them after adding them.

Next, we'll update the ContentView.swift file. Here, we're calling the struct MathOperations() and passing two numbers to it. We have a button which will run the additional function.
The updated code is in the boxes in the below screenshot.
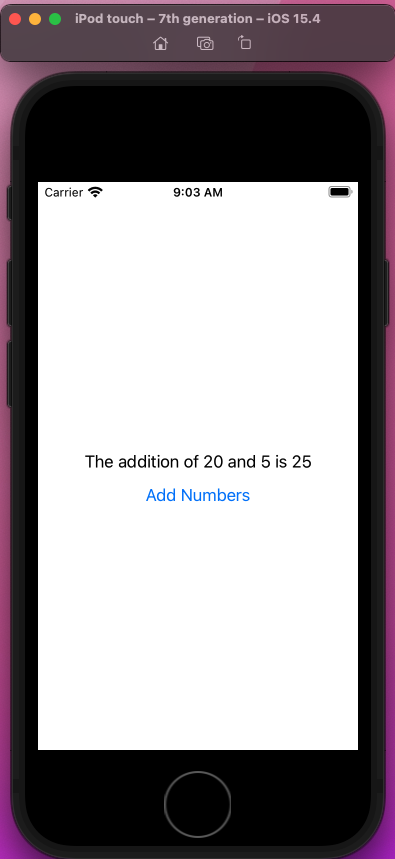
Now, our small app should be running fine in the simulator.
Adding Unit Tests
We'll write our unit tests with the built-in framework XCTest. It's the default testing framework in Xcode, so we don't have to do any additional setup. The other benefit of using it is that the developer can use the same language of Objective-C and Swift that they've written the app in.
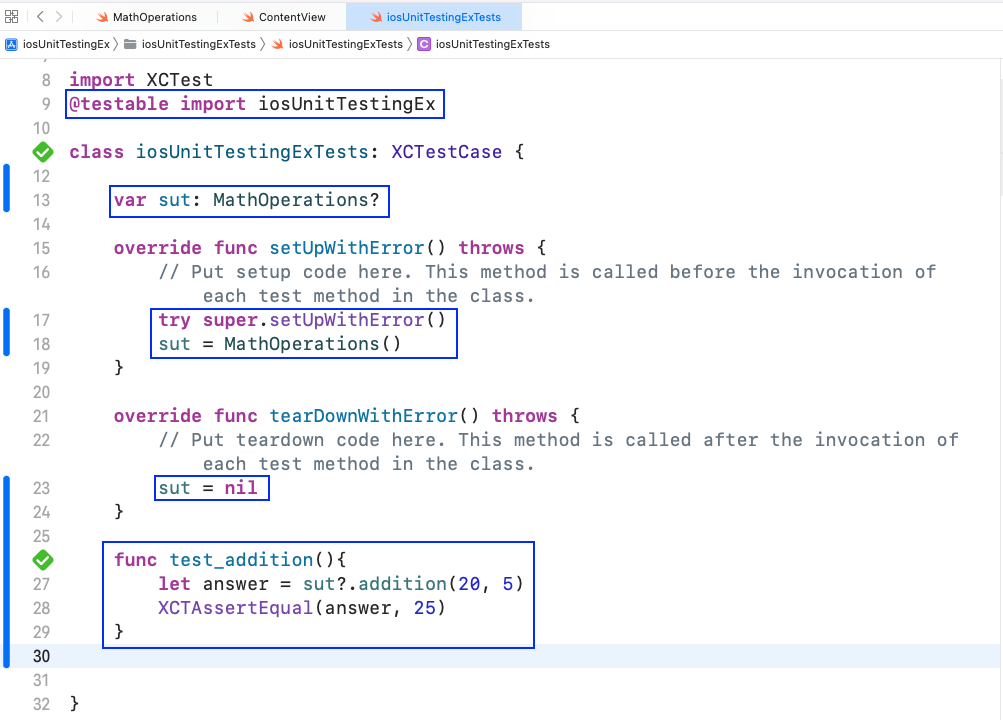
We need to write the unit tests in the iosUnitTestingExTests file, which has been automatically created. The function setUpWithError() is where you put any setup variables. We're going to put the variables in it next.
In tearDownWithError(), we'll put any code which we need to destroy after every test. This code is required to make the test clean.
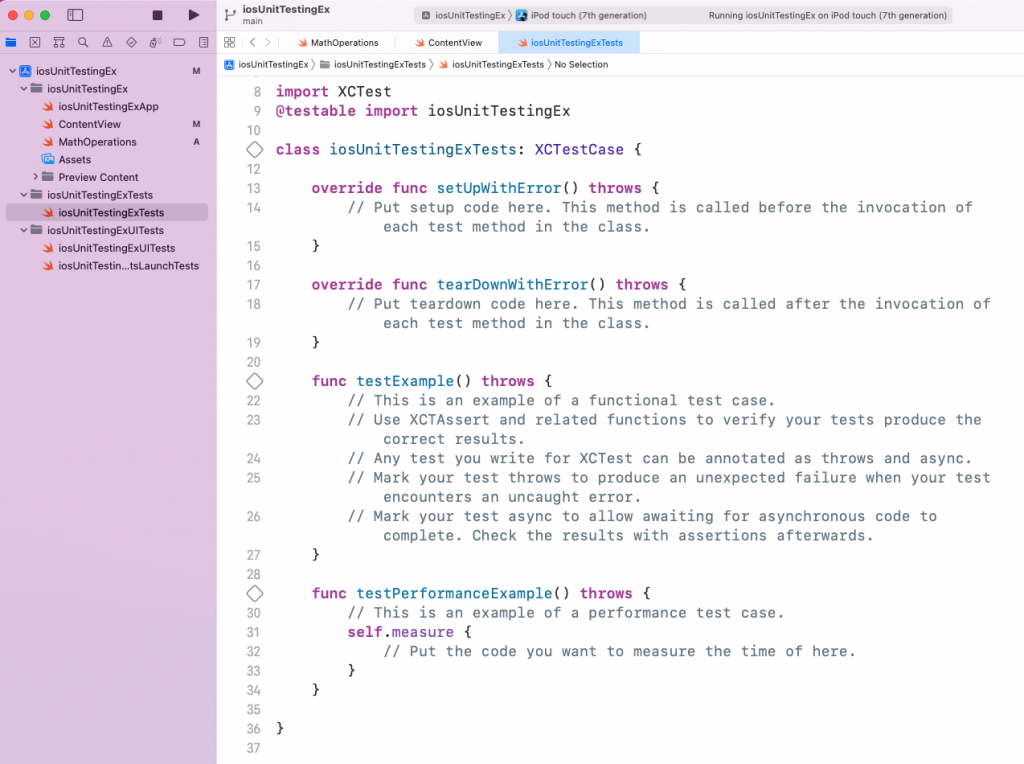
The first thing to do is to remove the testExample() and the testPerformanceExample() functions. We'll let Xcode know that our app is testable by importing it with @testable.
Next, we'll create a variable sut (short for System Under Test), which will be of type MathOperations. This is the name of the struct in our MathOperations.swift file.
Now, inside the setUpWithError() function, we need to first call it with super. After that, we can make the variable sut equal to MathOperations(). When the test runs, it'll run the setUpWithError() function, and it'll create a new struct sut.
In the function tearDownWithError(), we've made sut equal to nil. This is so that after every test, we'll start fresh.
Finally, we add our test_addition function. Here, we have an answer variable which will call our addition function. It's passing two variable values: 20 and 5. After that, we're using the built-in function of XCTAssertEqual to take the two parameters, compare them, and return a success if they are equal.
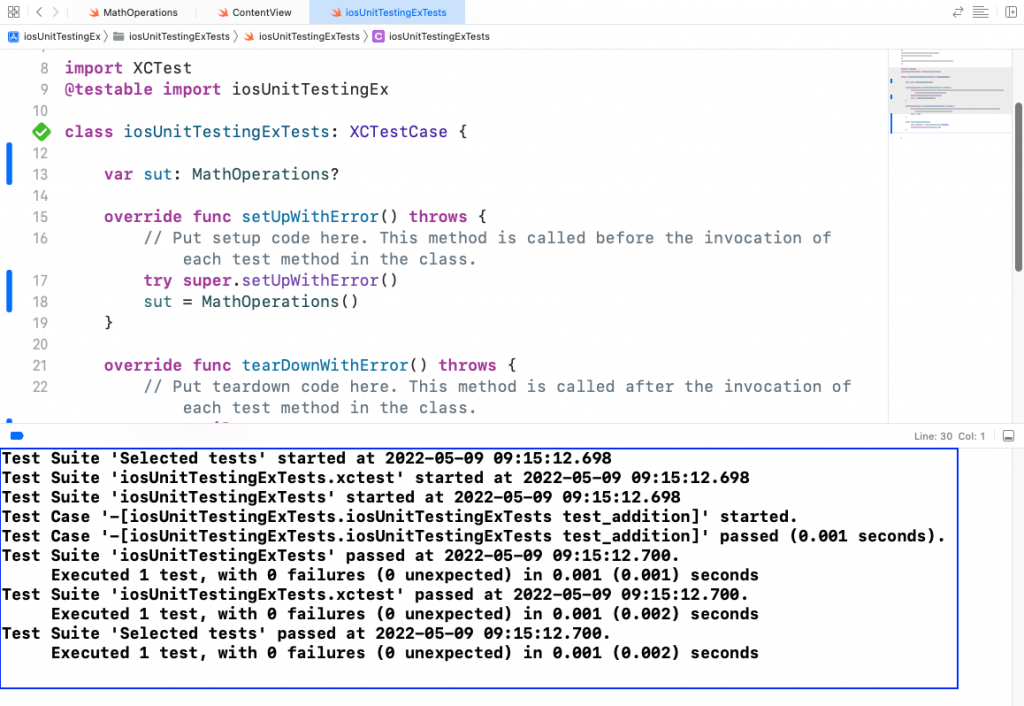
Now, to run the test cases, we need to hit the control + option + command + U keys. The test result will show in the console. As we can see below, all of our test cases have passed.
Failed Unit Tests
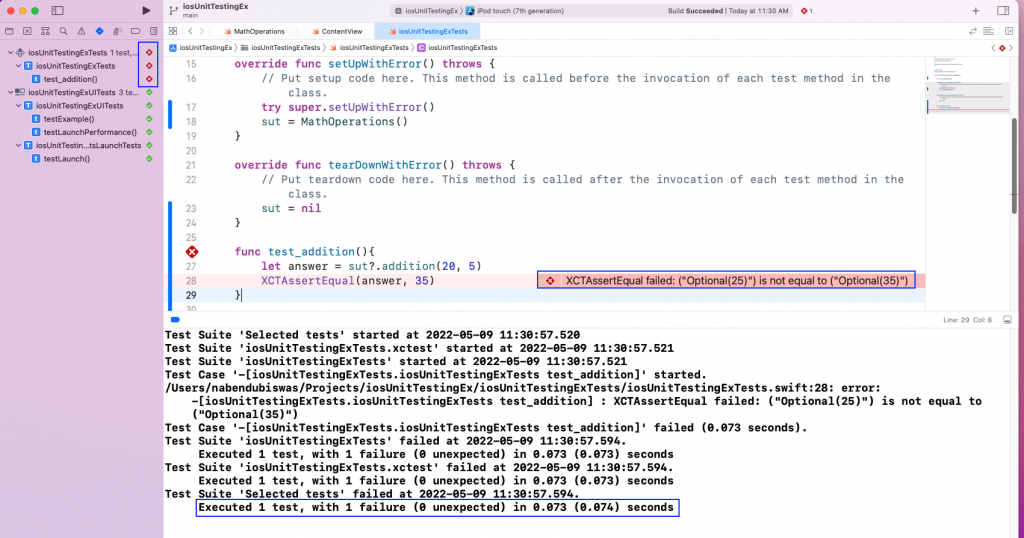
We'll now look into the case where a unit test fails. The XCTAssertEqual will return failure if both parameters are not equal. In the below screenshot of the test_addition function, we've made the answer wrong. After that, we can press the control + option + command + U keys. The failed test result will show in the console. It'll also show the exact reason for the failure beside our code.
We can also have an additional parameter for a failed test case. In the XCTAssertEqual function, you can add a third string that reads "The test failed".
Now, run the test cases by pressing the control + option + command + U keys. It'll show the failed test case along with the message "The test failed".

Adding More Unit Tests
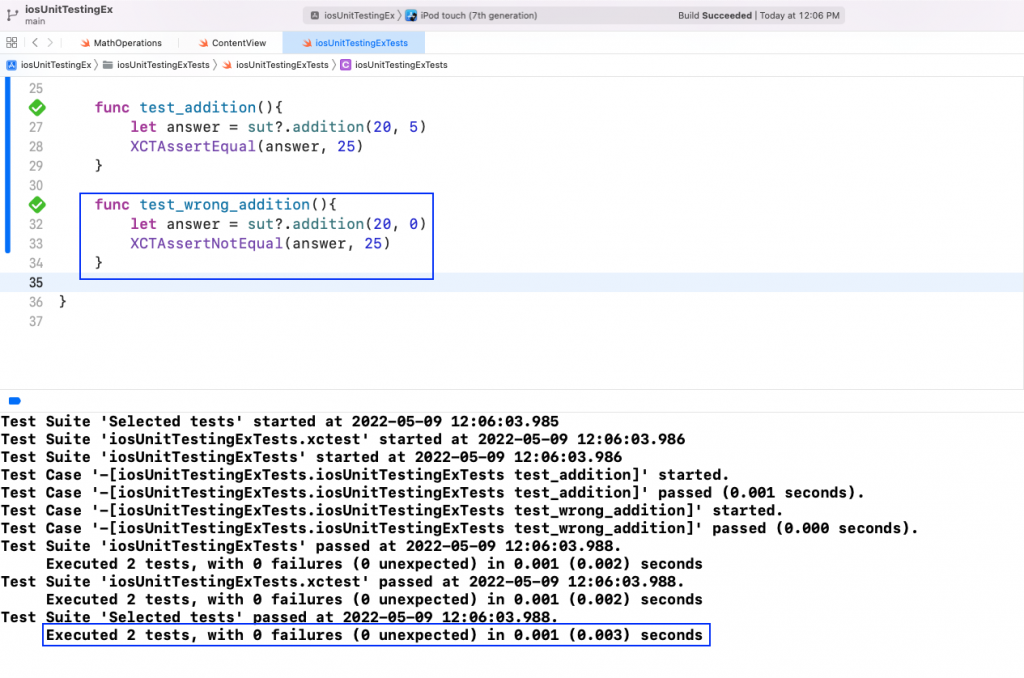
Let's write some more unit tests to understand the topic better. In the iosUnitTestingExTests file, add a new function called test_wrong_addition. Here, we're using XCTAssertNotEqual. It takes two parameter and returns success if they are not equal. Sometimes we need to check whether a test is not giving a result, and we can use XCTAssertNotEqual in that case. In the below example, if we add 20 and 0, it'll be 20 and not 25. Because of that, our test case will pass.
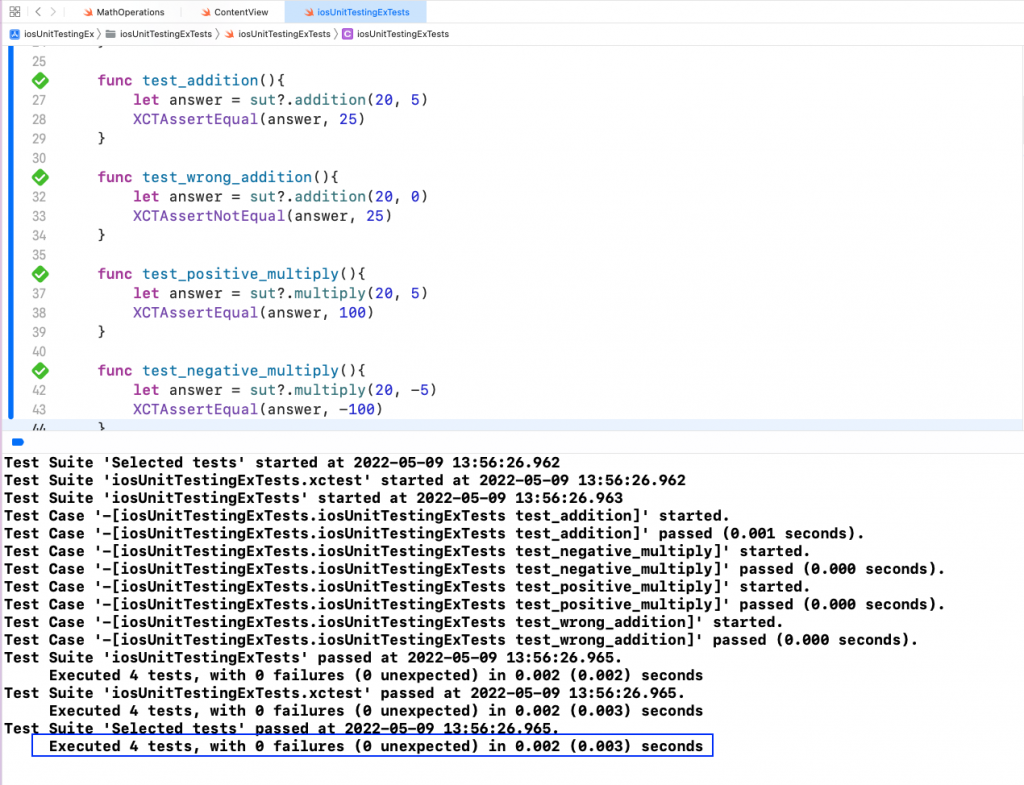
Now, run the test cases by pressing the control + option + command + U keys. It'll show that both the test cases passed in the console.
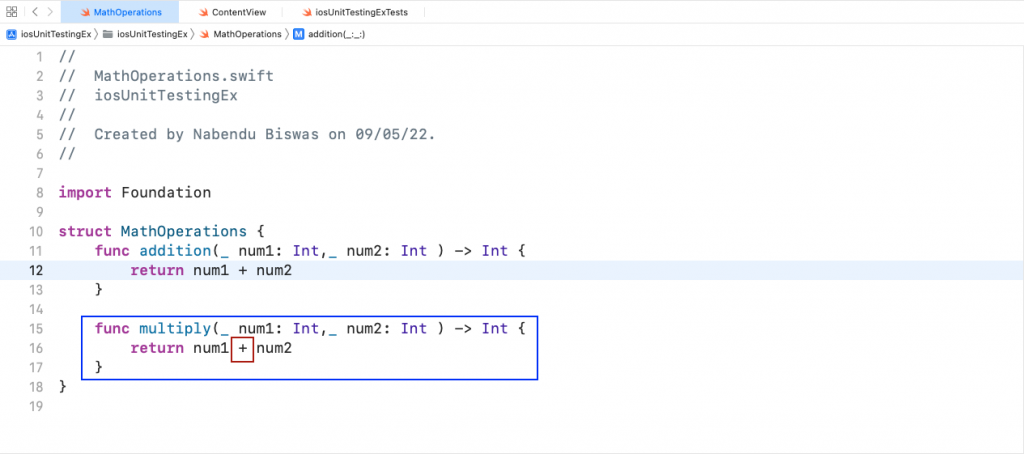
One of the most important aspects of unit tests is to catch errors in the code. We want to write a new function to multiply two numbers. As most software engineers do, we'll copy our addition code to multiply in the MathOperations.swift file.
Notice in the above code that we changed the name for the function, but we forgot to change the addition sign (+) to a multiplication sign (*).
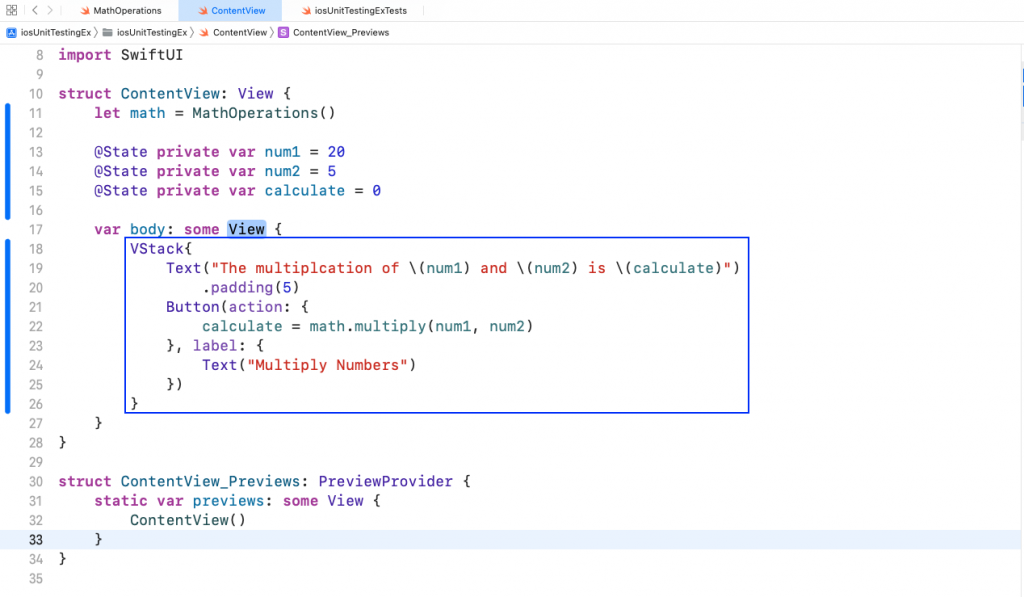
We also need to make the necessary changes in the ContentView file, which is responsible for showing the user interface of the application. See the example below.
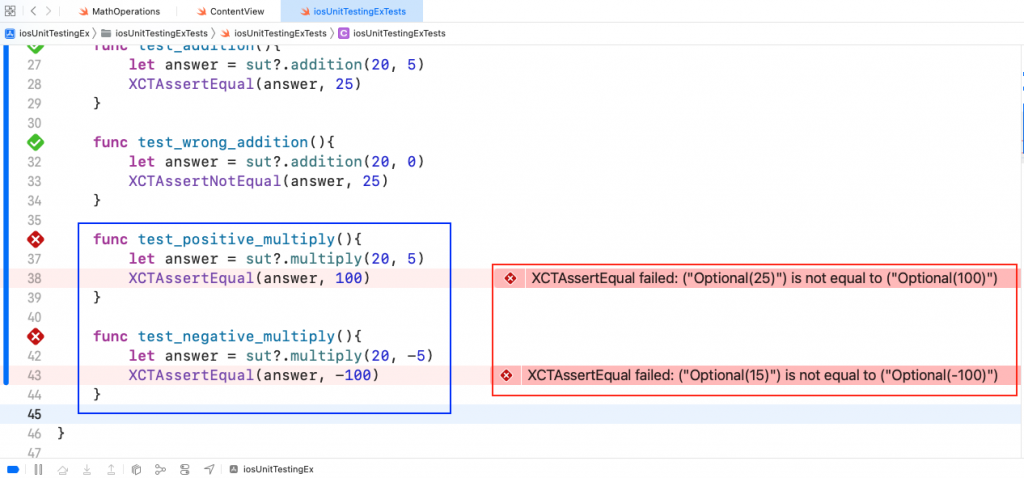
Next, notice that we've written two new test cases in the example code below for our multiply function in the iosUnitTestingExTests file. Here, we're testing the multiplication of two positive numbers first. After that, we're also testing the multiplication of one negative number and one positive number.
Now, run the test cases by pressing the control + option + command + U keys. Both of the test cases will show as failed in the console. We also get the correct message, shown below.
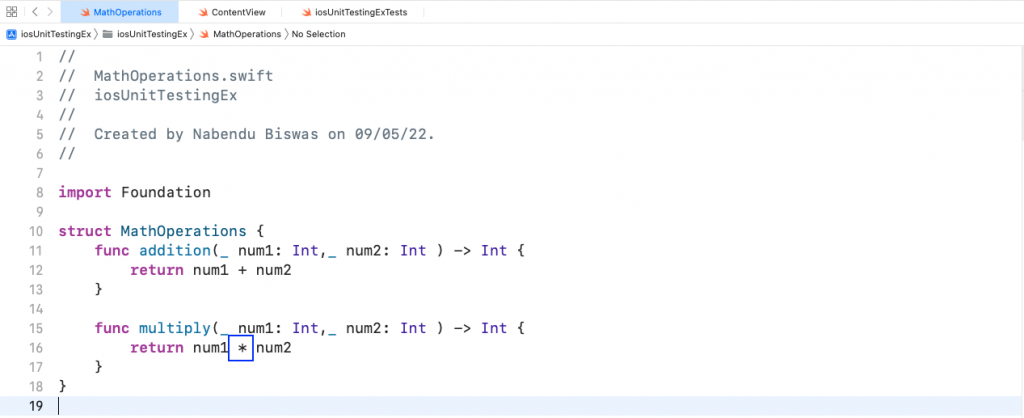
On inspection, we can easily find the fault and fix the issue. In our multiply code in the MathOperations.swift file, we'll change the addition sign (+) to a multiplication sign (*).
Now, run the test cases by pressing the control + option + command + U keys. Both of the test cases show as passed in the console.
Conclusion
In this post, we learned about iOS unit testing. First, we set up a simple iOS app that uses addition and multiplication functionality. After that, we wrote unit tests using the built-in XCTest framework. We first used XCTAssertEqual to write a simple test case for the addition. We also tested the case where the unit test fails. Next, We learned about XCTAssertNotEqual. After that, we wrote some more unit tests for the multiplication function. Now you should have the knowledge and tools to create your own iOS unit tests, making your future apps better and more resilient to problems.
Check this page to learn more about how Waldo helps with iOS app testing.
This post was written by Peter Morlion. Peter is a passionate programmer that helps people and companies improve the quality of their code, especially in legacy codebases. He firmly believes that industry best practices are invaluable when working towards this goal, and his specialties include TDD, DI, and SOLID principles.