


There is a function called setUp() that can be used to do the basic setup before every test. There also is a function called tearDown(), which can run after every test.
In this post, we'll learn about the setUp() function in XCTest, as well as its benefits and best practices to use it.
We'll also learn about the function of tearDown() in XCTest. This function is often used with setUp().
But first, let's start with some background on XCTest.
.png)
What Is XCTest?
XCTest is the unit testing framework developed by Apple. It was released in 2016 and allows users to write test cases for iOS devices.
We can test apps for all iOS devices, including the iPhone, iPad, Apple TV, and Apple Watch. The test cases are written in the Apple programming language of Swift.
XCTest is based on web-driver protocol, which is also used in other testing frameworks like Appium and Selenium.
Aside from writing unit test cases, we can also conduct performance testing with XCTest.
The Setup
Now, let's learn about XCTest and the setUp() and tearDown() functions.
We'll run our code in Xcode Playground. In Playground, we can run small programs and see the result in the console.
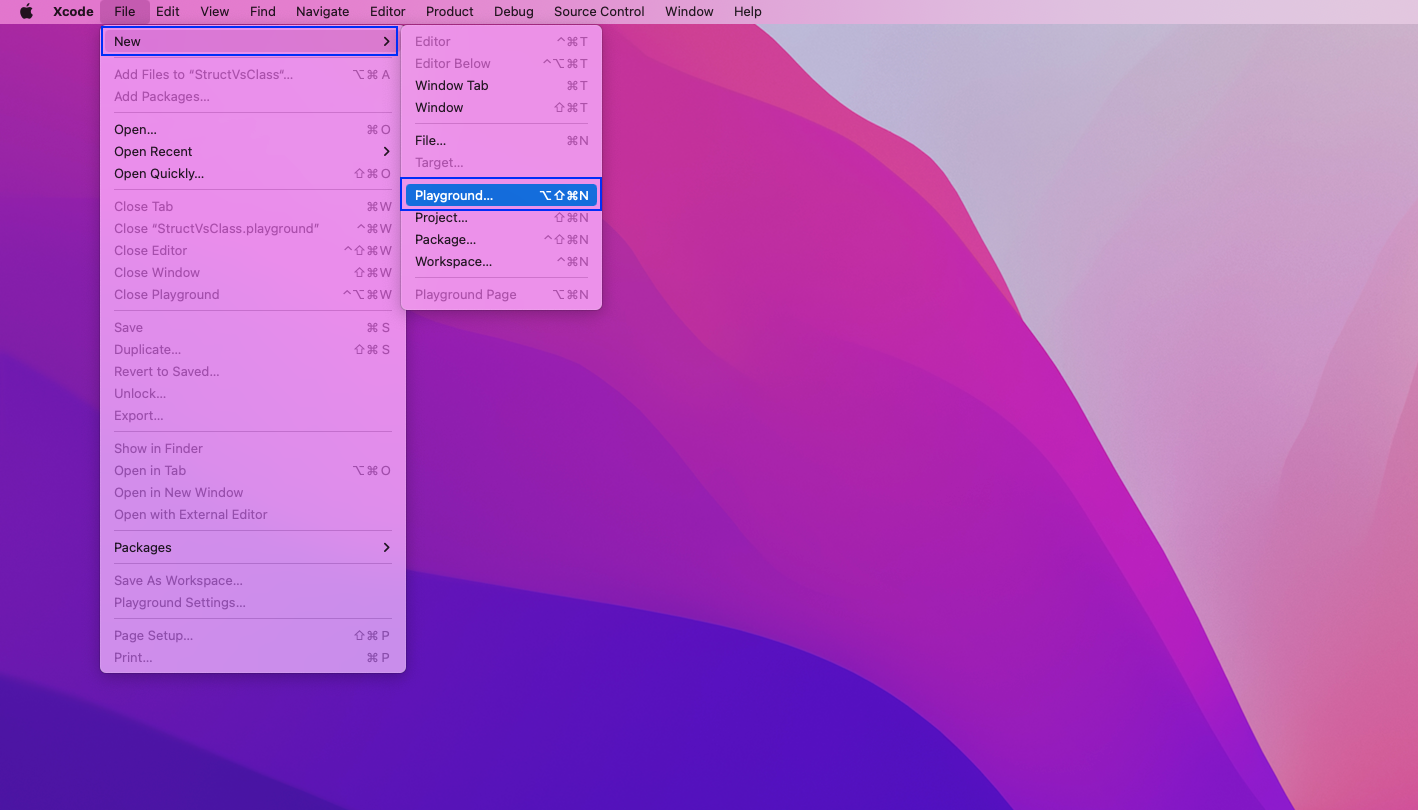
So, open Xcode and then click on File > New > Playground.
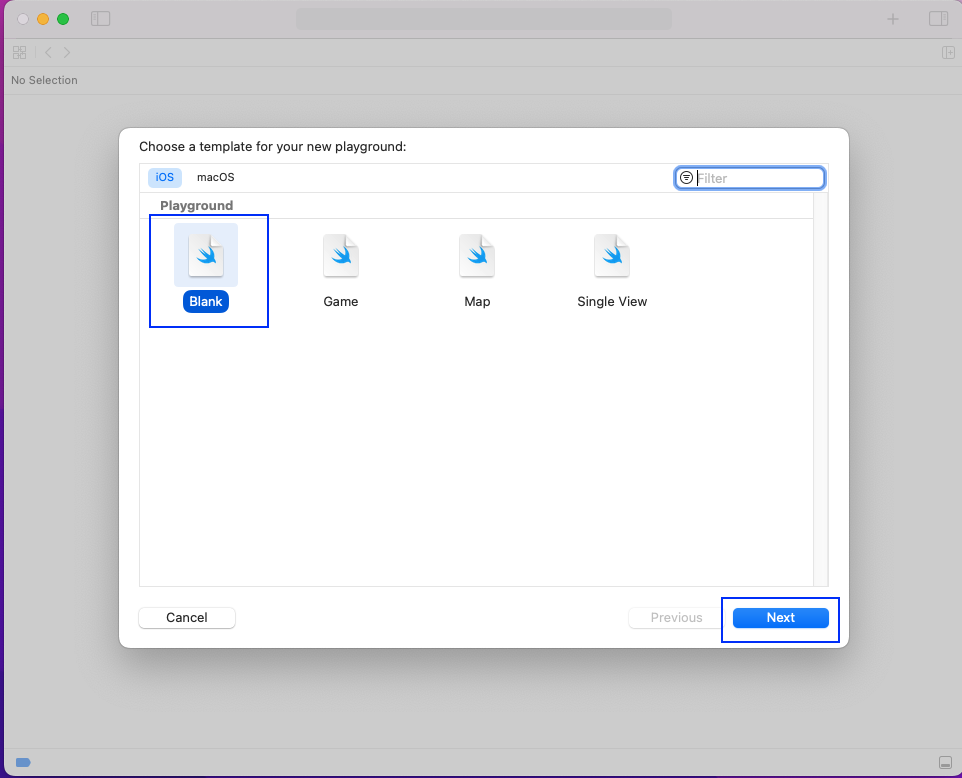
In the pop-up screen, select Blank. Then, press the Next button.
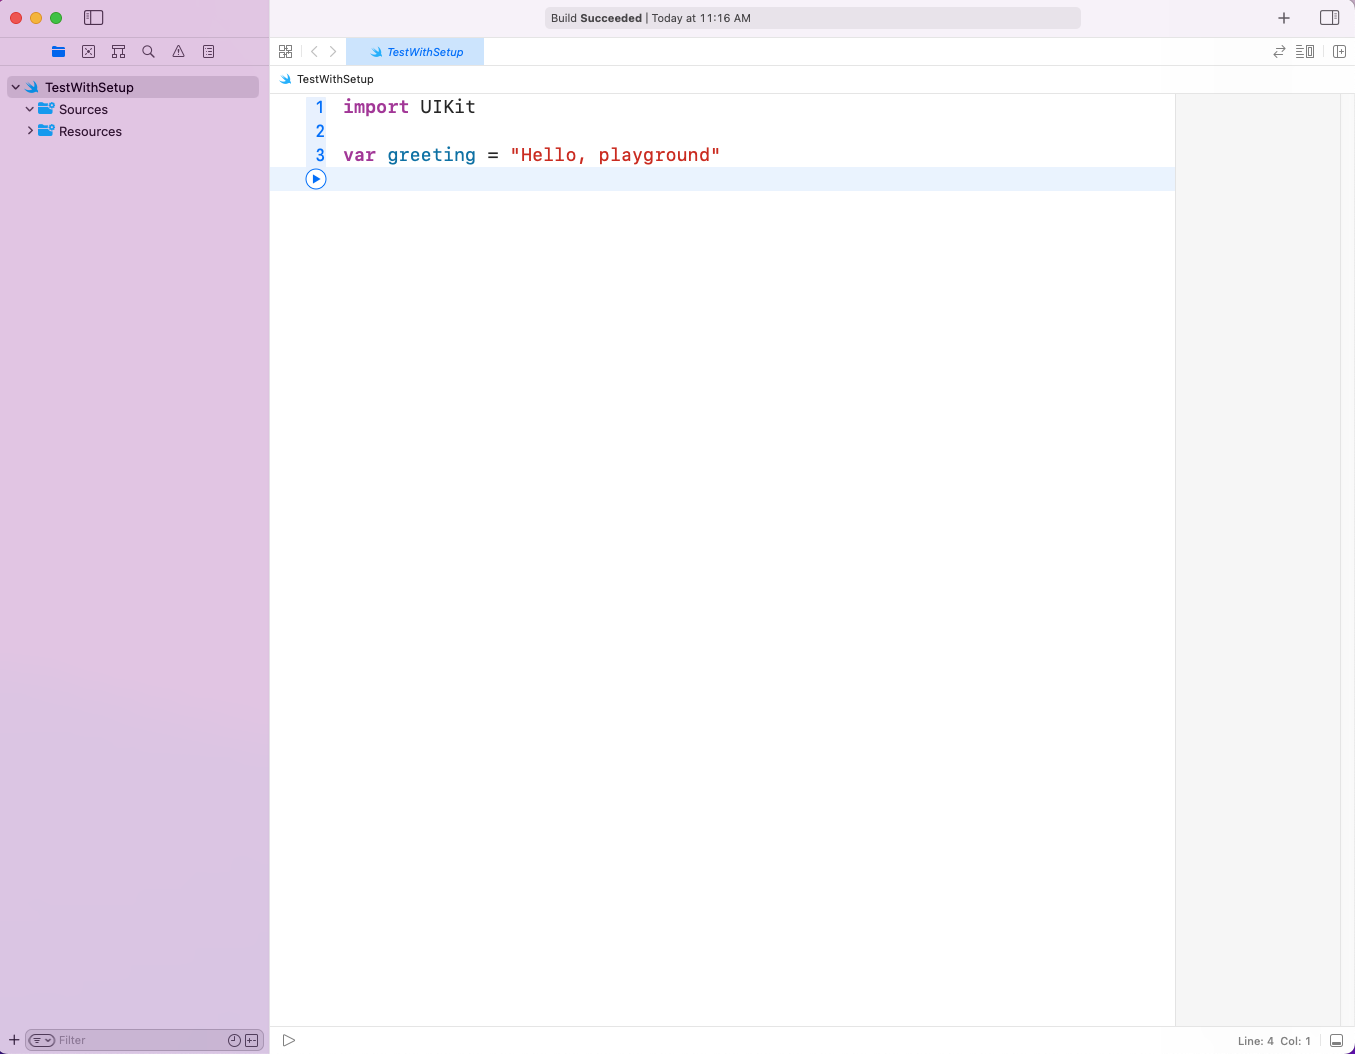
The Playground is named "TestWithSetup." Now, the Playground will be opened to a place where we can write the code.
The Testing
To start testing with XCTest, we need to do some setup in Playground.
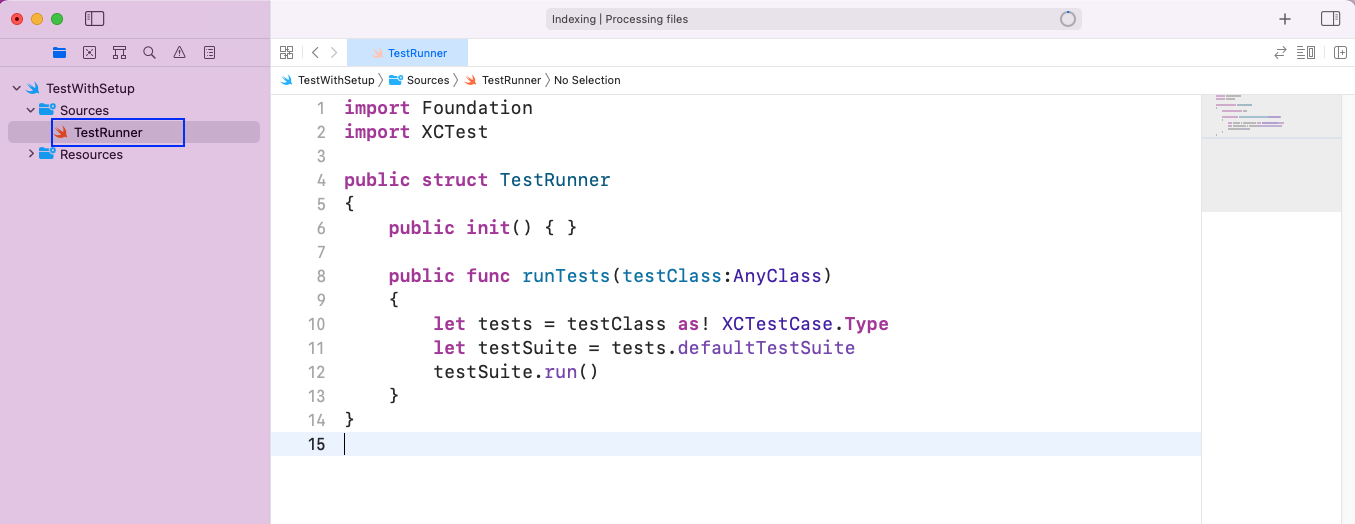
First, create a file called "TestRunner" in the Sources folder. After that, add the code below to it.
After the required imports, we'll write a struct called "TestRunner." This struct has a function called "runTests," which will run the test cases past it.
This is a boilerplate code that we need to write every time we do testing with XCTest. For detailed testing with XCTest, refer to our earlier post on the Switch statement in Swift.
Back in the TestWithSetup Playground file, first, do the required imports. After that, write a class called "TestWithSetup," where we have a function testShouldPass().
Inside the function, first, we have a variable color equal to purple. After that, we have simple Swift switch statements. Finally, we're doing the "XCTAssertEqual()" to check if the color is purple.
Now, run the runTests() function from the TestRunner file. Here, we'll pass the parameter as TestWithSetup.
The code for PlaygroundTestObserver is a boilerplate code. It's required for running a test case in Playground.

What Is the Use of setUp() and tearDown()?
There are two more functions—setUp() and tearDown()—that we can add to the above code. But let's first understand what they are.
Both of these methods are from XCTestCase, which we're inheriting in our TestWithSetup class.
- setUp() is a built-in function that runs before all tests. We need to override it to use it. To do this, we'll use the super.setUp() function.
- tearDown() is a built-in function that runs after all tests. We need to override it to use it, which we can do by using the super.tearDown() function.
In our earlier TestWithSetup file, we'll add the setUp() and tearDown() functions inside the class.
Here, we've added simple print statements inside both of them.
Upon running the TestWithSetup file, first, the print statement from setUp() is executed. After that, our test case is run, which is successful. So, the statement color is purple is printed.
Finally, the print statement from tearDown() is executed.

setUpWithError() and tearDownWithError()
There were two new methods added with the release of XCode 11.4: setUpWithError() and tearDownWithError(). With both, we cannot throw an error if some issue occurs.
Now, let's look into both of them with examples.
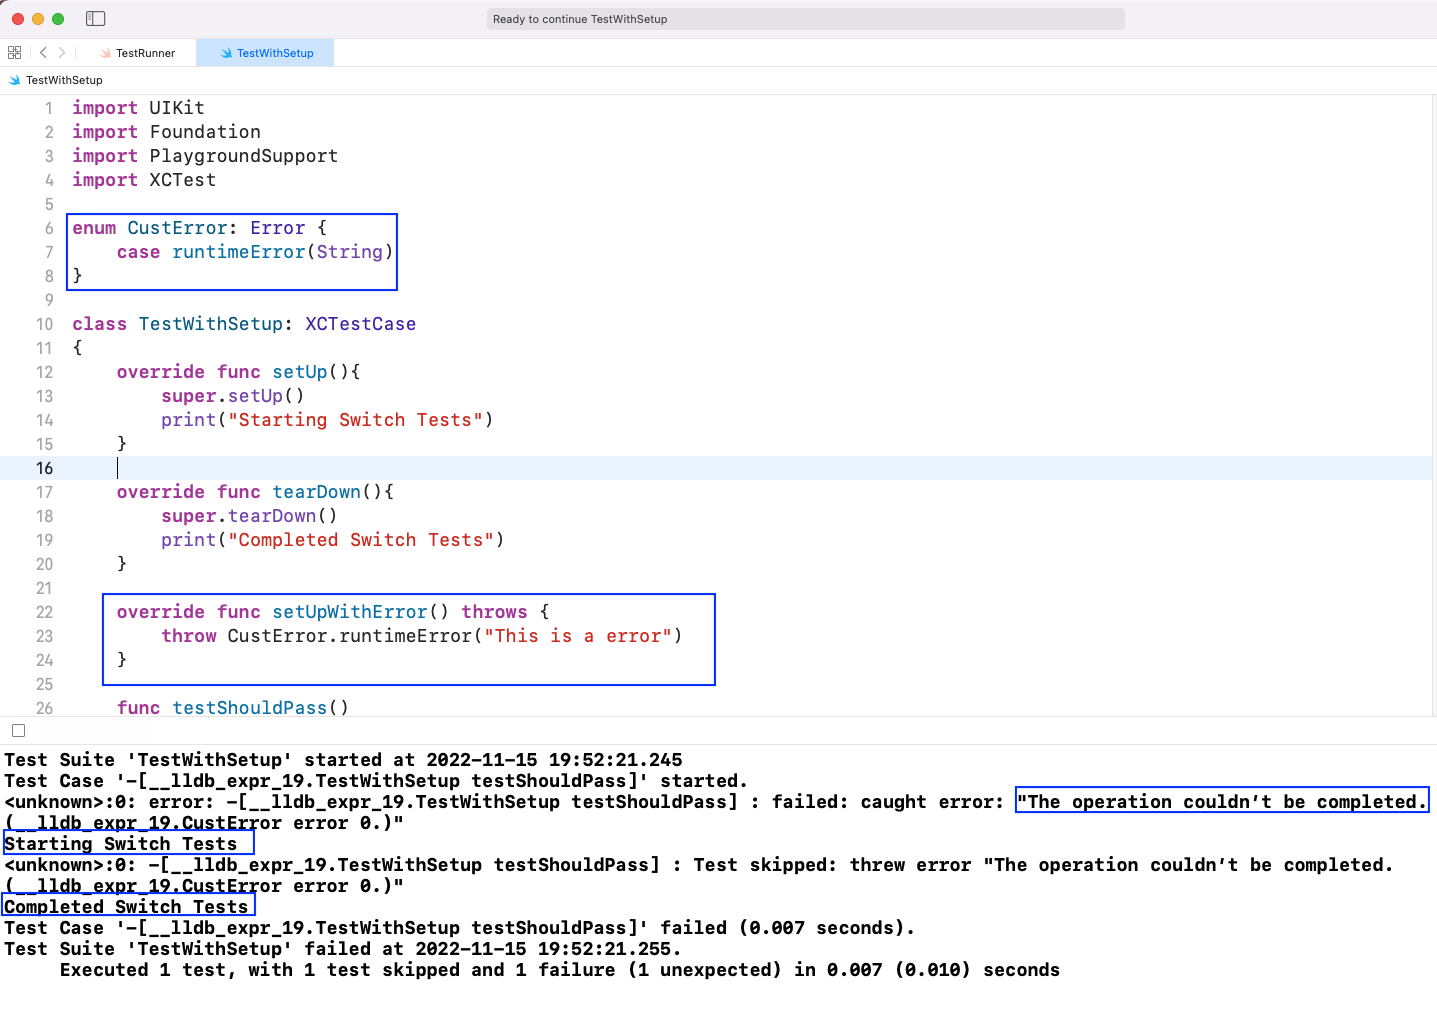
First, in our earlier code, we added a Custom error. We've added it through the CustError enum.
Next, from inside the class TestWithSetup, we've added the function setUpWithError. We're just throwing the Custom error, but in real apps, some conditions will be checked before an error is thrown.
Now, when we run our code, we'll find that first the print statement from setUp() is executed. But our test case is not executed because the setUpWithError() throws the error before it. However, the print statement from tearDown() is also executed.
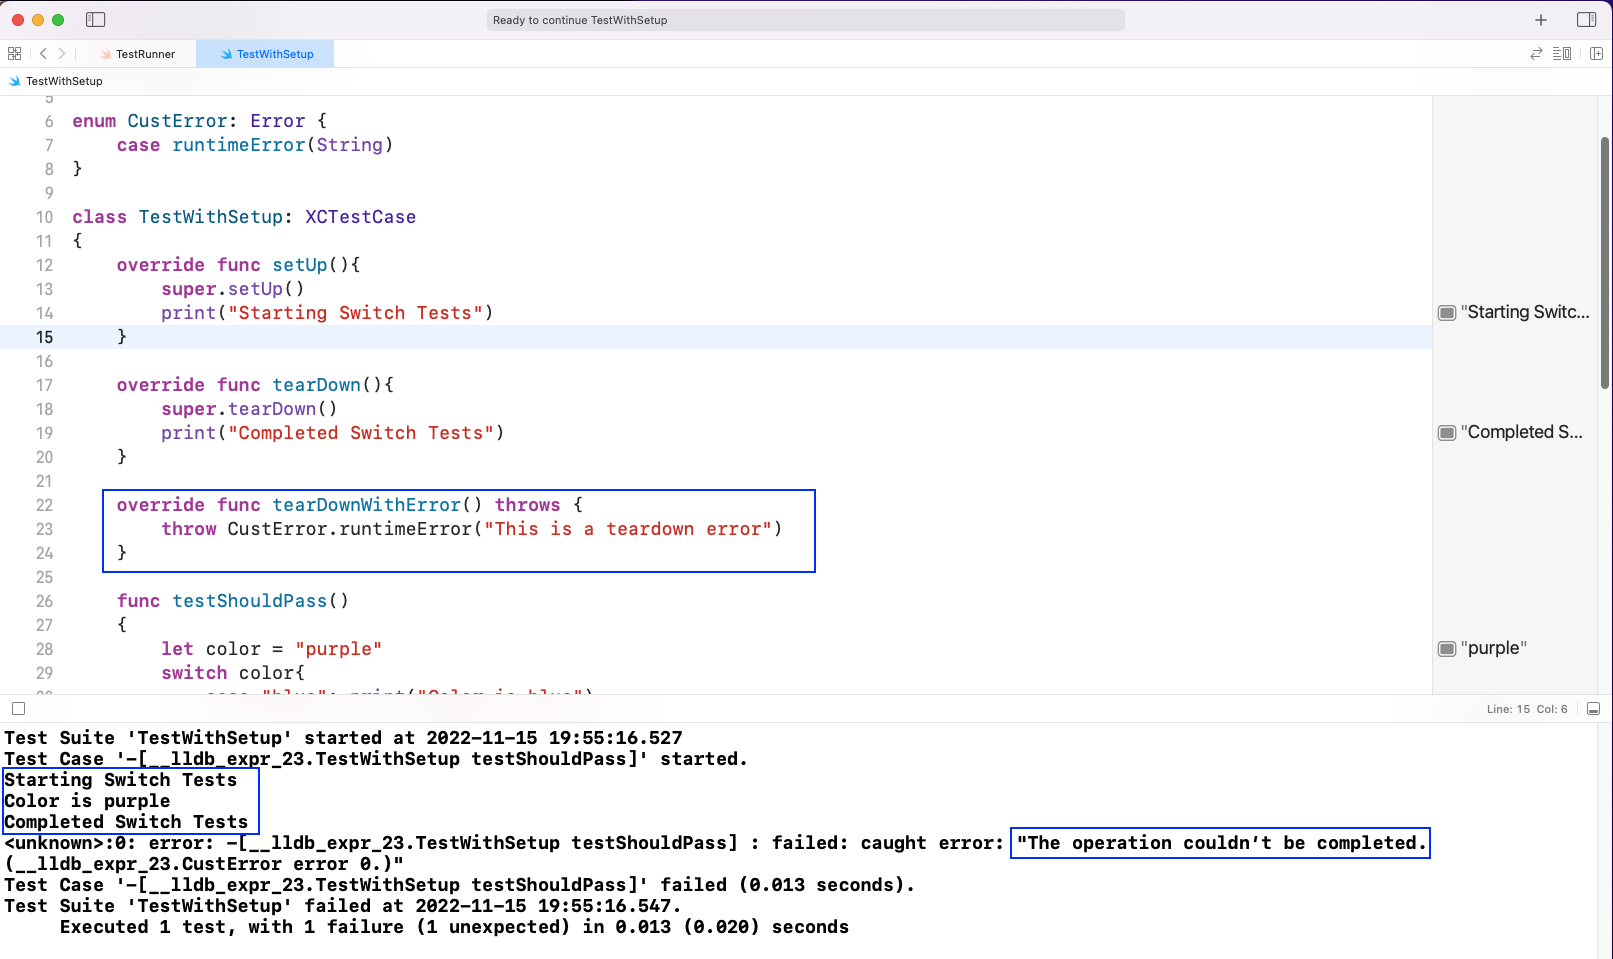
Next, we removed the code for setUpWithError() and added the code for tearDownWithError() in our TestWithSetup file.
Now, upon running the code, we find that the print statements for all setUp(), tearDown(), and the test case are printed. But still, we got the exception because tearDownWithError() runs at the end.
The Life Cycle Methods
All four of these methods are also called XCTestCase life cycle methods. These four methods of setUp(), tearDown(), setUpWithError(), and tearDownWithError() run in this order:
- setUp()
- setUpWithError()
- test cases
- tearDown()
- tearDownWithError()
The order is also obvious from our previous part, where the tearDownWithError() threw some error. But then all of the methods, including the test cases, ran.
Real-Life Use of Life Cycle Methods
We use the setup methods of setUp() or setUpWithError() to run some setup code before the test cases are executed. Additionally, we need to load the data from a JSON file before starting the test case.
Suppose we don't want to go further to do the test. If the JSON file isn't loaded, then it's better to use setUpWithError() because it'll throw an error in this case.
The methods of tearDown() and tearDownWithError() run after everything is done, including the test cases.
Sometimes we need to clear some setup codes, and here we need them. Suppose we have listener code in setUp() or setUpWithError() and we want to stop them once testing is done. Then, we'll add that code in tearDown() or tearDownWithError().
Again, we can check if some error is there while stopping the listener if we use tearDownWithError().
What We've Learned
In this post, we showed how to use the setUp() function in XCTest. We first did the setup for XCTest in the Xcode Playground. After that, we wrote a simple test case and added the method of setUp() to it.
We also learned about the functions tearDown(), setUpWithError(), and tearDownWithError().
But what if you want to test your apps more easily and without all of these complicated setups?
Then Waldo is the answer. Here, you only need to provide the APK or IPA file. After that, you can interact like a real user. And it'll automatically generate the test cases.
Automated E2E tests for your mobile app
Get true E2E testing in minutes, not months.


