


Today, I'll get you started on how to test your work in Swift.
This article will serve as the first step for developers to get introduced to the concepts and intricacies related to testing iOS applications on Swift. I'll first explore what automated app testing is and discuss the different kinds of tests that you can perform. Finally, I'll illustrate how to build a simple testing workflow on a Swift app.
If you know nothing about unit testing or automated testing in general, this article is for you. And if you're just dipping your toes into Swift, I recommend you spend some time getting yourself familiar with the language before continuing. You can do that by checking out these other articles on the topic.
Alright. Let's get into it.
Automated App Testing
As you can imagine, the concept of automated app testing refers to the implementation of individual tests or testing workflows that don't require human intervention.
In this case, an automated test would typically be a collection of routines and operations carried out by a separate application or a workflow that is part of the project itself. An excellent example of an application focused on testing is Waldo.io. More on them later.
There are four common types of automated tests: unit tests, UI tests, performance tests, and code coverage tests.
Typically, tests are designed to target units of operation. In the case of unit testing, these units are code that is stateless and serves a single purpose. However, in the case of UI tests, these units are specific user workflows or interactions that the user can perform.
Let's dive into these two more closely.
What Are Unit Tests in Swift?
As stated before, unit tests in Swift are operations and validations that can be designed and performed on an isolated unit of code. Think of it like the following.
You have a class that contains the code that performs all mathematical operations for a calculator app. This class includes all the functions and procedures that this calculator needs to perform so it can work as a calculator would. So performing unit tests in this app would imply designing individual test cases for each operation in the class.
In terms of frameworks to perform unit tests, Apple provides its native framework called XCTest.
What Are UI Tests in Swift?
If unit tests are focused on evaluating individual operations at the code level, UI tests are focused on evaluating individual operations at the user level.
UI tests emulate user interactions with the application with events like clicks and inputs that a host program can trigger programmatically. Essentially, it's a script of interactions that you can design to simulate the different ways a user would interact with the app to validate the visual stability and performance of the application.
In Swift, UI testing is performed by identifying the UI elements that must be interacted with in each view and querying them, then synthesizing events that the XCUIApplication API can trigger.
Writing Swift Automated Tests
Alright, let's get our hands on the code.
For the purpose of this article, we'll be using a project that already has some code on it to save some time. You can find it in this repository.
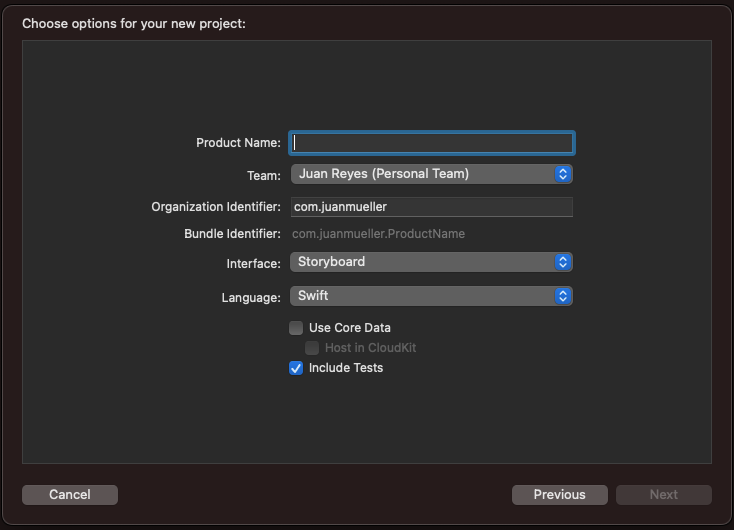
If you want to know how to set up a new project with tests, open Xcode, create an iOS app project, and don't forget to tick the "Include Tests" checkbox. Not that Xcode will do all the work for us, but it helps to set up all the groundwork.
Now that you have the project set up, explore it and run it. It's not a complicated app by any means, so you should be able to see how it works pretty quickly.
Once you're done, check out what's in the SwiftTestingSampleTests folder.
As you can see, Xcode already gives you an excellent framework to work with from the get-go. This code comes as is on every project that is set to have testing included.
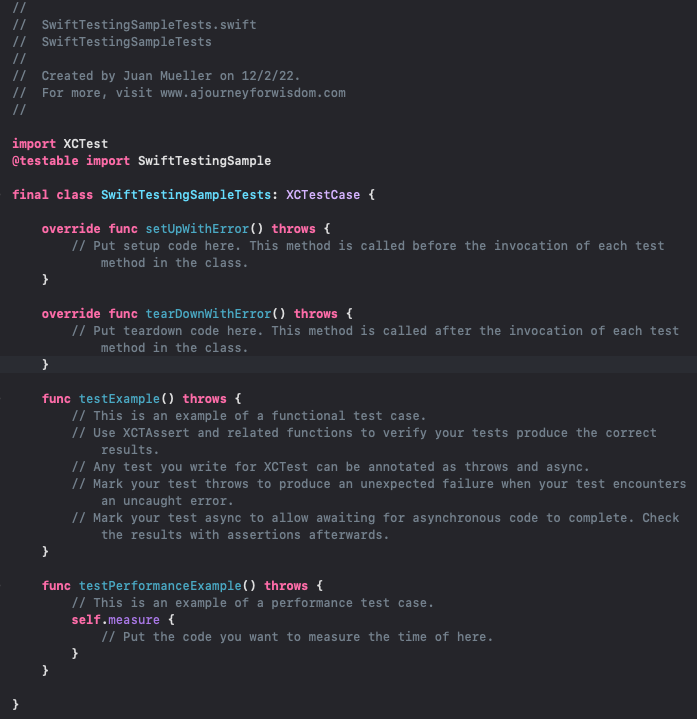
You have setup, teardown, and testExample operations. This last one is a template for your unit tests.
Now, if you go to SwiftTestingSampleUITests, you'll find two files with the groundwork for UI testing.
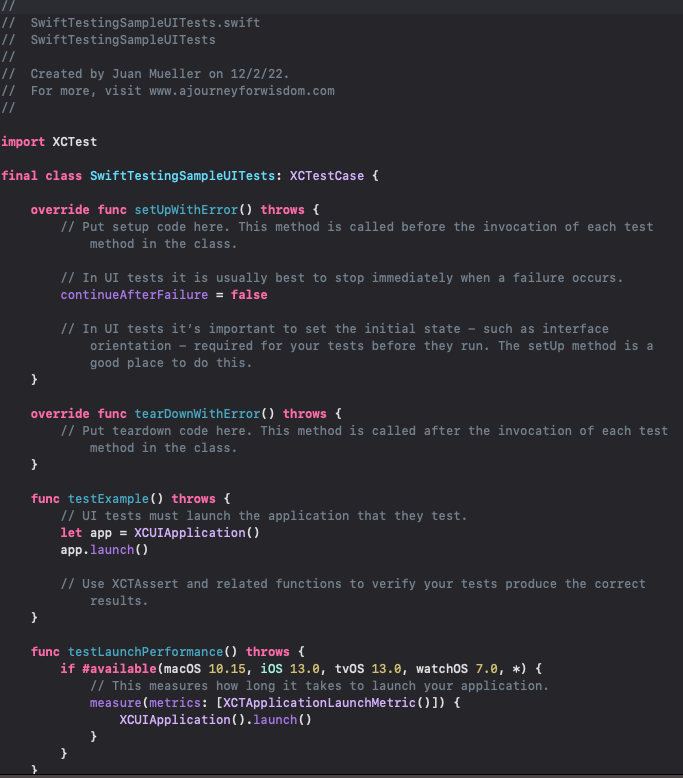
One file is there to serve as a proxy for setting up the launch of the app with the proper context and parameters, and the other is pretty much identical to the unit test one, following a structure of setup, teardown, and units of tests.
Let's write a simple test to validate that the calculateResult() function works as intended.
Writing Unit Tests in Swift
Open the SwiftTestingSampleTests.swift file and add the following property:
This property will serve as a reference to the view controller that you will test on this workflow.
Now, modify the setUpWithError() and the tearDownWithError() with the following code:
During setup, we initialize the view controller and load all its views.
During the teardown, we flush the references to clear all the resources and reset the test state.
This process is essential to ensure that all test cases are consistent and have the same context, avoiding issues with the app state or some global variable having different values affecting how the test responds.
Now create a new test case named testResultsAreCalculatedProperly().
func testResultsAreCalculatedProperly() throws {}
It's important to note that all test cases must start with the word "test." Otherwise, Xcode won't recognize them and won't execute them.
Add the following code to the test:
As you can see, the test is pretty self-explanatory. First, you retrieve the elements and set values necessary to set up an initial state. Then you trigger the operation to be tested. And finally, you assert your expectation.
Notice how there are some calls to the sleep() method. The reason for this is to make the test more visible to us, but they're unnecessary and would hinder the performance of large workflows of tests.
There are many different kinds of assertions at your disposal:
All these follow a similar format and allow you to evaluate assumptions about the output of your operations.
You can find more in the official Apple documentation here.
Writing UI Tests in Swift
Unlike the unit test setup, here you won't need to make a setup or teardown, at least for this simple test.
Create the same testResultsAreCalculatedProperly() test case and add the following code:
Here, setting the initial values for the test involves interacting with the application by emulating a user's behavior. This is achieved throughout the events API that Xcode offers you to issue tap events and also input on the elements directly.
As you can see, the app property gives us access to the available elements on the screen through collections. You can, for example, access the buttons on the screen through the buttons collection, the labels through the staticTexts collection, the text fields through the textFields collection, and so on.
The rest of the test is carried out in a very similar manner. We instantiate the necessary references, set up an initial state, and trigger the operation to test and evaluate our expectations.
You can run the test and see how they behave. The whole test code can be found on the repository in the testSamples branch.
An Alternative
Now, if you find the process of developing a testing workflow complicated, you're not alone. For many teams, the hours and effort necessary to build all this logic are just not a good investment of their limited resources. For those teams, I recommend checking out Waldo.io's extensive toolset for UI testing. It requires no coding and is very approachable, even for nondevelopers.
Automated E2E tests for your mobile app
Get true E2E testing in minutes, not months.


