Waldo sessions now support scripting! – Learn more
App Development

How to Create a Slider in SwiftUI: A Detailed Guide

Juan Reyes
Juan Reyes
How to Create a Slider in SwiftUI: A Detailed Guide
December 27, 2022
18
min read

Have you ever wondered, "How can I enable users to easily and seamlessly pick a value from a range with a visual element in SwiftUI?" Too specific? Well, today you are in luck because I will introduce you to the SwiftUI slider, a UI element that allows your users to pick a value from a defined range by sliding a thumb through a track and giving visual feedback in real-time.

I will first start with a brief introduction to SwiftUI development so that we are all on the same page. Then I will define what a slider is in more detail and provide some examples. And finally, I will guide you through developing a simple SwiftUI application that illustrates all the things you just learned about the slider with a cool image editor sample.

Heads up: If you don't have a background in Swift development, you might not be able to follow the article. However, you can find out more through our articles introducing you to Swift.

SwiftUI is the Apple ecosystem's new instrument for building app user interfaces using code

A Brief SwiftUI Introduction

What is SwiftUI? Put simply, it's the evolution of the UI design standards that Apple created specifically to work with their Swift language infrastructure. SwiftUI is the Apple ecosystem's new instrument for building app user interfaces using code. Furthermore, it contains a language that is quite rich and straightforward to work with in iOS, macOS, and WatchOS.

As Apple states, "SwiftUI provides views, controls, and layout structures for declaring your app's user interface. The framework provides event handlers for delivering taps, gestures, and other types of input to your app, and tools to manage the flow of data from your app's models down to the views and controls that users see and interact with."

SwiftUI projects start with two files: ContentView.swift and <APP_NAME>App.swift, where APP_NAME is the name you used for the project.

All SwiftUI views are represented in classes referred to as view classes and follow a rudimentary structure. The view struct establishes the structure of the view and its functionality, while a PreviewView struct acts as a helper for the handy emulator that displays your work in real-time.

Additionally, a variable type of view called "body" defines the body of the ContentView. Any modification to this variable will result in a visual change to the current view.

All new view classes typically contain a simple TextView element with the text "Hello World!"

What Is a Slider?

As mentioned before, a slider is a UI element that allows users to interact with a single value selector. It provides an intuitive interface that both restricts and enhances the possible forms of interaction with a value that can be linked to other elements or views.

As you can imagine, the primary interaction mechanism with a slider is a drag gesture, where the user moves a thumb element in the slider and sees a value update in real-time. This mechanism is handy when you want the user to be able to set granular alterations between large ranges or provide a visual cue as to how much the value represents from the whole.

Let's see an example.

slider

The slider not only allows me to change the contrast properties of the image, but does so in a fluid and seamless way. There's no stop to the motion, just a constant flow of changes that help me see the best value to pick much faster and easier than inputting values manually or selecting from a range.

By the way, this isn't just a great example of a slider. It also looks pretty cool, right?

Well, let's go ahead and build it.

Implementing a Slider in SwiftUI

Creating a slider is the first step to building the image editing sample app. Adding a slider to your SwiftUI app is as simple as adding the following code:


    import SwiftUI

    struct ContentView: View {
        @State private var brightness: Double = 0
        
        var body: some View {
            VStack {
                Slider(value: $brightness, in: -100...100, step: 1)
            }
        }
    }

Notice that here we have a @State variable named "brightness" that binds the value state between views and classes. This variable will hold the selected value in memory. Swift will then intelligently update any element (like the slider or a text element) with this variable as a binding parameter, meaning having the $ prefix on the variable.

This mechanism is called state management and is one of the fundamentals of SwiftUI.

As Apple shares in its documentation, "A State instance isn't the value itself; it's a means of reading and writing the value... When the value changes, SwiftUI updates the parts of the view hierarchy that depend on the value. Use state as the single source of truth for a given value stored in a view hierarchy."

Apart from the binding parameter $brightness, the slider element is initialized here with a range of values from -100 to 100, delimiting what values a user can pick. And finally, a step property dictates the step of every change.

Let's add some more elements to have the entire view structure.

Designing a Slider in SwiftUI

Modify your content view to the following:


    import SwiftUI

    struct ContentView: View {
        @State private var contrast: Double = 100
        @State private var brightness: Double = 0
        @State private var saturation: Double = 100
        
        @State private var image: Image?
        
        var body: some View {
            VStack {
                image?
                    .resizable()
                    .aspectRatio(contentMode: .fit)
                    .padding(.horizontal, 50)
                    .padding(.bottom, 30)
                
                HStack {
                    Text("Contrast:")
                        .bold()
                    Text("\((Int(contrast) - 100))%")
                        .bold()
                }
                
                Slider(value: $contrast, in: 0...200, step: 1)
                    .padding(.horizontal, 10)
                
                HStack {
                    Text("Brightness:")
                        .bold()
                    Text("\(Int(brightness))%")
                        .bold()
                }
                
                Slider(value: $brightness, in: -100...100, step: 1)
                    .padding(.horizontal, 10)
                
                HStack {
                    Text("Saturation:")
                        .bold()
                    Text("\((Int(saturation) - 100))%")
                        .bold()
                }
                
                Slider(value: $saturation, in: 0...200, step: 1)
                    .padding(.horizontal, 10)
                
                Button("Reset") {
                    contrast = 100
                    brightness = 0
                    saturation = 100
                }.padding(.top, 30)
                    .buttonStyle(.bordered)
            }.onAppear {
                image = Image("img")
            }.padding(10)
        }
    }

Most of this code is pretty self-explanatory. We have more state variables, more sliders, and some text elements that display the slider's current value.

Additionally, we now have an image variable declared as a state variable. The reason for creating it this way will be more apparent once we link the state of the brightness, contrast, and saturation properties to the image properties.

But for now, you can see that the elements have some styling modifiers added to them and some configurations to be displayed.

swiftui slider

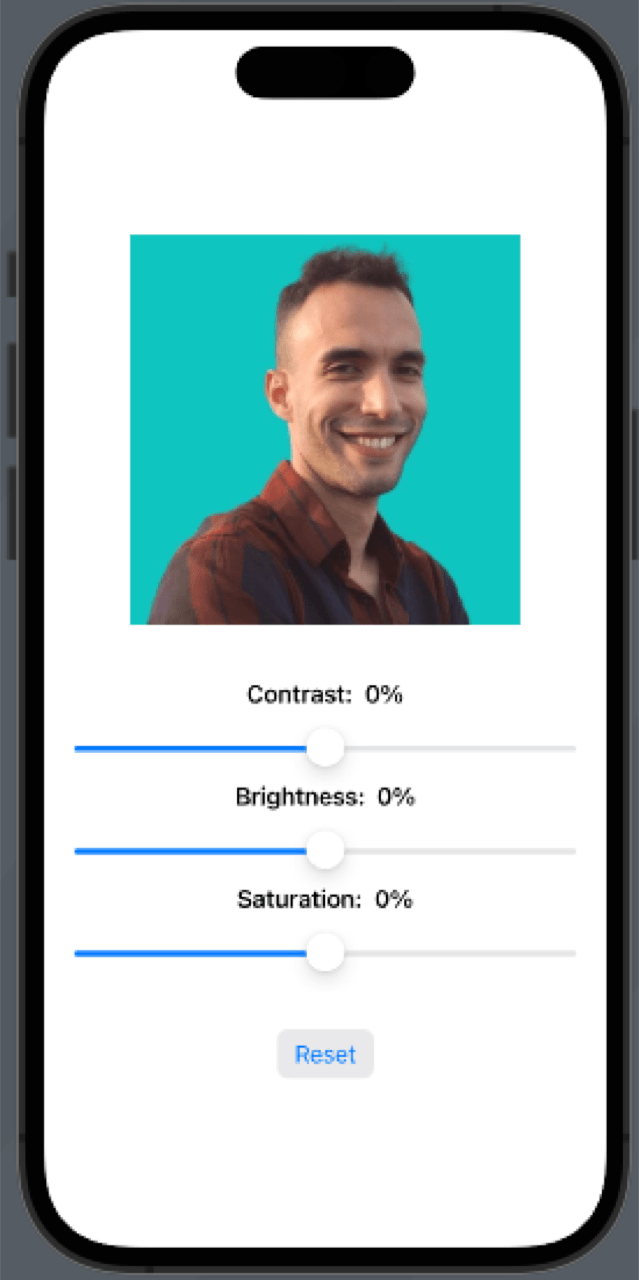
If you check your preview page, you can see that your work looks identical to the example above. But if you move the sliders, the image remains the same.

Let's now focus on the functionality of working with the values of the sliders.

Setting a Value on a Slider in SwiftUI

As you might have noticed at this point, we are already setting values and using the values to update views and affect the app with the text elements that show the value of each slider in real time.

However, we can do much more with the sliders, like altering the properties of an image. This functionality will require working with the Core Image libraries in Swift, but don't let that intimidate you.

Add the following code below the body variable:


    func alterImage(by _: Double) {
        // Retrieve clean instance of the image
        guard let inputImage = UIImage(named: "img") else { return }
        // Initialize a Core Image instance with the UIimage
        let beginImage = CIImage(image: inputImage)
        // Initialize context
        let context = CIContext()
        // Initialize Filter
        let filter = CIFilter.colorControls()
        // Set image
        filter.inputImage = beginImage
        // Apply filter values
        filter.contrast = Float(contrast / 100)
        filter.brightness = Float(brightness / 100)
        filter.saturation = Float(saturation / 100)
        // Retrieve the output
        guard let outputImage = filter.outputImage else { return }
        // Create a CGImage instance from the output
        if let cgimg = context.createCGImage(outputImage, from: outputImage.extent) {
            // Get the UIimage equivalent
            let uiImage = UIImage(cgImage: cgimg)
            // Update the image instance
            image = Image(uiImage: uiImage)
        }
    }

This function essentially loads the image from the assets resource, creates a CIFilter instance—a library that allows you to modify image properties—and transforms the image according to your input.

You can see that we are setting the contrast, brightness, and saturation properties with the available state variables and processing the image through different conversions.

Your code might complain that the filter object is not defined. Make sure to add it at the top like so:


    var filter: CIFilter?

Alright. We are almost there.

Now we have to link the change of values event to the alterImage() function. Modify your code to the following:


    import SwiftUI

    import CoreImage
    import CoreImage.CIFilterBuiltins
    
    struct ContentView: View {
        @State private var contrast: Double = 100
        @State private var brightness: Double = 0
        @State private var saturation: Double = 100
        
        var filter: CIFilter?
        
        @State private var image: Image?
        
        var body: some View {
            VStack {
                image?
                    .resizable()
                    .aspectRatio(contentMode: .fit)
                    .padding(.horizontal, 50)
                    .padding(.bottom, 30)
                
                HStack {
                    Text("Contrast:")
                        .bold()
                    Text("\((Int(contrast) - 100))%")
                        .bold()
                }
                
                Slider(value: $contrast, in: 0...200, step: 1)
                    .padding(.horizontal, 10)
                    .onChange(of: contrast,
                              perform: alterImage)
                
                HStack {
                    Text("Brightness:")
                        .bold()
                    Text("\(Int(brightness))%")
                        .bold()
                }
                
                Slider(value: $brightness, in: -100...100, step: 1)
                    .padding(.horizontal, 10)
                    .onChange(of: brightness,
                              perform: alterImage)
                
                HStack {
                    Text("Saturation:")
                        .bold()
                    Text("\((Int(saturation) - 100))%")
                        .bold()
                }
                
                Slider(value: $saturation, in: 0...200, step: 1)
                    .padding(.horizontal, 10)
                    .onChange(of: saturation,
                              perform: alterImage)
                
                Button("Reset") {
                    contrast = 100
                    brightness = 0
                    saturation = 100
                }.padding(.top, 30)
                    .buttonStyle(.bordered)
            }.onAppear {
                image = Image("img")
            }.padding(10)
        }
        
        func alterImage(by _: Double) {
            // Retrieve clean instance of the image
            guard let inputImage = UIImage(named: "img") else { return }
            // Initialize a Core Image instance with the UIimage
            let beginImage = CIImage(image: inputImage)
            // Initialize context
            let context = CIContext()
            // Initialize Filter
            let filter = CIFilter.colorControls()
            // Set image
            filter.inputImage = beginImage
            // Apply filter values
            filter.contrast = Float(contrast / 100)
            filter.brightness = Float(brightness / 100)
            filter.saturation = Float(saturation / 100)
            // Retrieve the output
            guard let outputImage = filter.outputImage else { return }
            // Create a CGImage instance from the output
            if let cgimg = context.createCGImage(outputImage, from: outputImage.extent) {
                // Get the UIimage equivalent
                let uiImage = UIImage(cgImage: cgimg)
                // Update the image instance
                image = Image(uiImage: uiImage)
            }
        }
    }

Notice that we added an onChange() modifier to all the sliders. This modifier allows you to specify a function to be called every time the slider value changes. In this case, we specify which value is being observed and which function to trigger.

Go ahead and try it out.

Testing a Slider in SwiftUI

Great! Now you have a functional code with all the features you want. But here's the thing: Your work is never secure from bugs or scrutiny without a solid testing workflow.

Let's add a simple test case to validate that the sliders work as expected.

Before we do that, we need to modify the code of our view a little bit so we can access the view elements in our test.


    import SwiftUI

    import CoreImage
    import CoreImage.CIFilterBuiltins
    
    struct ContentView: View {
        @State private var contrast: Double = 100
        @State private var brightness: Double = 0
        @State private var saturation: Double = 100
        
        var filter: CIFilter?
        
        @State private var image: Image?
        
        var body: some View {
            VStack {
                image?
                    .resizable()
                    .aspectRatio(contentMode: .fit)
                    .padding(.horizontal, 50)
                    .padding(.bottom, 30)
                
                HStack {
                    Text("Contrast:")
                        .bold()
                    Text("\((Int(contrast) - 100))%")
                        .bold()
                        .accessibilityIdentifier("contrastSliderValue")
                }
                
                Slider(value: $contrast, in: 0...200, step: 1)
                    .padding(.horizontal, 10)
                    .onChange(of: contrast,
                              perform: alterImage)
                    .accessibilityIdentifier("contrastSlider")
                
                HStack {
                    Text("Brightness:")
                        .bold()
                    Text("\(Int(brightness))%")
                        .bold()
                        .accessibilityIdentifier("brightnessSliderValue")
                }
                
                Slider(value: $brightness, in: -100...100, step: 1)
                    .padding(.horizontal, 10)
                    .onChange(of: brightness,
                              perform: alterImage)
                    .accessibilityIdentifier("brightnessSlider")
                
                HStack {
                    Text("Saturation:")
                        .bold()
                    Text("\((Int(saturation) - 100))%")
                        .bold()
                        .accessibilityIdentifier("saturationSliderValue")
                }
                
                Slider(value: $saturation, in: 0...200, step: 1)
                    .padding(.horizontal, 10)
                    .onChange(of: saturation,
                              perform: alterImage)
                    .accessibilityIdentifier("saturationSlider")
                
                Button("Reset") {
                    contrast = 100
                    brightness = 0
                    saturation = 100
                }.padding(.top, 30)
                    .buttonStyle(.bordered)
            }.onAppear {
                image = Image("img")
            }.padding(10)
        }
        
        func alterImage(by _: Double) {
            // Retrieve clean instance of the image
            guard let inputImage = UIImage(named: "img") else { return }
            // Initialize a Core Image instance with the UIimage
            let beginImage = CIImage(image: inputImage)
            // Initialize context
            let context = CIContext()
            // Initialize Filter
            let filter = CIFilter.colorControls()
            // Set image
            filter.inputImage = beginImage
            // Apply filter values
            filter.contrast = Float(contrast / 100)
            filter.brightness = Float(brightness / 100)
            filter.saturation = Float(saturation / 100)
            // Retrieve the output
            guard let outputImage = filter.outputImage else { return }
            // Create a CGImage instance from the output
            if let cgimg = context.createCGImage(outputImage, from: outputImage.extent) {
                // Get the UIimage equivalent
                let uiImage = UIImage(cgImage: cgimg)
                // Update the image instance
                image = Image(uiImage: uiImage)
            }
        }
    }

Notice that all that was added was a modifier called accessibilityIdentifier(). This modifier essentially adds an ID that test workflows can query so the system can interact with the elements in the app.

Now go to the UITest.swift class in your testing target bundle and add the following under testExample():


    func testSliderUpdates() throws {
        // UI tests must launch the application that they test.
        let app = XCUIApplication()
        app.launch()
        
        let contrastSlider = app.sliders["contrastSlider"]
        let contrastSliderText = app.staticTexts["contrastSliderValue"]
        
        let brightnessSlider = app.sliders["brightnessSlider"]
        let brightnessSliderText = app.staticTexts["brightnessSliderValue"]
        
        let saturationSlider = app.sliders["saturationSlider"]
        let saturationSliderText = app.staticTexts["saturationSliderValue"]
        
        sleep(1)
        
        contrastSlider.adjust(toNormalizedSliderPosition: 0.7)
        
        sleep(1)
        
        brightnessSlider.adjust(toNormalizedSliderPosition: 0.3)
        
        sleep(1)
        
        saturationSlider.adjust(toNormalizedSliderPosition: 0.8)
        
        sleep(1)
        
        XCTAssertEqual(contrastSliderText.label, "41%", "Contrast slider is not updating properly")
        XCTAssertEqual(brightnessSliderText.label, "-41%", "Contrast slider is not updating properly")
        XCTAssertEqual(saturationSliderText.label, "62%", "Contrast slider is not updating properly")
    }

Here all we are doing is launching the app, retrieving references from the elements that will be interacted with in the test, triggering events (in this case, dragging the slider to a certain percentage), and validating your assumptions on what the expected outcome should be.

You can expand this pattern to generate more thorough tests and ensure that your app will respond as intended.

You can find the complete code in this repository.

Conclusion

Testing a complex application can be challenging—even more so when your resources are limited. A lot goes into developing a robust testing workflow for a mature and extensive application.

For those cases, I recommend that you check out Waldo's comprehensive toolset for UI testing. It requires no coding and is very approachable, even for non-developers.

Learn more about Waldo's support for SwiftUI.

Automated E2E tests for your mobile app

Waldo provides the best-in-class runtime for all your mobile testing needs.
Get true E2E testing in minutes, not months.

Reproduce, capture, and share bugs fast!

Waldo Sessions helps mobile teams reproduce bugs, while compiling detailed bug reports in real time.