


With the introduction of SwiftUI drag-and-drop functionalities to iOS 13.4 last year, the engineers at Cupertino made a bold statement to all developers: Bring modern and intuitive UI features to iPhones and iPads. For us developers, SwiftUI has made the process of implementation of this feature very approachable and straightforward.
Nevertheless, if you haven’t had the opportunity to implement it yet—or you’re just exploring SwiftUI and want to learn about the feature—keep reading.
Our goal with this article is to introduce the SwiftUI drag-and-drop feature. You’ll be creating a simple and interactive implementation that you’ll carry out as we progress. In addition, you’ll explore some of the most commonly used features. And you’ll implement some simple testing to ensure the work you’ve done is in order.
Heads up! Before you continue, if you’re new to Swift or SwiftUI, please check here and work on getting used to it first.
A Quick SwiftUI Introduction
Let’s start with a short summary of what you can expect in a new SwiftUI-based project in Xcode.
First, open Xcode and create a new SwiftUI-based project. Once that’s done, you’ll see that your template project contains two files. There’s a ContentView.swift class file and an <APP_NAME>App.swift class file.
If you’re new to SwiftUI View classes, don’t worry! They’re pretty simple to figure out. All SwiftUI View files have the same structures: a View struct defining the view structure and functionality, and a PreviewView struct for the emulator to display the code in the previewer in real time.
You can put your code in the “body” variable inside the View struct to add more views or elements. As you can see, there’s already a TextView object with the text “Hello World!” in it.
Simple, right?
Now, let’s jump into your project.
Drag and Drop in SwiftUI
All right. If, for some reason, you’ve gotten to this part of the article and you aren’t sure about what the drag-and-drop feature is, here’s a brief explanation.
The SwiftUI drag-and-drop feature is a gesture that allows the user to transfer an object in between two different contexts. This gesture enables intuitive UI interactions that are convenient for users in most platforms.
To implement the drag feature in SwiftUI, all you have to do is add the onDrag modifier to the element you want to respond to the drag gesture. This modifier allows you to define what information the object will carry. Additionally, it’ll tell the drop handler the context or element to handle this gesture.
Adding NavigationView
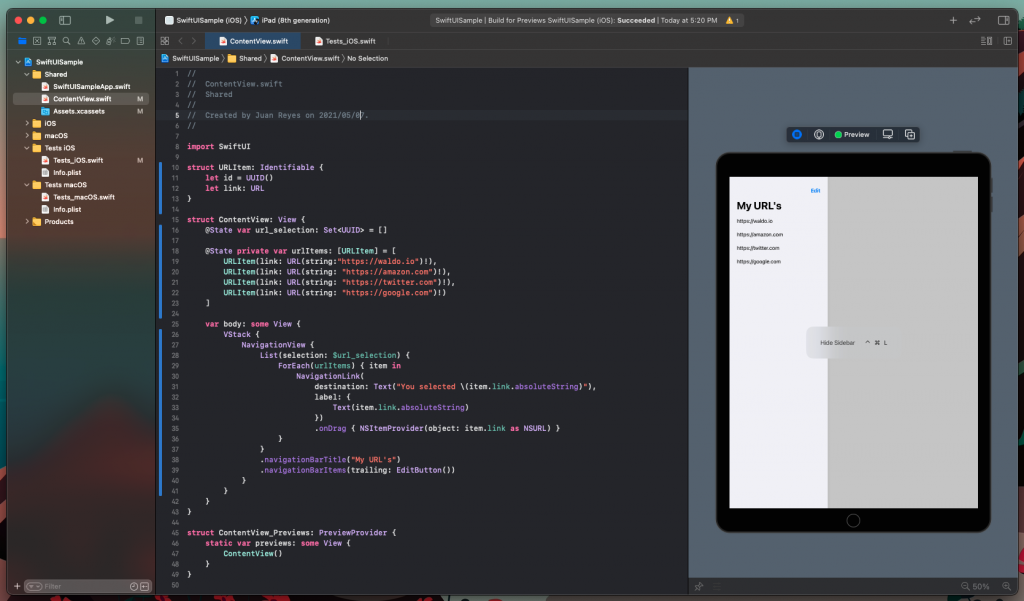
Let’s start by removing the Hello World and replacing it with a NavigationView containing a list of URLs.
If you’re having a hard time following what some of this code does, don’t worry. It’s pretty simple.
Inside the VStack, your List contains the NavigationLink elements that respond to a tap event from the user to navigate them to a new view. This structure results in the split-view that commonly has the hidable menu to the left on an iPad.
More About NavigationView
The NavigationView constructor has two parameters:
- Destination: This is where you pass the view to be displayed when the navigation is performed.
- Label: As its name indicates, it has the title to display in the navigation menu.
The most important part of the code resides in the onDrag modifier.
Here’s where you indicate what is to be passed to the receiving end of the gesture. As you can see, you instantiate an NSItemProvider, which receives an object as a parameter. You’re giving the URL as an NSURL instance.
You can go ahead and run this code in the emulator. Make sure to select an iPad emulator so you can use the multitasking functionality to have a split-screen between the app and Safari. That way, you can test dragging a URL item into the browser.
Sharing Data Through Drag and Drop
You have a functional project with the ability to share items out of the app! Next, let’s make it so it can also receive items dropped into it.
The first thing to consider to implement the drop functionality is what container you’re using. For example, if you’re using ScrollViews, Stacks, and such, then you can use the onDrop modifier and implement a DropDelegate to handle the gesture.
The delegate would look something like this.
In this code snippet, you can see that you first check if the dropped object conforms to your defined ItemProvider, which in this case is “public.url.” You then extract the URL String value and add it to your Binding variable, passing it back to the parent View.
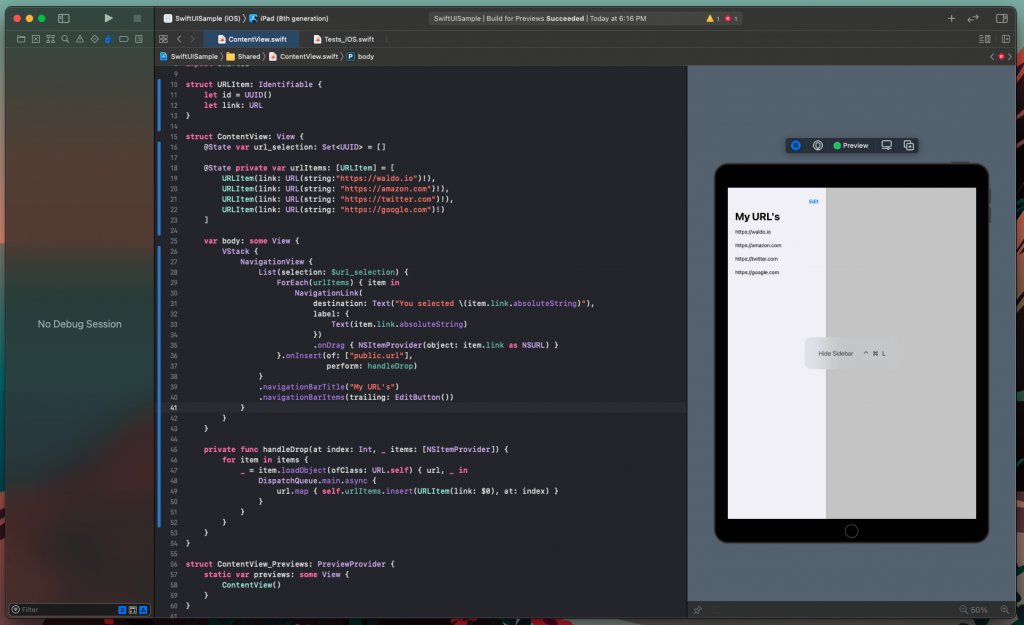
However, you can’t use this implementation for your sample project. That’s because the List container doesn’t support the onDrop modifier.
Instead, you can use the onInsert modifier, which is a simpler version of the onDrop modifier, to achieve the same objective.
The handleDrop method will serve the same function as your previous delegate, and it’ll handle the NSItemProvider object.
Notice that you need to insert the new URL in a new thread.
The resulting code looks like this.
Go ahead and run it.
If you open the app again side by side with Safari and drag a URL item into the app, you’ll notice that it’s added to the URL list. Pretty impressive, right?
Finally, let’s add some testing so you can be sure that everything is working as intended.
Test Your Work
In the case of drag-and-drop testing in Xcode XCTest, you’re limited to the elements inside your app. So, for the sake of brevity, you’ll implement a simple test where the second element will be dragged and dropped on top of the last component duplicating it.
This scenario, while simple, tests all the features already implemented in the code.
Simply go to the Test_iOS.swift class file and add the following code to the testExample method.
And that’s it!
Run the test, and see how the list responds.
If you want a more comprehensive and in-depth testing solution for your app, consider checking out Waldo‘s solution. Their tool requires no coding, and it can interact with views outside of the target app. There’s a free trial plus a blog with lots of information on testing.
Don’t Drag to the Future
Finally, regarding the iPad, Apple has consistently conveyed a clear message to the market: Our iPad can replace your computer. Of course, that statement could have sounded relatively shallow and lacking before. But with the introduction of more features that have been native to Mac on iPadOS and iOS, Apple is putting its money where its mouth is.
Now that you have a more comprehensive understanding of the feature and the intuitiveness it brings to your UI, you can make sure that your users have the best experience possible with your product.
Automated E2E tests for your mobile app
Get true E2E testing in minutes, not months.


