


.jpeg)
Colors are an important part of any project on the web. They're equally important for a mobile app.
React Native provides all the colors that are available on the web for CSS. But CSS also has its own useful patterns and modules.
In this post, we'll look at various types of color syntax available in React Native. After that, you'll learn about the two APIs for color: PlatformColor and DynamicColorIOS. Lastly, you’ll learn about a library to pick colors from. We'll look into all of these syntaxes by using them in a small app.
You'll be expected to have basic knowledge of JavaScript, React, and React Native to follow along. It'll also be good to have basic knowledge of color in CSS.
Initial Setup
We'll use React Native CLI for this project. Our emulator is iOS, so we'll need to set up XCode on a Mac system. The setup steps are clearly outlined in the tool's official documents.
Once the setup is done, we need to create a new React Native project. From the Mac terminal, give the command npx react-native init <project-name> to create a new project.
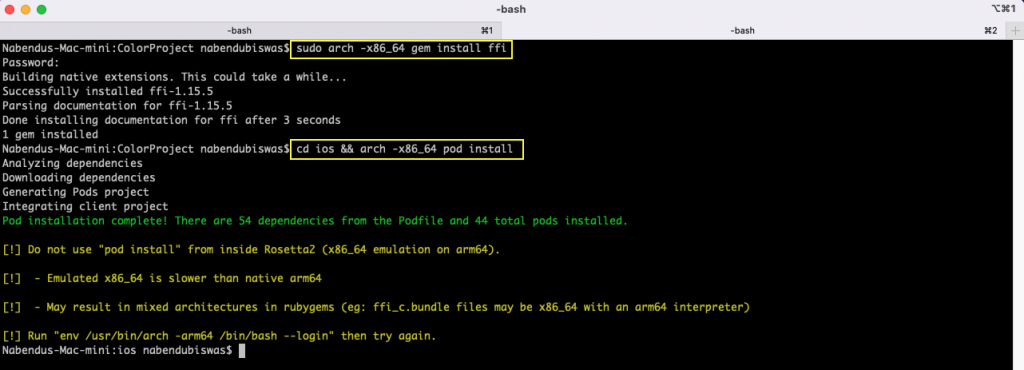
We also need to run two commands on the Mac, running M1 chip in the project directory.
Running the React Native Colors Project
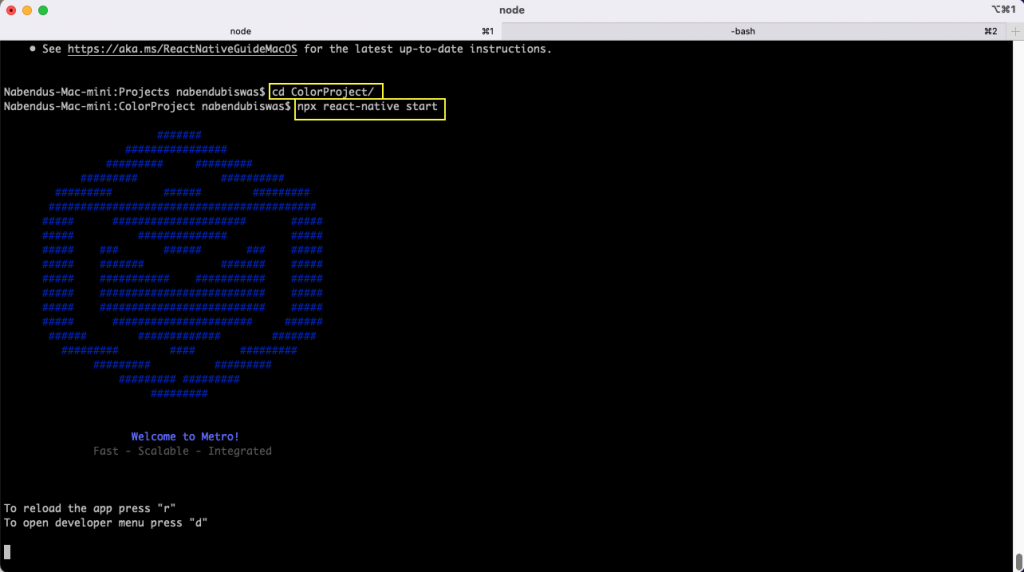
From inside the project directory, run the command npx react-native start. If successful, you'll get this screen:
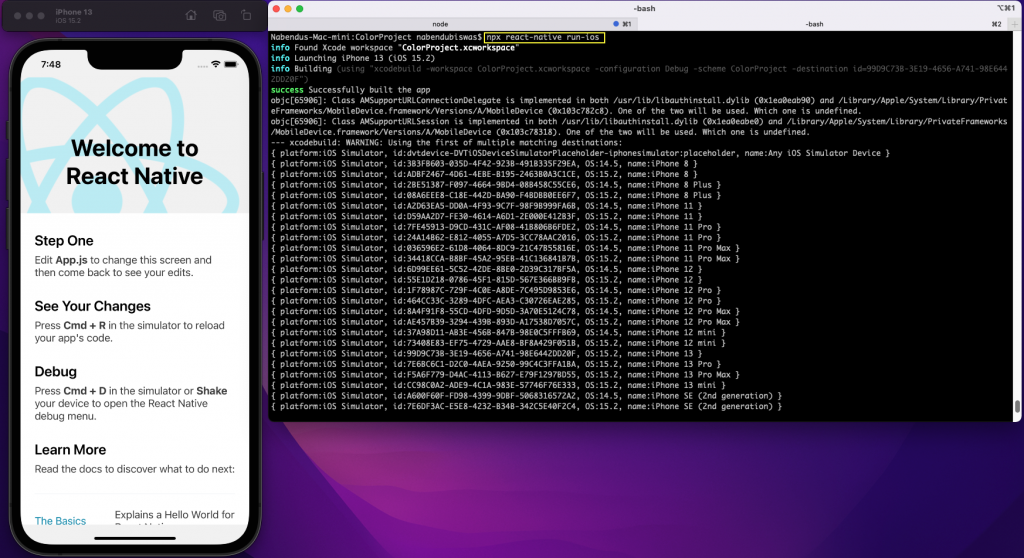
Now, we need to run another command from the project directory to start the iOS emulator. Open a new terminal and run the command npx react-native run-ios.
We'll get this screen if everything is OK:
Color Basics
We style our React Native app through a prop called style. Now, all of the CSS styles apply in React Native, but we'll follow the camel case notation because we use JavaScript to apply style in a React Native app.
We also can use inline styling, where color can be applied. Using StyleSheet, we can create and give style.
We'll first use the four major CSS color systems in our React Native project. These are
- the hexadecimal system,
- the RGB (red, green, blue) system,
- the HSL (hue, saturation, lightness) system, and
- the named color system.
We'll learn about these systems next and apply them to our project.
.png)
Hexadecimal System
The hexadecimal system is one of the earliest system of colors in CSS. It's used exactly the same way in React Native as it is on its web counterpart. The only difference is that it's given in single quotes in React Native.
Now, the most common hexadecimal system consists of six digits. It starts with # and is followed by the six digits.
Hexadecimal is different then the binary system of 0-9. The binary system is of base 10, whereas the hexadecimal system is of base 16. It has zero to nine digits and also the letters A through F.
Now, the first two digits represent red, the next two represent green, and the last two represent blue. This is done because the human eyes can only see a combination of these colors. Each of the colors can have values from 00 to FF. The value 00 means absence of the color and FF means presence of it. For example, #FF0000 is the color code for red.
We also have a short-form notation of hex code. It consists of three digits only. For example, #FFFFFF can be written as #FFF. So, this means that the digits will be repeated.
There's an additional two-digit or one-digit code in short-form notation for alpha value. It also has values from 00 to FF and is used for transparency. In this case, 00 means completely transparent and FF means fully opaque.
Using Hex Code
Now, we'll use some of the hex codes in our simple app.
First, we'll create a components folder in the root directory. Create a file called HexCode.js inside it and add this content:
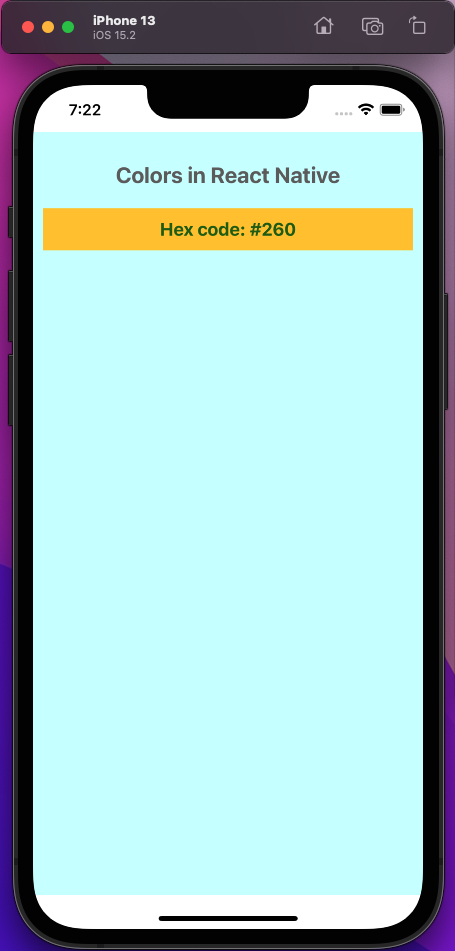
In this case, we're using three ways of hex code. In the titleText, we're using color as #2009, which represents RGBA format. Next, in the item we're using #ffc600 for background color, which represents RRGGBB format. In the same item, we're giving color by #260, which represents RGB format.
We'll also delete all of the content from the app.js file and add the content below in it. Here, we're also showing our hex code component. We're giving the background color of the app as #00ffff33, which represents the RRGGBBAA format.
Now, it should look like this on our iOS simulator:
RGB System
The RGB system represents the colors red, green, and blue. We give it by using the rgb() format, which is similar to the web.
Inside it, we mention the red, green, and blue color. The values are from 0-255. Again, zero means the absence of a value and 255 means the presence of a value.
We also have an rgba() format, in which "a" represents transparency. Its value is from 0.0-1.0. The value of 0.0 means fully transparent and 1.0 means fully opaque.
Using RGB
Now, we'll use the two RGB formats in our app. Inside the components folder, create a file called RgbSystem.js. Put the content below in it. Here, we're using both the rgb() and rgba() formats mentioned earlier.
We'll now import RgbSystem into our app.js file.
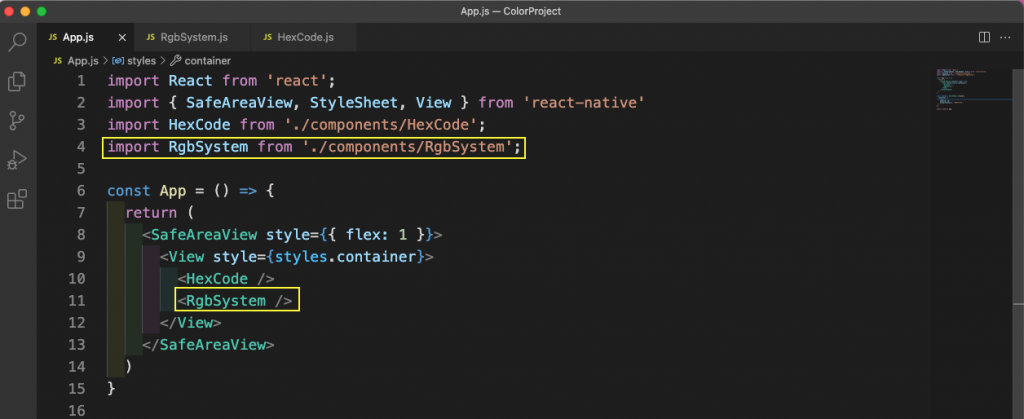
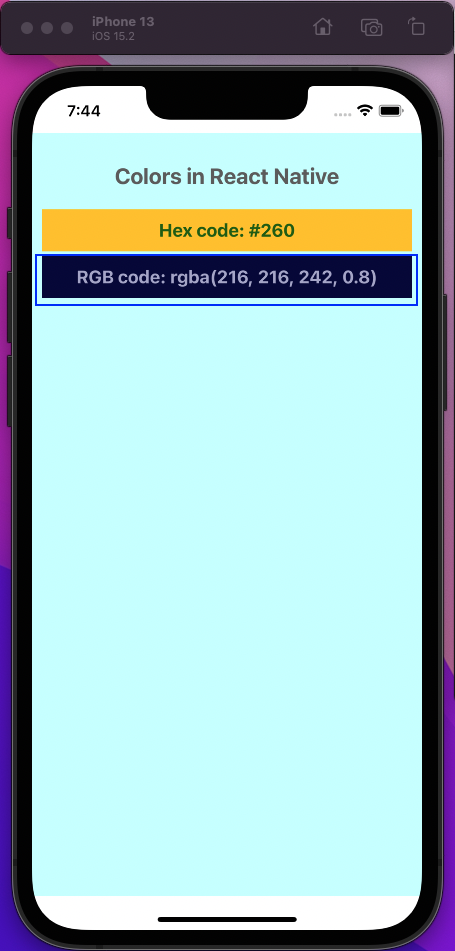
Now, it should look like this on the iOS simuliator.
HSL System
The HSL system represents hue, saturation, and lightness. We give it by using the hsl() format, which is similar to the web. The hue value represents the color from an RGB color wheel. The hue is a number from 0-360, which represents all three colors.
Besides this, we have saturation and lightness.
Saturation is a percentage from 0-100. In this case, 0% means some gray and 100% means full color.
Lightness is also in percentages from 0-100. Here, 0% is completely black and 100% is completely white.
We also have an hsla() format in which "a" represents transparency. Its value is from 0.0-1.0, with 0.0 meaning fully transparent and 1.0 meaning fully opaque.
Using HSL
Now, we'll use the two HSL formats in our app. Inside the components folder, create a file called HslCode.js. Put the content below in it. Here, we're using both the hsl() and hsla() formats mentioned earlier.
We'll now import HslCode in our app.js file.
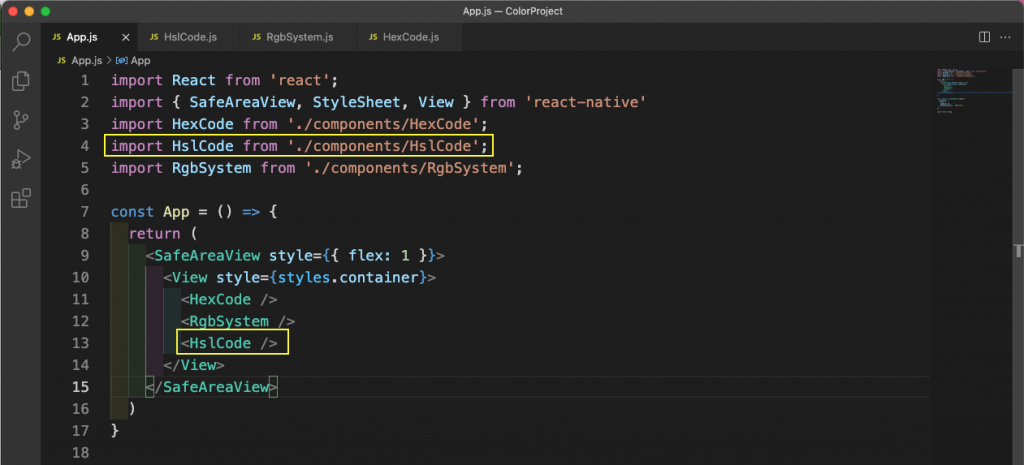
Now, it should look like this on our iOS simulator.

Named Color System
The named color system is basically directly giving the color name. We have 140 color names in CSS, and we can use all of them in React Native. The complete list can be found here.
However, we'll need to give all color names in small case. For example, on the web we can give a color name as MidnightBlue, but in React Native we have to give it as midnightblue.
Next, we'll look into the usage of this system in our app.
Using Named Color System
Inside the components folder, create a file called NamedColor.js. Put this content in it:
Now, we'll import HslCode into our app.js file.
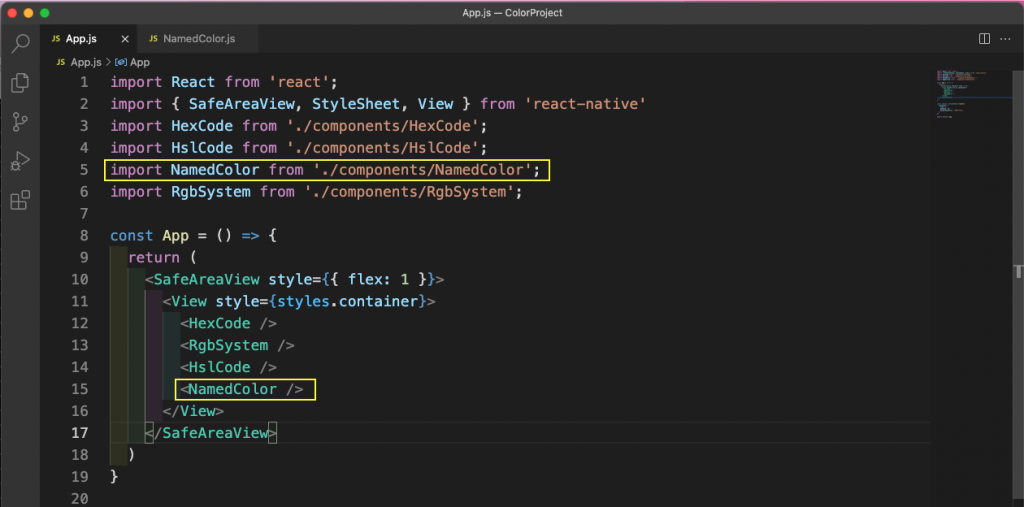
It should look like this on our iOS simulator:
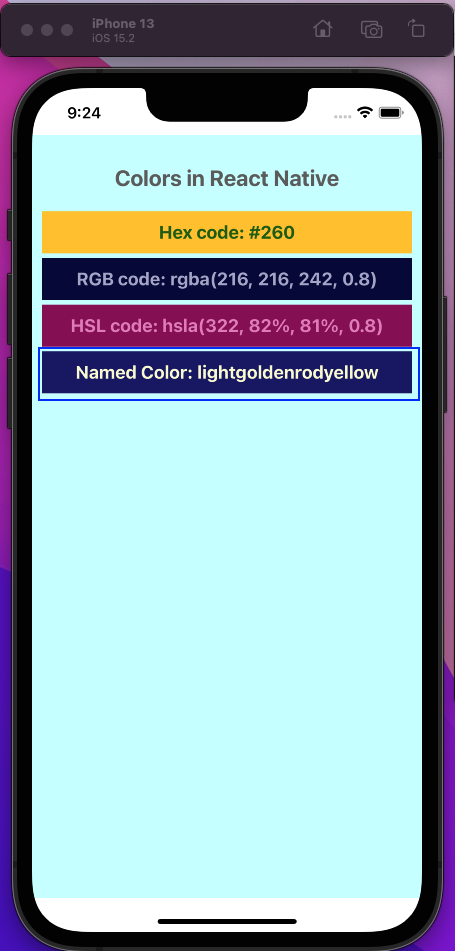
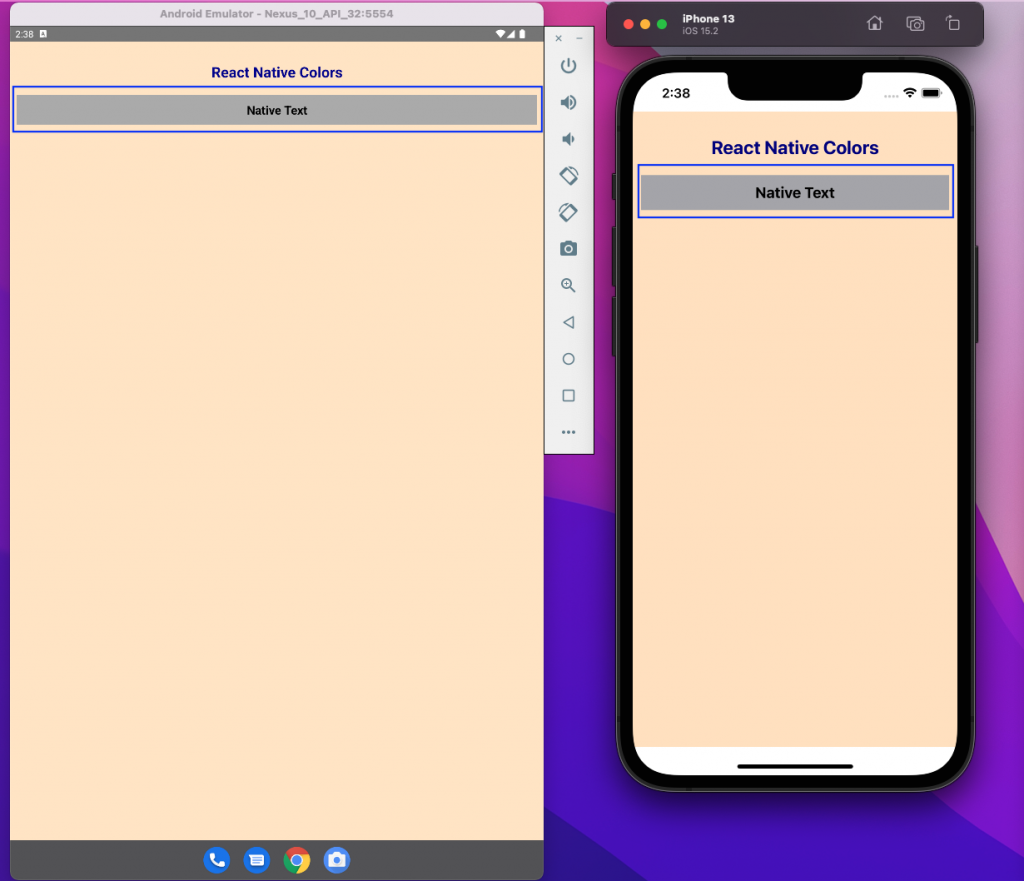
Applying PlatformColor
React Native uses PlatformColor, which has special color palates recommended by Apple and Google. Apple uses its palate for its own apps and Google uses its own platform-specific colors for its apps, including YouTube and Gmail. You can get the Apple color names here and the Android colors names here.
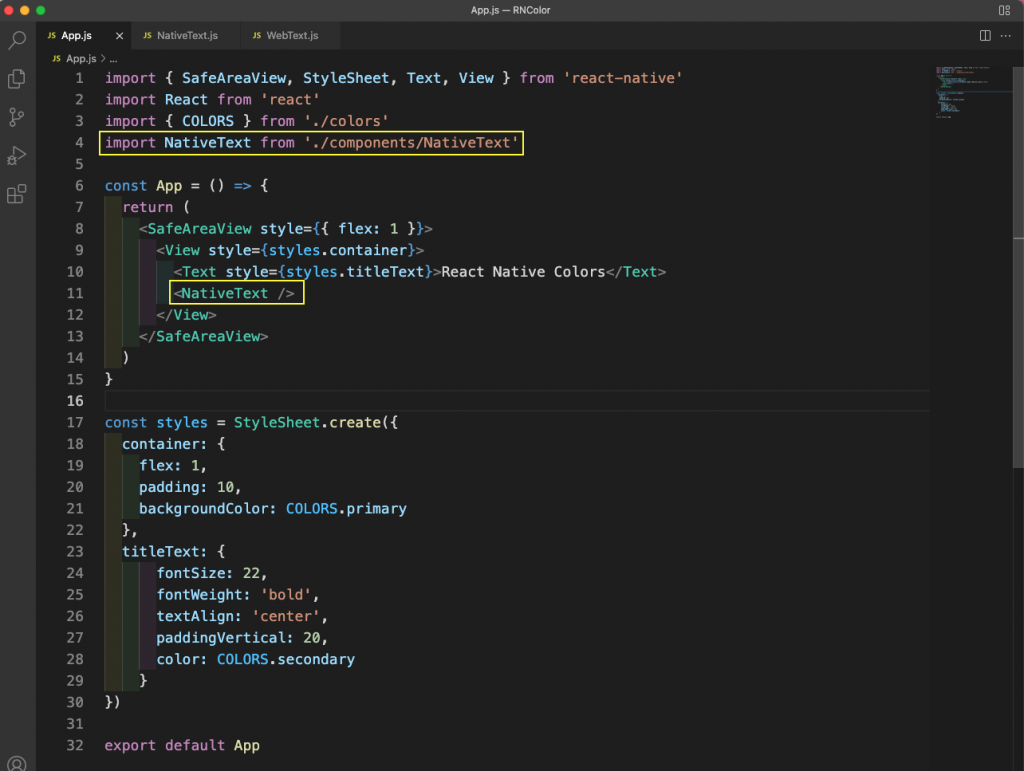
Now, let’s use them in our app. First, change the app.js file. Inside the components folder, create a file and call it NativeText.js. Then, you’ll call a NativeText component from the App.js file.
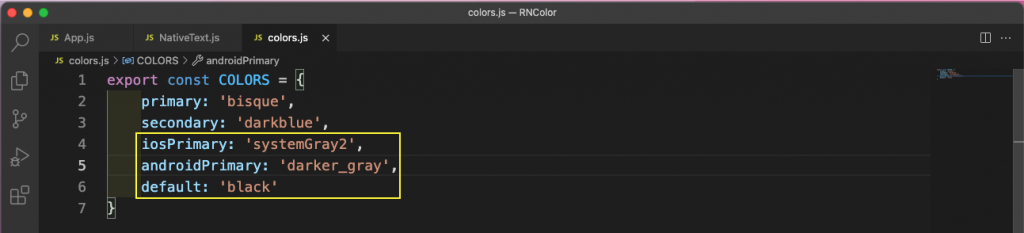
Next, let’s add some new colors to the colors.js file. The color names iosPrimary and androidPrimary are special color names taken from the official documents for iOS here, and the official documents for Android here.
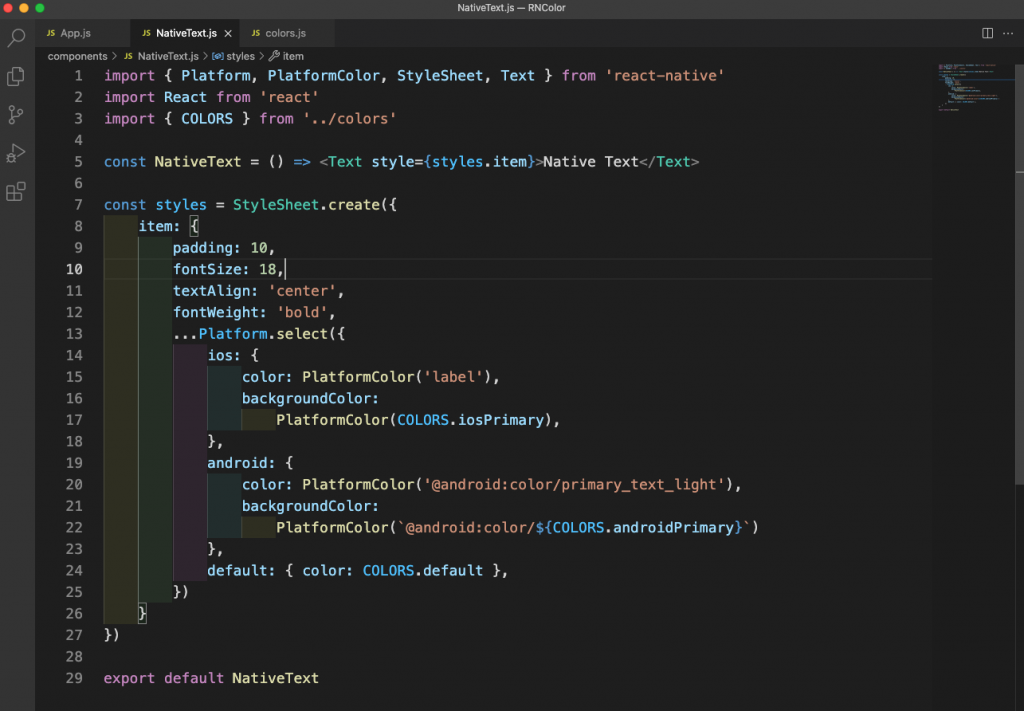
In the NativeText.js file, you first select the platform with Platform.select(), then indicate iOS specific colors with PlatformColor(); do the same for Android.
Open the Android emulator to see the Android colors and the iOS simulator to see the iOS colors.
Applying DynamicColorIOS
Now we’ll demonstrate how to apply DynamicColorIOS, which applies the light and dark modes in iOS. For this, update the App.js to show the DynamicText component.
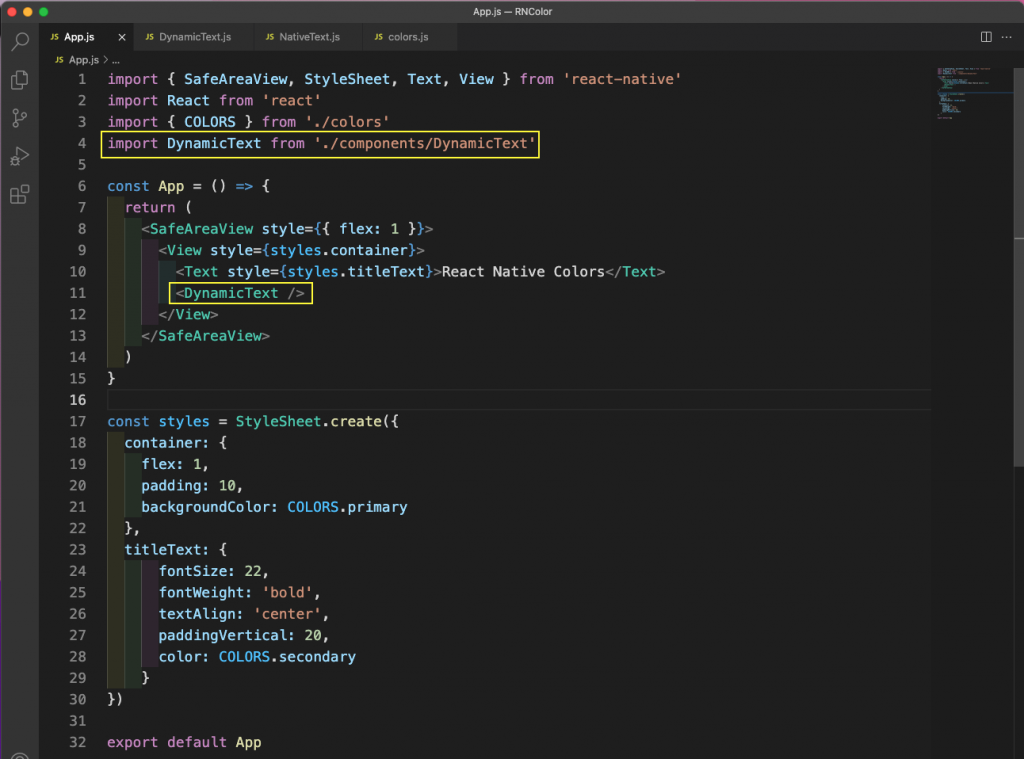
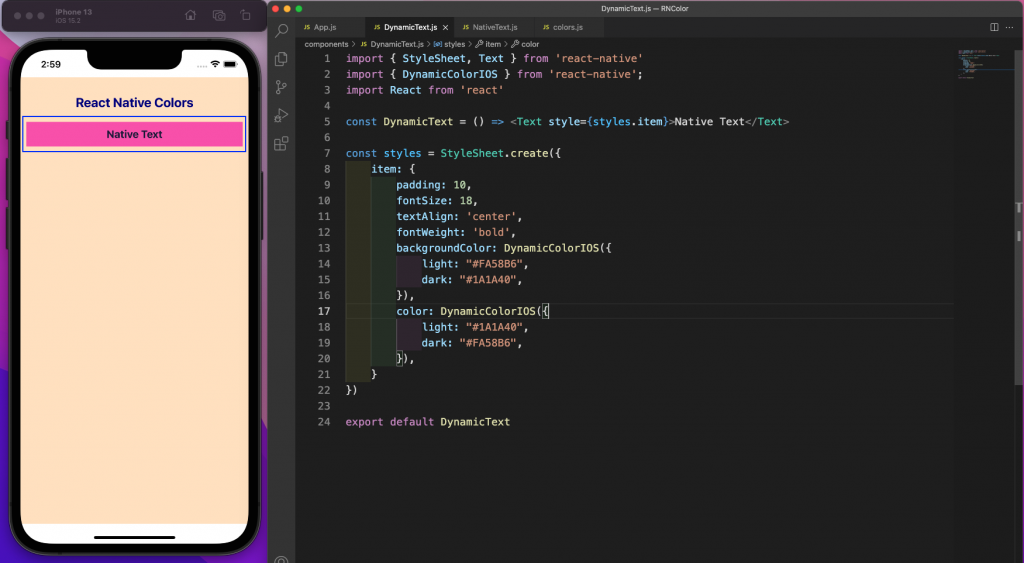
Create a file called DynamicText.js in the components folder and again, you’ll create a simple Text component. After that, change the background color and text color based on the mode (light vs. dark) of your iOS device.
As seen below, in light mode we get a pink box with blue text.
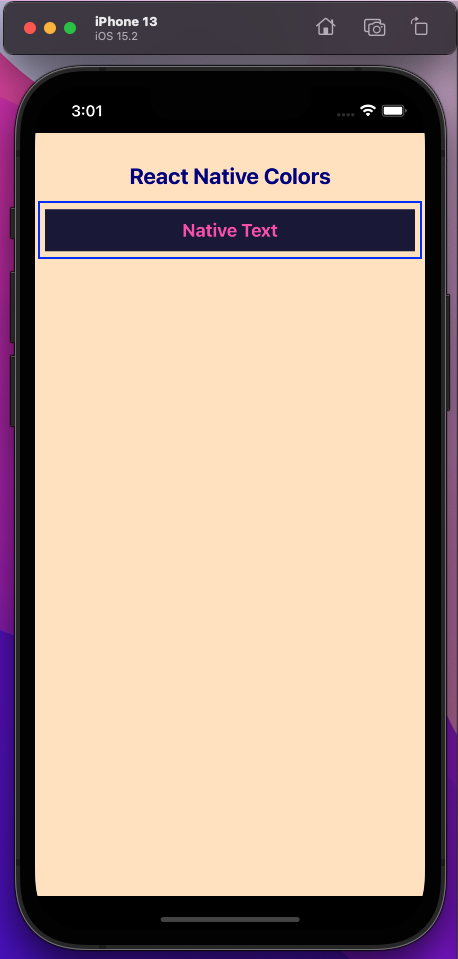
Now, change the light mode to dark mode using the shortcut Command + Shift + A. This changes the background box to blue and the text color to pink.
Picking Color
Next let's take a look at color pickers.
React Native Color Picker
React Native comes with many color picker libraries that provide us with different types of color wheels. Through these color wheels, we can pick any color.
We'll use the react-native-color-picker library to show color picker in our project. So, we need to install this package in our application with this command:
Using Color Picker
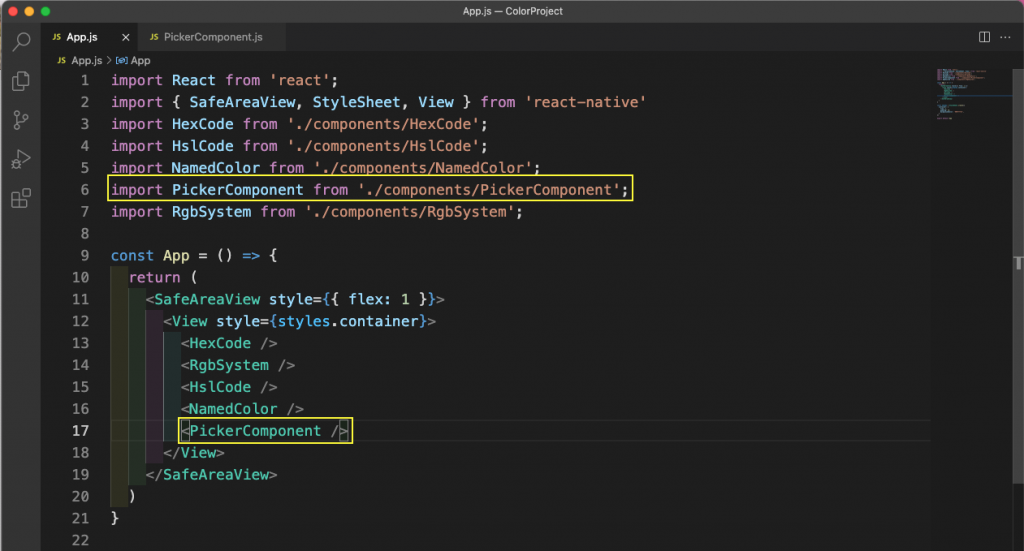
Inside the components folder, create a file called PickerComponent.js.
Put the content below in it. Here, we're using the color picker as per the documentation of the package.
export default PickerComponent
We'll now import PickerComponent in our app.js file.
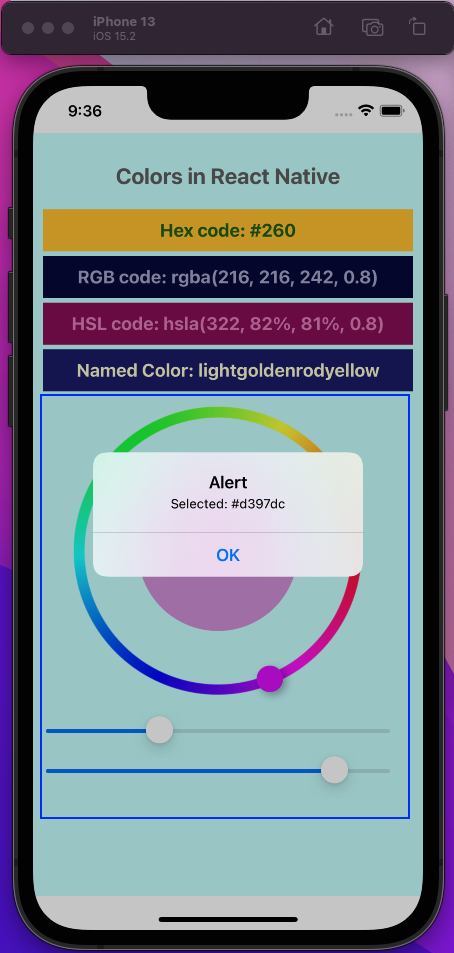
Now, the color picker is shown in the app. After selecting, when we click on the color, it also shows the color name in an alert.
Triangle Color Picker
Let’s look at another color picker, the Triangle Color Picker from the react-native-color-picker package. For this, update the App.js to show the ColorPicker component.
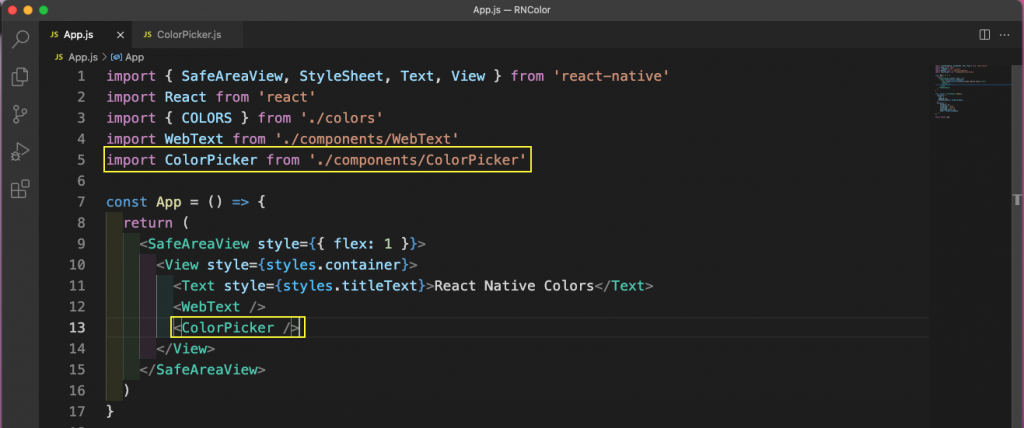
Now, inside the components folder, create a file called ColorPicker.js and use the TriangleColorPicker as per the package’s documentation. The app shows the color picker and you can select a color from the outer circle. Then you can chose a variant of the color from inside the triangle.
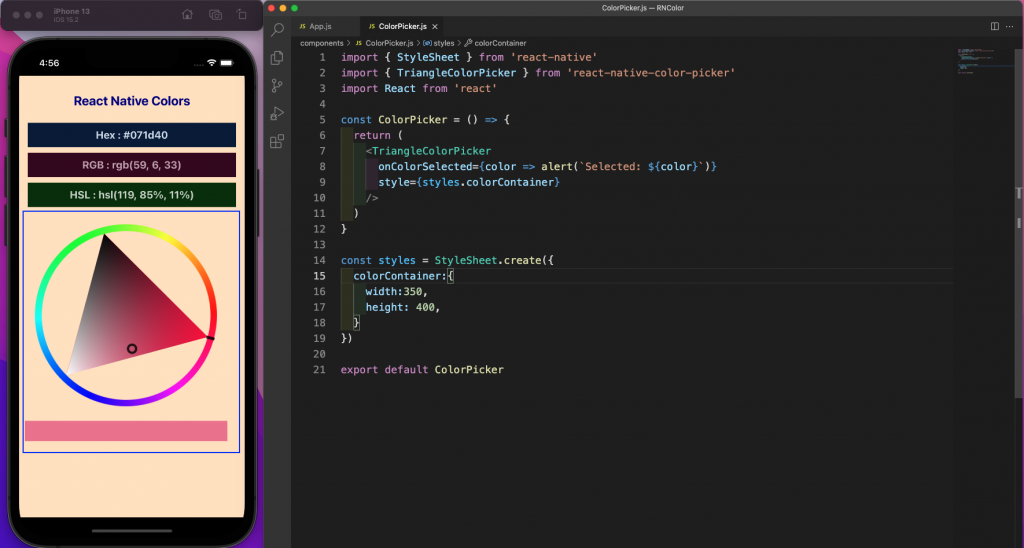
Once you finish selecting, the box changes according to your selection, as seen below. When you click on the color, the color name displays in an alert.

Testing the App
To test the app, we'll use snapshot testing with Jest. In the __tests__ folder, remove the earlier file called app-test.js. Add these four files in it: HexCode-test.js, HslCode-test.js, NamedColor-test.js, and RgbSystem-test.js.
In the HexCode-test.js file, add the content below. This is a simple snapshot test, which matches all the tags with the app.
Now, in the HslCode-test.js file, add this content:
Similarly, in the NamedColor-test.js file, add this content:
Lastly, in the RgbSystem-test.js file, add this content:
Now, run the npm run test from the terminal.
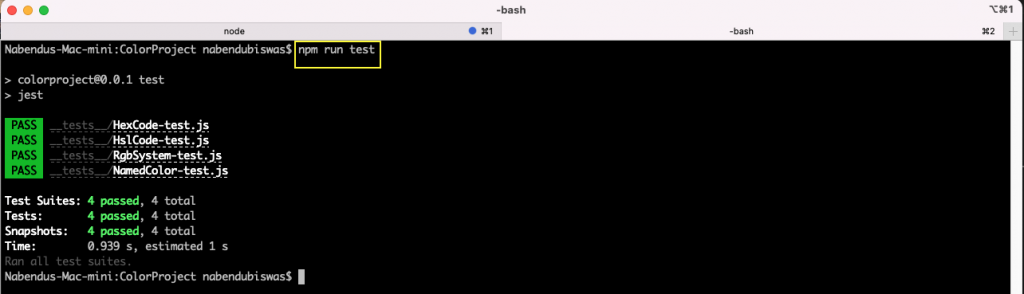
All of our test cases ran successfully.
However, adding the color picker to the testing would require us to write a more complicated test case. Color picker interactions also require the help of manual testers. Now, instead of writing all test cases manually, we can use Waldo.
Waldo is a no-code testing platform in which we just need to upload the APK or IPA file. We can also do the user iteration, which is required in the color picker.
You can create a free Waldo account here to test its features.
Conclusion
In this post, we've learned about the basics of React native colors, including all four ways to give color on the web as well as in React Native.
You learned about the two different color APIs, PlatformColor and DynamicColorIOS.
We've also integrated a color picker into an app and tested the app through Jest. We learned we can also test our app more easily with the no-code testing platform Waldo.
Automated E2E tests for your mobile app
Get true E2E testing in minutes, not months.


