


.jpg)
With Ktlint, you have a companion that ensures that you're writing clean, readable code that follows best practices. Kotlin Ktlint does this by checking your code for poor formatting and warning you about where you need to make improvements. Overall, using a linter like Ktlint improves code quality.
In this post, you'll learn about what Ktlint is and how to use it to improve the quality of your Kotlin code.
Before we dive deeper, let's walk through what linting is all about.
.png)
What Is Linting?
In simple terms, linting is the process of analyzing code for potential errors or defects in formatting. It requires running a program that does the actual job of analyzing the code.
Benefits of Linting
- One benefit of linting is that it can make it easier to catch bugs early. Since the linting program usually runs before you execute your code, it reports any potential issues and gives you a chance to fix them.
- Linting also enables multiple persons working on the same project to stick to the same code formatting style. As a result, you make all the code that makes up an application consistent.
- With linting, you can more quickly spot typos and whether you used any undeclared variables.
- Overall, linting helps developers write cleaner code that runs better and that's easier for other people to read.
What Is Ktlint?
Ktlint is a linting tool (a linter) for the Kotlin programming language. Ktlint can check your code to verify that it meets whichever style guide you use. In addition, Ktlint can automatically reformat codes that don’t follow the style guide.
What Can Ktlint Do?
The following are some of the operations that Ktlint can perform:
- Code analysis: Ktlint can check Kotlin code at different points in development to verify that they meet official Kotlin coding conventions and style guides. This analysis can detect defects that may lead to bugs.
- Error reporting: After analyzing your code, Ktlint outputs the result in a report. This report shows data like which files have errors and the parts of the file where you’ll find the errors.
- Code formatting: In addition to analysis and reporting, you have the option of letting Ktlint reformat your code so that it meets a set of coding rules or styles.
How to Set Up Ktlint
Now that you know what Ktlint is, let's walk through an example of how to set it up. There're different ways to set up Ktlint, either via CLI or a plugin for a tool like Gradle. For this example, we'll use the Ktlint plugin for Gradle and an Android Studio Kotlin project to test how to use Ktlint to improve code quality.
Prerequisites
In order to follow along better, make sure to have the following:
- The latest version of Android Studio
- Basic Knowledge of Kotlin and of working with Gradle files
- An Android Studio project
Step 1: Add the Ktlint Plugin to Your Project
Just as I mentioned in the previous section, you'll need an Android Studio project for this tutorial. You can either create a new project or use an existing one.
Now, let's add the plugin to the project. Open the app-level build.gradle file and add the following line to the plugin section:
Once you finish, you can hit the Sync Now button to enable Gradle to download the plugin.
Note: For older Android Studio projects, you may have to use the apply method to add the plugin.
Step 2: Add Custom Configurations
Though Ktlint comes out of the box pre-configured, there's plenty of support for customization. So, let's customize it a bit.
Still within the app-level build.gradle file, create a new section on the root of the file with the following configuration:
Let's walk through some details about what the above code does:
- First, android = true lets Ktlint know that your project is an Android project.
- Next, if the ignoreFailures value returns true, it means your project will fail to build if any Ktlint detects any issues.
- Last, but not the least, we set up to generate reports in plain text.
Step 3: Introduce Code With Bad Style
Just before we run our first analysis with Ktlint, let's add some code that has a format the plugin considers bad by default.
Go to your project's MainActivity.kt or some other Kotlin file within your project and add the following line anywhere within the file:
The above code, just as it reads, is a regular comment, hence you can place it anywhere within any of your .kt files.
Step 4: Run Ktlint Check
Now that we've added Ktlint to our project and have some code that should fail the lint check, let's attempt to analyze the code using Ktlint.
To do this, simply run the following command in a terminal within Android Studio:
Once the analysis is complete, you should get an output similar to the following:
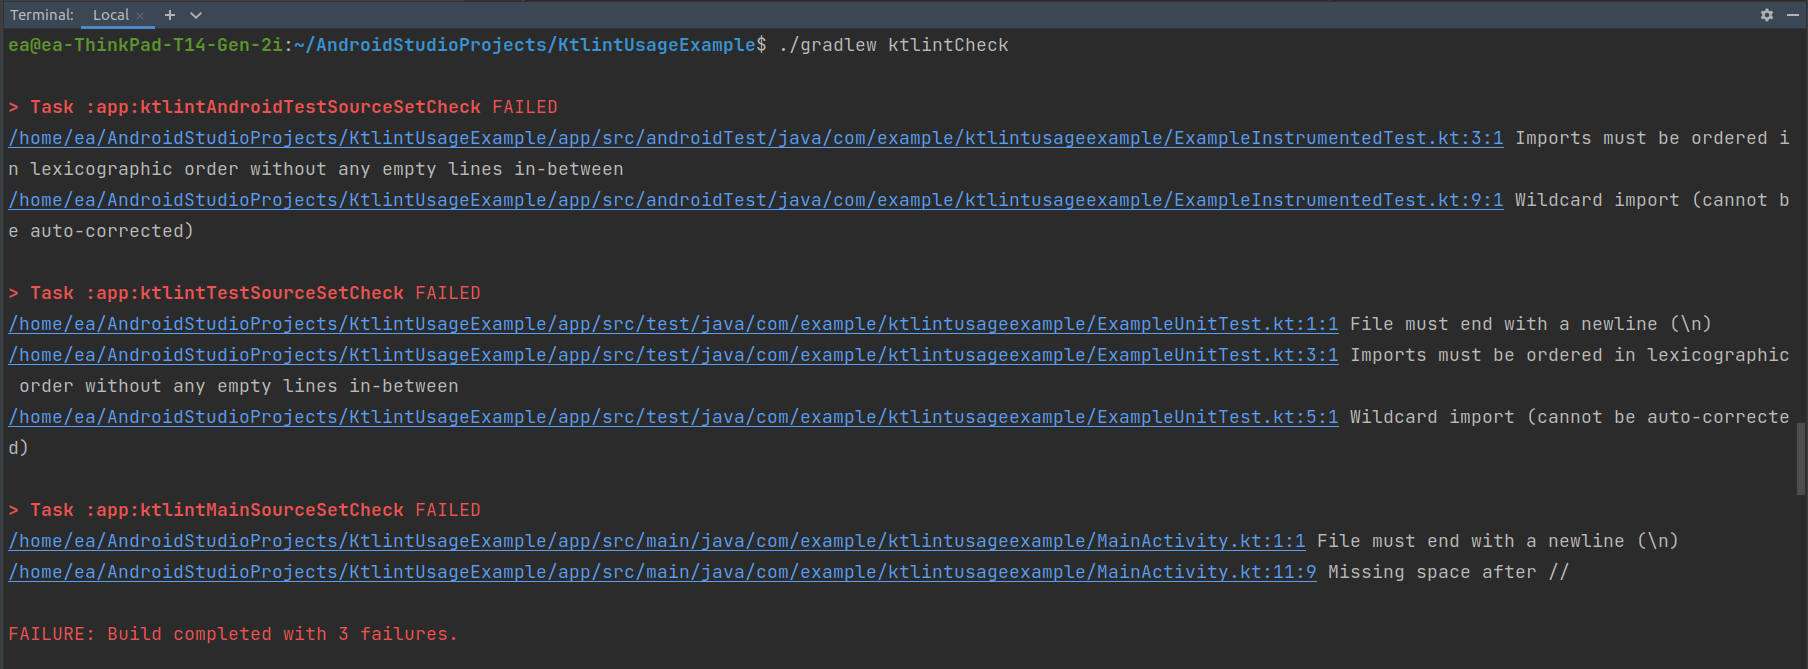
From the above result, we can see all of the files with issues. The result also includes the specific lines with issues and details of the issue.
First, in the main source set group, Ktlint reports an issue with the comment we added in Step 3. Ktlint's default rule does not allow comments without a white space after the second forward slash. Additional issues include formatting of imports and not ending each file with a new line. If you fix these issues and run the ktlintCheck again, you should get a successful build.
Step 5: Autoformat Code Using Ktlint
In addition to running a check on your code, Ktlint can also reformat code that doesn't meet the coding style. However, note that Ktlint cannot autoformat all coding errors.
To autoformat your code with Ktlint, run the following command:
After running the above code, you should notice that some of the issues, like the one in the comment line, get fixed automatically. However, if you run ktlintCheck (from step 4) again, you'll find some of the issues related to imports still active.
.png)
Summing Up
Ktlint, and linting generally, help developers write cleaner code. You should always learn the best coding style for whatever programming language or development framework you're using and adhere to it whenever possible. Tools like Ktlint are built with Kotlin’s recommended coding style out of the box and make room for customization where necessary.
In this post, we covered how to add Ktlint to your Kotlin project and how to use it to analyze your code. We also considered an example of how you can use Ktlint to reformat your code. There's so much more you can do by configuring Ktlint to meet your specific needs. I recommend you check the official Ktlint documentation for more info. You can also check out Waldo if you want to know more about codeless mobile automation testing.
Automated E2E tests for your mobile app
Get true E2E testing in minutes, not months.


