


You might know Kotlin as a modern programming language and as the official language for building Android apps in 2021. What then is Kotlin/Native?
Kotlin/Native makes it possible to compile Kotlin code to native binaries that are capable of running without a virtual machine. Kotlin/Native is based on LLVM infrastructure. With Kotlin/Native, it is possible to develop for multiple platforms. For example, it’s possible to develop for iOS using Kotlin/Native.
In this post, we’ll take a deep dive into Kotlin/Native setup. We’ll look at two ways to do this and close with the pros and cons of each method. So let’s get started with Kotlin/Native setup using a command-line compiler.
Kotlin/Native Setup Using Command-Line Compiler
Here we’ll set up Kotlin/Native using the command-line compiler.
Prerequisites
- The Kotlin/Native compiler
- Some experience working with terminal or command prompts for Windows users
Steps
1. Getting the Kotlin/Native Compiler
First, we need to download the Kotlin/Native compiler. It’s available for Windows, macOS, and Linux. Click here to get the compiler from GitHub. Make sure you get the correct version for your machine. For example, if you are on are using a macOS device with an Intel-based processor, download the kotlin-native-macos-x86_64 asset.
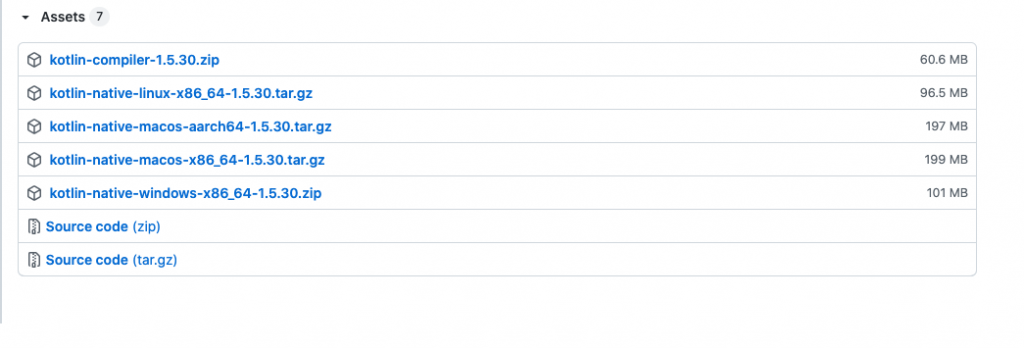
After downloading the compressed file, extract its content to a folder on your device. For this example, in this tutorial we’ll be extracting to “home/development.”
2. Add Kotlin/Native to Environment Variables
Once you’re done extracting the archive, note the path to the “bin” folder in the extracted content. Next, add the path to your machine’s environment variable. The process for doing this varies for different operating systems. However, a quick search on the internet for “how to add an environment variable” for your operating system should help. For our example, we’re using a macOS device with a zsh-based terminal. Here are the instructions if yo’ure using the same operating system.
Open the terminal and run the following commands:
The above command will open the .zshenv configuration file in the nano text editor. Next, add the path for bin noted earlier on a new line using the following code:
Note: Replace “{full/path/to/kotlin/native/compiler/bin/}” with the actual path to the file on your machine. (And don’t include the braces.)
Finally, restart the terminal so that the changes to the environment variable can be loaded.
3. Writing Kotlin Code
At this point, we have the environment variables set. Hence, we can now write some Kotlin code to test our setup. We’ll be using nano to write the code in this step. However, you can use any text editor of your choice.
But before doing that, create a new directory to store the Kotlin file. Then change your working directory to the new directory. Run the following command in the terminal to change your working directory:
Once again, replace “{/path/to/folder}” with the actual path for the new folder you created.
Once all that is done, run the following command to create a new Kotlin file using nano:
Then paste the following Kotlin code in nano”
After that, press control + x and accept the save prompt to save your code.

4. Run the Code
Now let’s test our code. Open the terminal, make your working directory the place where you saved the code, then run the following command:
If you get a successful build, you’ve run your first Kotlin/Native program.
Creating Kotlin/Native Project in InteliJ IDE
Now let’s create a project using the IntelliJ IDE.
Prerequisites
The only requirement before getting started here is the IntelliJ IDE itself. You can download IntelliJ for free here.
Steps
The following steps were performed using IntelliJ version 2021.2.1. You might notice slight differences in the user interface if you are on a different version of IntelliJ. However, any differences should not cause any issues.
1. Create a New Project
First, start by creating a new Kotlin/Native project. To do that, navigate to File -> New -> Project in IntelliJ. The new project window will open.

Select Kotlin from the left pane and Native Application on the middle pane. After that, enter the project name, then click Next.
The following screen should show up after the last screen.
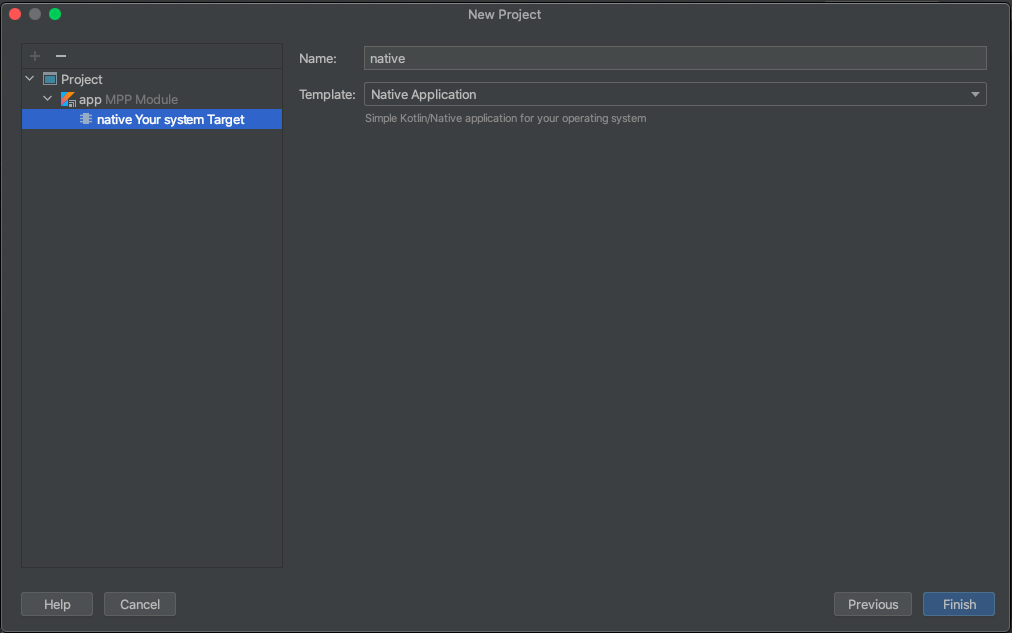
Select native Your system Target, then click Finish. After that, wait for the IDE to set up your new project. This initial setup process may take some time, depending on your internet connection.
2. Writing Kotlin Code
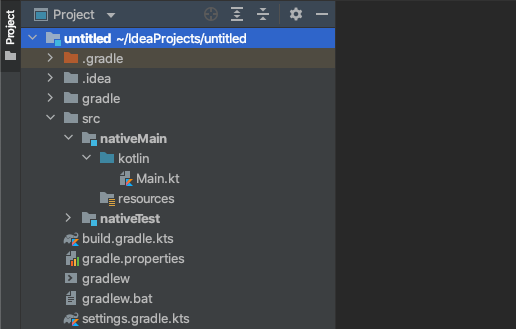
Before we continue, let’s talk about the file structure for our new project. Your Kotlin code can be found inside the src folder. The default entry point for our Kotlin/Native app is Main.kt (located in “project/src/nativeMain/kotlin”).
Open the Main.kt file, then replace the entire content with the following code:
The above code snippet is a simple program that prints “Hello Kotlin”.
3. Run Code
A quick way to run the code is to click on the button with a green play icon next to the main method in Main.kt and then wait for your code to build. The output from the program will be visible in the Run window of IntelliJ.

4. Automated Testing
You can write automated tests for your Kotlin/Native app in the tests subset directory (for example, nativeTest). Also, you can test an app built with Kotlin/Native using Waldo, a no-code testing solution. You can try Waldo for free here.
Kotlin/Native Command-Line vs Other Options: Pros and Cons
You can set up a Kotlin/Native project using the command-line compiler, the IntelliJ IDE, or the Gradle build tool. However, each method has its strengths and weaknesses. So far in this post, we’ve looked at the first two methods. In this section, we’ll compare all three methods.
Kotlin/Native Command-Line Compiler
Pros
- No special IDE required. You can get started with any text editor.
- Ideal for small test projects. Because of the low requirements and smaller number of files, this is perfect for running a small piece of Kotlin/Native code.
Cons
- Cannot be used for a large project. This method can’t scale, so it should only be used to test a small program.
- Initial setup requires manually downloading the compiler and adding the path to the environment variable. This is not very user-friendly and may cost the developer more time.
Kotlin/Native Using IntelliJ
Pros
- Unlike the command line method, this does not require any manual setup. Just open the IDE and follow the new project wizard to get started.
- Availability of IntelliJ’s auto-complete code suggestions, lint warning, and other IDE-specific features can reduce errors and save time.
- Can be used for developing large projects. Files are structured for a better development experience.
Cons
- It depends on a specific IDE (IntelliJ). Developers will need to install IntelliJ.
Kotlin/Native Using Gradle
Pros
- Does not require a specific IDE. The developer can use any text editor.
- Handles the download of all the necessary plugins and tools. As a result, this method requires less manual effort.
Cons
- Compared to using IntelliJ, the file structure is less organized.

Conclusion
With Kotlin/Native, it’s possible to extend the universe of the Kotlin programming language beyond Android. For example, you can build native apps for both macOS and iOS using Kotlin/Native.
Kotlin/Native has been around for some time, and there are plenty of learning resources available. Check out the official sample projects repository here to learn more.
This post was written by Pius Aboyi. Pius is a mobile and web developer with over 4 years of experience building for the Android platform. He writes code in Java, Kotlin, and PHP. He loves writing about tech and creating how-to tutorials for developers.
Automated E2E tests for your mobile app
Get true E2E testing in minutes, not months.


