


.jpeg)

If you've used JavaScript on the web, you must be familiar with timers. Timers are special functions in JavaScript that can help you run your code asynchronously. They come in handy in situations such as mocking API calls, implementing animations, creating stopclocks, etc.
Luckily, React Native also provides timer functions that you can use in your app. So in this post, I'll help you get the hang of React Native Timer. We'll also explore a real-life example to understand timers better. Finally, I'll show you how you can write an automated test for your timer functions.
Why Do We Need Timers?
Before we jump into the topic at hand, let's quickly understand why we even need timers in the first place.
By its nature, JavaScript is a single-threaded synchronous language. This means it executes your code blocks one after the other on a single main thread and cannot put off heavy computations on a separate thread for executing code blocks in parallel.
Imagine if you were rendering a heavy animation in your JavaScript app. Your users would have to wait for the entire animation to render before they could interact with it. This would also make the application appear laggy and heavy. In another scenario, let's say you were fetching data from a remote web server or an API. Since this is an asynchronous action, again, your users would have to wait to interact with your app until that data is fetched.
In all such cases, the web API or browsers provide us with timers. These timers help you execute code asynchronously via the event loop that mimics the behavior of running code in a multithreaded fashion.
Timer Functions
Now that we understand why we need timers, let's see what each function does with code examples. You can run these snippets in your browser's console or in a CodeSandbox.
setTimeout and clearTimeout
The setTimeout function takes two primary parameters. The first is a callback function that it executes. The second is the time in milliseconds after which it executes that callback.
This brings us to the definition of the setTimeout timer function. It executes a code block once, asynchronously, after a specified amount of time. Let's try out an example. We'll log a simple message on the console after three seconds:
And now you should see the message appear only after three seconds have elapsed:

Further, we can stop the execution of this timer function using the clearTimeout function. For this, we'll return an instance or a unique identifier of the setTimeout function in a variable.
Now our above message will not be logged to the console at all. This is because clearTimeout will delete its instance, and it will never be executed.
setInterval and clearInterval
Similar to setTimeout, setInterval also runs a block of code after some given time. However, unlike setTimeout, setInterval runs that code indefinitely. This means that, by default, the callback function will be executed until the timer function is cleared.
Structurally, it's exactly the same. It takes the first parameter as a callback function. The second parameter is the time after which it keeps on executing the function. Let's understand it better with an example:
The above message will be logged to the console after every one second.
So how do we stop the execution of setInterval? We'll need to clear its instance the same way we did for setTimeout. Only this time, we'll use a different method instead called clearInterval.
So now the above message will be logged only once. Since we'll clear it thereafter, we won't see it again. The above behavior is just like a setTimeout that runs after one second.
requestAnimationFrame and cancelAnimationFrame
The requestAnimationFrame function is a tailored fit for use cases involving animations. When dealing with animations and moving graphics, we often talk in terms of frames per second. So we focus on how many frames we can easily render of that moving graphic in one second.
Thus, requestAnimationFrame can be used to recursively invoke a function that renders an animation on the UI. It takes only a single callback function as a parameter. Here's a quick example:
Then, when you wish to stop its execution, you can invoke the cancelAnimationFrame function by passing the timer ID as in the previous scenarios.
Practical Examples
By now, you're familiar with the above timer functions. Awesome! Let's put all that theory into some code and practice. We'll now use the above timer functions in some real-life examples that you must have seen in a lot of native apps. We'll begin by creating a new Expo-based React Native project for this.
Set Up an Expo App
In a directory of your choice, create a new Expo app by running the following:
Choose a Blank Template as the option. Once the Expo project is created, open it via a code editor and kick-start the project.
Great! Let's look at our first practical example involving a timer function.
Build a Stopclock With React Native Timer Function
You must have seen numerous apps like clock apps, alarm clocks, stopwatches, or gym and fitness apps with a stop-clock feature. We'll now build a very simple stopclock using the setInterval timer function. For this, create a new directory called stopclock inside the root directory.
Display Time
To display time in a digital clock-like fashion, we'll use some helper functions to convert milliseconds into minutes, seconds, and milliseconds. We'll handle all this inside a component called <Time/>. So create a file called Time.js inside the stopclock directory.
Next, add the following code inside it:
We have three helper functions to carry out our time conversions. The <Time/> component will take the time of the stopclock as props from its parent component. Using the above helper functions, it will display the minutes, seconds, and milliseconds elapsed separately.
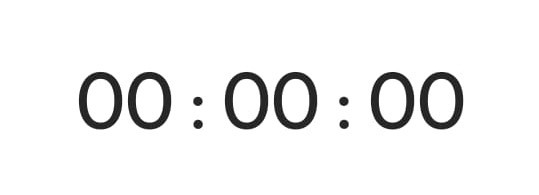
We also have some basic styles for displaying the time. If you pass the default value for the time props as 0, your <Time/> component should look like this:
Add Control Buttons
Next, we'll add three buttons, one each for Start, Pause/Resume, and Stop. These buttons will control the following actions respectively:
- Start the stopclock
- Pause or resume the stopclock
- Reset the stopclock to 0
The handlers for each of these will reside in the parent component. However, the rendering logic and UI will reside in a separate component called <Controls/>. So create a new file called Controls.js inside the stopclock directory.
Then add the following code inside it:
The above component renders three buttons as discussed for the start, pause, and stop functionalities. It takes the handlers as props and also the status. Status indicates at any instant if the stopclock is paused, playing, or stopped.
Each button is also conditionally disabled based on the value of status. If you set the status to -1 in the above component, your <Controls/> component should look like this:

Great! Let's now put everything together to create the entire stopclock.
Stopclock UI
First, we'll render our <Time/> and <Controls/> components inside the <Stopclock/> component. Create a new file called Stopclock.js inside the stopclock directory with the following code:
Great! Finally, we'll render the <Stopclock/> component inside the <App/> component or the App.js file:
Stopclock Logic
For the stopclock's logic, first, we'll make a simple comment above our status state for our own reference.
We'll set the status to -1 if we wish to reset the clock, 0 for pausing or resuming the clock, and 1 if the clock is running. We can now accordingly populate our handlers:
Awesome! Let's now write our stopclock's logic using the setInterval timer function. We need to begin, pause/resume, or stop our clock counter every time the status state changes. Hence, we'll use useEffect with the status as a dependency.
We'll create a local timerID inside useEffect. Then we'll check if the clock is started using the status value 1 and increment the time state by 10. The time state holds the value of our stopclock and is updated every 10 milliseconds. For any other case, we call the clearInterval function to clear the setInterval's running instance and stop its execution.
We do the same thing when our component unmounts so that every time our component comes back, our setInterval has a fresh execution. Lastly, for the reset or stop action, we'll call a reset function.
Inside this function, we'll simply set the time state back to 0. And that's it! Here's the entire code for the Stopclock.js file:
If you've done everything correctly, give your stopclock a whirl. Then, let's now see how we can write an automated unit test using Jest to test a timer function.
Automated Test for React Native Timer Functions
Writing unit tests ensures a robust and foolproof codebase. However, timer functions make it difficult to write unit tests since we're using external APIs to mimic a multithreaded behavior. Luckily, Jest provides some useful methods out of the box that we can use to test react native timer functions.
Set Up Unit Testing in Expo
First, we'll set up Jest to use in our Expo project. We need to install jest and jest-expo by running the following command inside the root directory:
Then we'll add some additional scripts and a preset to the package.json file:
Great! We're all set up now.
Create Timer Function
We'll now create a utility wrapper around a generic setTimeout function. We can then use this helper or utility function whenever we want to use setTimeout in our React Native app. For right now, we'll keep the delay to one second or 1,000 milliseconds.
Create a file called timer.js inside the root directory with the following code:
Now, whenever we want to use a setTimeout with a one-second delay, we'll simply invoke the above timer function and pass our callback.
Unit Test for React Native Timer Function
Now we'll write a simple unit test in Jest that tests our timer function. Create a file called timer.test.js in the root directory. This is where our test will reside. We'll test the following things:
- Callback is not invoked right away
- Callback is invoked after one second
- Callback is invoked only once after one second
Makes sense? Let's code this out. Here's what our test file should look like:
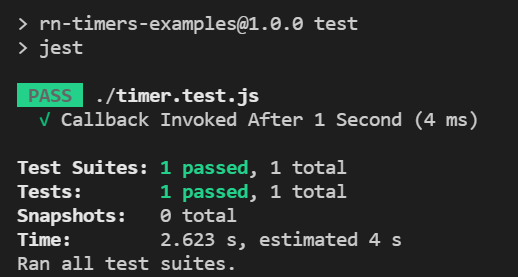
Let's now run this test. To do so, we'll run the following command inside the root directory:
And our test should pass successfully!
Conclusion
Awesome! We've not only learned timers and implemented them but have also validated our code by writing a simple unit test. Since timer functions themselves are complex in nature, what you build with them could be even more complex. In those cases, writing unit tests to validate your features may not be an easy task. You can check out Waldo in such cases, as it allows you to run automated tests for your features directly in your browser.
Automated E2E tests for your mobile app
Get true E2E testing in minutes, not months.


