


Kotlin AlertDialog is a kind of dialog that displays a message with either one, two, or three action buttons. Dialogs are popular, and most apps have at least one feature that displays messages using a dialog.
In this post, we’ll take a deep look at AlertDialog. You’ll find out how to implement an AlertDialog using the Kotlin programming language. In addition to that, you’ll also learn how to generate automated tests for an AlertDialog.
What’s an AlertDialog?
Dialogs generally are small modals that don’t take up the entire screen. The default theme for an AlertDialog renders a white floating card with a message and optional text buttons.
You’ll see an AlertDialog positioned over every other view on the screen. Usually, tapping the action buttons will dismiss the dialog and reveal the content underneath. Another option for dismissing a dialog is tapping outside the modal.
AlertDialog Class
This class has been part of the Android operating system since API 1. It’s a subclass of the Dialog class. This class contains the logic needed to set up and control an AlertDialog. DatePickerDialog and TimePickerDialog are also subclasses of AlertDialog class.
The recommended practice is to implement AlertDialog using an AlertDialog builder. Therefore, let’s take a closer look at the AlertDialog.Builder class.
AlertDialog.Builder
AlertDialog.Builder is an inner class inside the AlertDialog class. Its primary job is to simplify the process of creating an AlertDialog. To use the builder, first create a new instance of the class. After that, other properties of the dialog to be created are specified on that instance.
The AlertDialog.Builder class has two public constructors.
- The first constructor accepts one argument (the context).
- The second constructor accepts a context and a theme resource ID.
In the case where only context is provided, the AlertDialog will use the default there.
Below are some of the common methods of the AlertDialog.Builder class.
1. create() method: This method creates a new AlertDialog that has all the values configured in the builder. Let’s look at an example:
From the code sample above, alertDialog is an object of AlertDialog with the title “Welcome!” The create method on its own doesn’t cause the dialog to display. We’ll take a look at the method that displays the dialog in a later section.
2. setTitle() method: An alert dialog may require a title. The title can be set by providing a string or resource ID as a parameter for the setTitle method.
3. setMessage() method: This method lets you define the main message that will display in an AlertDialog. You can set the message using a string parameter or resource ID.
4. show() method: As you may have guessed from the name, this is the actual method that’ll cause the AlertDialog to show.
In the next section, we’ll look at methods that are related to AlertDialog action buttons.
AlertDialog Action Buttons
An alert dialog can have one to three buttons, depending on its purpose. There are three kinds of buttons. One is the negative action button. The second is positive action, and the third is neutral action.
Here are methods that set up the AlertDialog buttons:
- setNegativeButton(text: String, listener: DialogInterface.OnClickListener!): The work of this method is to set up a listener for the negative button. A user tapping the negative button will cause the code in the listener to execute. It’s also where you specify the text (label) that will display on the button.
- setPositiveButton(text: String!, listener: DialogInterface.OnClickListener!): This method sets the listener and labels for the positive action button.
- setNeutralButton(text: String!, listener: DialogInterface.OnClickListener!): This method sets the listener and label for the neutral action button.
Example
Now that you know what an AlertDialog is and understand about the AlertDialog.Builder class, let’s walk through creating an actual AlertDialog step by step.
In this example, you’ll build an app that displays a dialog when the user hits the Back button in the root activity.
Prerequisites
To follow this guide, you need to have the following:
- Android Studio IDE (4.0+)
- Basic knowledge of Kotlin
- A physical Android device or emulator
1. Create a New Project
Open Android Studio, and navigate to New -> New Project. Then, complete the new project wizard. Specify your project name, and leave other options as default.
2. Create an AlertDialog Field
Now, let’s create a field of type AlertDialog. To do that, open MainActivity.kt (located in app/java/your.package.name). Then, add the following code just above the onCreate method:
The above code creates a mutable variable alertDialog. The initial value for the variable is null.
3. Set Up the Dialog
Now you need to write the code that creates the dialog. Add the following code just below the onCreate method:
The above code creates a new createDialog method.
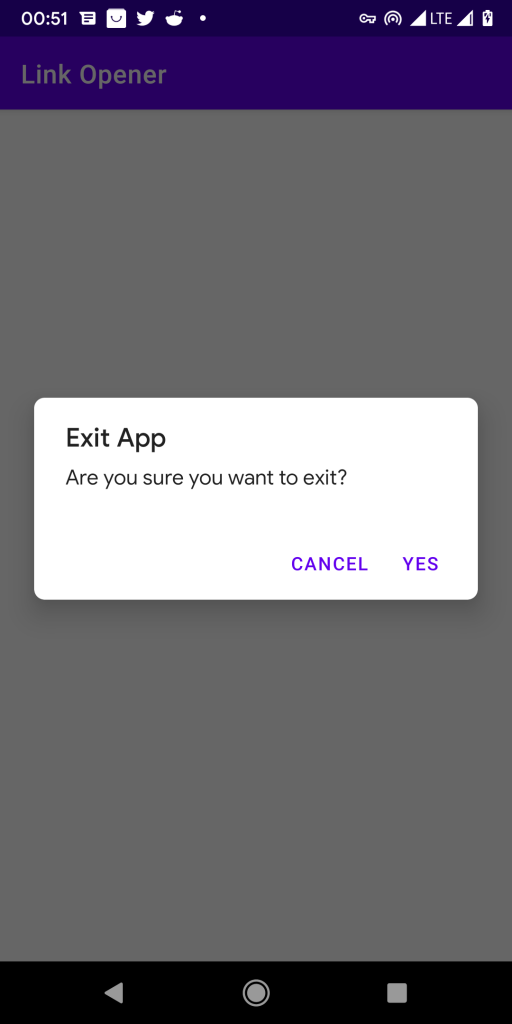
The first line creates a new instance of AlertDialog builder. Also, the setTitle() method sets the dialog’s title to “Exit App.” Next, the setMessage() method sets the main content to “Are you sure you want to exit?”
After that, the setPositiveButton() and setNegativeButton() methods set the action buttons. Therefore, the AlertDialog that will render will have just two buttons.
Finally, the last line in the createDialog() method creates the dialog. A reference to the AlertDialog is stored in the alertDialog field.
4. Override onBackPressed() Method
You’ll want to show your alertDialog when someone presses the Back button. To do that, override the onBackPressed by adding the following code at the end of the MainActivity class:
5. Implement AlertDialog Button Click Listeners
As your app is currently, tapping on either button dismisses the dialog. You need to code the positive button so that tapping on it kills the app. Search the createDialog() method for the following line:
Replace the entire line with this code:
The above code adds a listener that fires the finish() method. For this reason, the app will exit when someone taps the positive button.
On the other hand, the negative button will close the AlertDialog and return to the current activity.
Here’s the full code for MainActivity.kt:
Great! Are you ready to see how this works?
6. Run the App
Connect a physical Android device or start an instance of an emulator. After that, hit the green Play button in Android Studio and wait for the application to build. Once the app is running, hit the Back button to activate the dialog.
Congrats! You’ve successfully added an AlertDialog to your application.
Writing Automated Tests for AlertDialog
It’s possible to write an automated test for AlertDialog. For our example, we’ll be using the Espresso test library.
To begin, click the class name in MainActivity.kt. Then press ALT + ENTER. Doing that will open a menu. Select “Create test” from the menu.

Next, follow the wizard to generate a test class for MainActivity.kt.
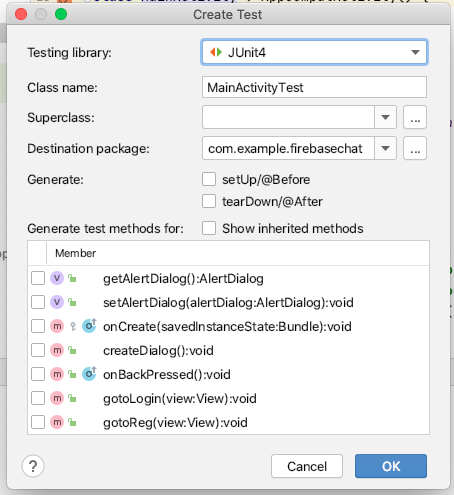
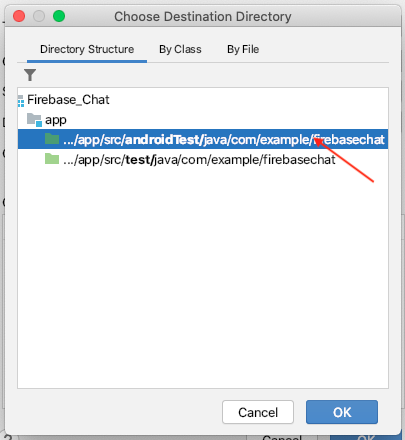
TIP: Make sure to change the value for Testing library to JUnit4. Also, select the path with “androidTest” as the destination. To explain further, JUnit4 is the testing library while “androidTest” contains tests that depend on Android-specific libraries.
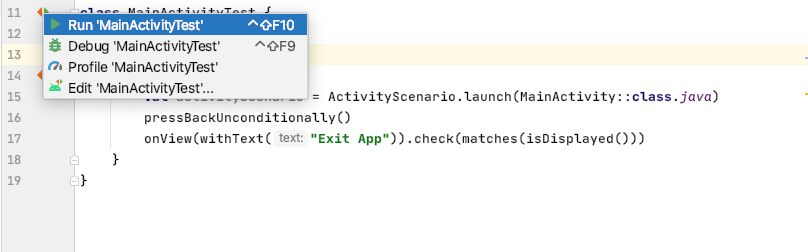
Once you’re done, add the following code to the MainActivityTest.kt file, which is located in App -> Java -> your.package.name(androidTest).
The above code will launch a test for MainActivity. After that, it’ll perform a Back button click. This should cause the AlertDialog to show. Finally, the test checks if there’s a view with the title for the dialog on the screen.
To run the test, click the arrows next to the class name.
After that, the test should pass.

However, there’s a simpler way to perform the above test using Waldo. Waldo is a no-code testing tool built for mobile engineers. You can try the tool for free and check out Waldo’s blog posts on mobile engineering.

Summing Things Up
In this post, we were able to cover what an AlertDialog is. Then, we looked at the AlertDialog class. You also saw some of the methods of the AlertDialog.Builder class used for setting up an AlertDialog.
There are multiple ways of implementing an alert dialog in an app. Your implementation depends on the use case of your app. In our example, we used the dialog to alert users before they exit our app.
Finally, it makes sense to follow the material design guide for best practices on implementing AlertDialog. Learn more here.
This post was written by Pius Aboyi. Pius is a mobile and web developer with over 4 years of experience building for the Android platform. He writes code in Java, Kotlin, and PHP. He loves writing about tech and creating how-to tutorials for developers.
Automated E2E tests for your mobile app
Get true E2E testing in minutes, not months.


