


With the advent of agile development, companies are focusing on creating APIs. Teams are using these APIs to build apps that can either be internal applications or SaaS applications. In this blog post, we'll discuss how to create an API endpoint in four quick steps. But before getting into it, let's understand what an API endpoint is.
What Is an API Endpoint?
An application programming interface (API) is a set of protocols and routines for building software applications. It specifies how software components should interact.
An API endpoint is a URI that addresses a specific resource in an API. It's the endpoint that you request data from when you make an API call. The endpoint is typically the last part of the URL after the domain name.
Each endpoint usually corresponds to a specific resource or set of resources and can be used to perform various operations on those resources. For example, an endpoint might allow you to retrieve information about a specific user or allow you to create a new user.
What Is an API Request?
An API request is a request that's made to a particular API. User/API clients can make this request to any available API, which will typically include some information specific to the API being requested.
For example, a request could be made to an API to retrieve a list of users or create a new user within the application.
An API request can be sent using any API testing tool such as Postman, a programming language such as NodeJS, or a framework such as Python's FastAPI.
.png)
What Is an API Response?
The API response is the data format returned by an API after a request is made to the server. It can be in the form of a JSON object, XML object, or any other format. The API response contains data that the client requested, as well as any other data that the server wants to include.
The client can use the data in the API response to do various things, such as display the data on a web page, authenticate a user, and much more.
How to Create an API Endpoint in 4 Easy Steps
Creating an API endpoint is simple with the following four steps, detailed below.
1. Pick the Programming Language of Your Choice
Many different programming languages are available, and choosing the right one can be difficult. However, it's essential to select a language that you're comfortable with and that will be able to meet your needs.
For this guide, we'll be using FastAPI in Python to create the API for a to-do list. We'll be creating a single endpoint, but we'll use a couple of different request types to perform operations:
- GET Request to get all items in the list.
- POST Request to add an item to the list.
2. Set Up Your Environment and Directory Structure
Now that we've decided what we want to build, it's time to take the next time. First, create a todo-backend directory and navigate into it using the command cd todo-backend. We'll be using pipenv to install all required Python packages for our project. To install packages, use the following command:
The above command will install all required packages to run our project. To get started, let's create our first file and name it main.py (in the root directory). You can also make this file by entering in touch main.py on the command line.
With this done, we've completed the initial setup, and now it's time to start with code.
3. Get Started with Code
Creating the API
To create this API, we won't be using an actual database server to store the to-do items. We'll be storing the details in a list that will look something like this:
We'll use the todo_items list to store all the data and return the list when the user wants to get all the to-do items.
To get started, paste the following code to the main.py file.
In the above code snippet, we've imported FastAPI from the fastapi package. The app variable will be used to create all the API endpoints (routes). Next, we've created a /health endpoint, which will be used to check if our application is running or not.
In @app.get("/health"), /health refers to the API route, and get is the type of request.
Now let’s create our first endpoint, which will be responsible for adding a to-do item to our list.
The function add_item is responsible for adding a to-do item to the list. As you can see, this is a post request. In this request, an item will be received in the request body. We’ll understand this better in the later steps while testing the API.
In the last line of the function, we're returning status and message as the API response (in JSON format).
Starting Our Server
We've successfully created our first API endpoint, so it’s time to start the server. To do so, use the following command:
The above command will start the server on http://127.0.0.1:8000/. Now, if you open the URL, you’ll get the following error message:
We got the above error message because we have not created an API endpoint in our file for the / route. We only have an endpoint for /health. Now, if you change the URL to http://127.0.0.1:8000/health, you’ll see the following message:
This shows that our application is working correctly. We won’t be able to test the POST request, as we can’t send POST requests using the browser. In the later stages, we’ll use Postman to test this out.
Now let’s quickly add the other endpoint as well.
In the get_items function, we're simply returning the todo_items list. Now, if you open the URL again, you’ll get the following message:
We're getting the above message as we have not yet added any items to the list.
And with this, we've successfully created our API. Now, it’s time to test the API we've created.
4. Test the API Endpoints Using Postman
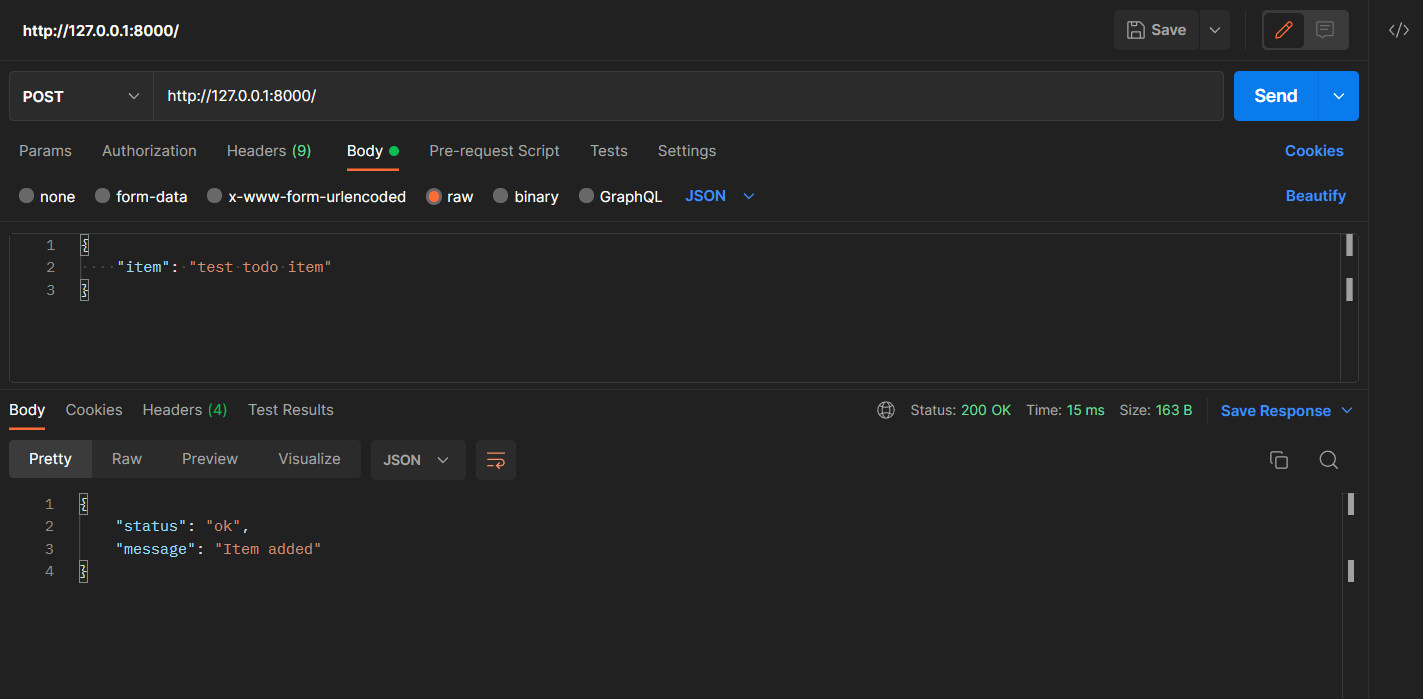
Fire up your Postman, add http://127.0.0.1:8000/ as the URL, and select POST as the request type. As we're using JSON for transferring data, navigate to the body tab and then choose Raw -> JSON.
Once done, add the following payload to the request body and send the request.
If you have done everything as listed above, you’ll see a response as shown in the following screenshot:
Now, if you change the request type to get and send a request, you’ll see a list of items we have added.
And that’s a wrap! You can access the code from the Gist.
To learn more about creating APIs using FastAPI, check out the official FastAPI documentation.
.png)
Conclusion
We hope you enjoyed our article on creating an API endpoint in four quick steps. The world of APIs continues to grow in popularity, and we're excited to see the new possibilities they can bring, along with the faster pace of innovation for both individuals and companies. With the tools and information in our article, you can build your API and your own set of tools that people can use and build upon.
We're always excited to see what you're working on. We’d love to know if you've started building your API!
Automated E2E tests for your mobile app
Get true E2E testing in minutes, not months.


