


Displaying data in a grid format is one a fundamental feature for user-facing applications. Whether it's a mobile application displaying a list of items or a website displaying a gallery, grids are a ubiquitous aspect of UX design.
In Flutter, creating grid views is handled by the GridView widget. This widget offers a robust and straightforward way to create a grid-like element with a ton of flexibility and customization.
In this article, you will learn how to make use of the GridView widget. To achieve this, we will create a simple Flutter app for the web and add a simple implementation of the GridView widget. Then, we'll explore some of the customization options available. Finally, we'll explore some of the common issues that might arise when first implementing GridView.
It's important to emphasize that we wrote this article for Flutter developers and people who want to learn about Flutter. If you find some of the information here hard to follow, we recommend that you spend a few minutes exploring Flutter development resources.
First Steps With Flutter
Before jumping into Flutter widgets, let's make sure your environment is ready. We've already covered this setup process in previous Flutter articles. But we want to make sure you have everything you need, so let's have a brief refresher.
Don't worry. This process is extremely simple and short. You can skip this section if you have your environment set up and ready to go.
First, go to the Flutter.dev website install section here and download the package for your operating system. In our case, we downloaded the macOS install package.
Once you have done this, extract the file and keep the extracted folder in a safe directory where it can reside for the time being. We like to keep things tidy, so we set it on the /documents/development/environments/flutter directory.
Next, open a terminal window, or bash, whatever you prefer using, and navigate to the directory where you placed the Flutter directory. Then type the following command.
Note that this command only sets your PATH variable for the current terminal window. To permanently add Flutter to your path, see Update your path.
Excellent, now you have all you need to run Flutter apps on your environment.
Mobile Development
Depending on whether you have XCode and Android Studio or not, you might be able to emulate applications on these devices. However, you can always run your applications on the web without installing anything else.
To ensure everything is in order, run the following command, which will tell you what other dependencies you might be missing:
Finally, you will want to have an IDE or editor to create and work with your Flutter projects, debug your code, and run your application. In our case, we will be using VS Code because it offers excellent integration for all these requirements and is fast, lightweight, and free.
All you have to do is install the VS Code app by downloading it from here, look for the official Flutter extension, and install it.
You can find an extensive guide for more information on this process here.
All good? Great, let's move on.
What Is a Flutter GridView?
If you've seen a list of items in an application, you've seen an implementation of a GridView.
In essence, a GridView is an element, or widget, that displays a list of items as a 2D array in a horizontal and vertical arrangement structure. This structure is analogous to displaying data in a table format. Unlike a typical list, which renders items in one direction, GridView can simultaneously render items horizontally and vertically. This is useful when you want to display items more dynamically and need a structure to accommodate the elements in different configurations. Additionally, GridViews are great for displaying elements with different sizes and aspect ratios.
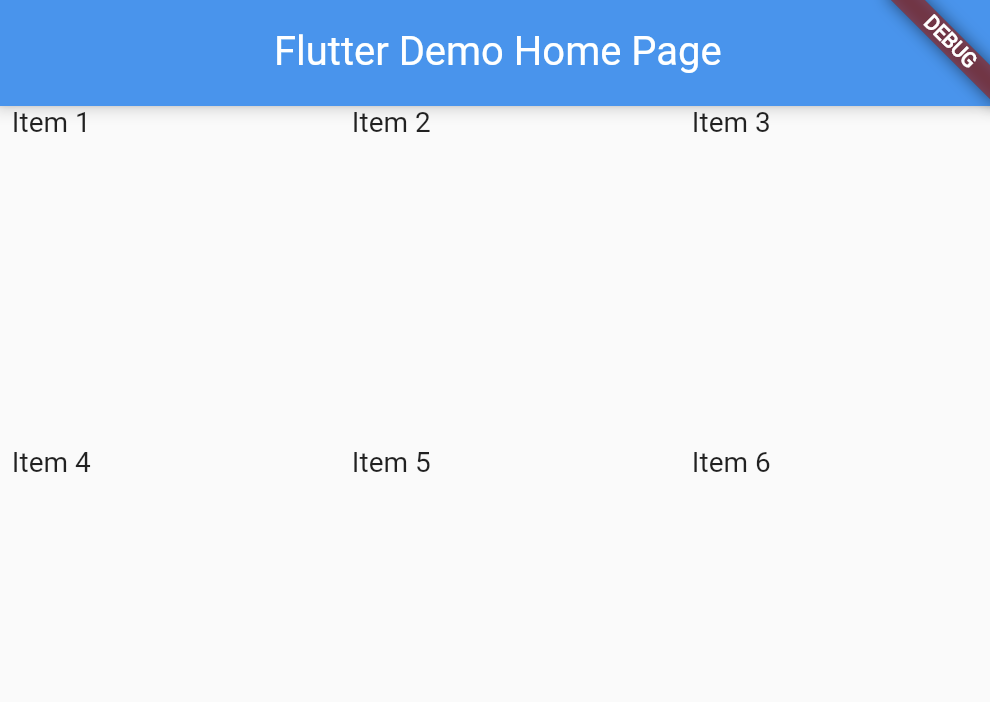
A simple implementation of a GridView would look something like the following:
Notice that the GridView arranged the items in a three-column structure.
Implementing a Flutter GridView
Now, implementing a Flutter GridView is actually quite simple once you have a good understanding of the basic Flutter widget structure. But if you don't, don't worry. All you have to do is make slight modifications to the boilerplate Flutter app that VSCode creates for you. Then open the new project menu with Command + Shift + P and Select "Flutter: New Project" to create this project.
Once you've done this, open the main.dart file residing in the lib/ directory and find the scaffold line in the widget builder. Then replace everything that lies inside the body: property with the following code:
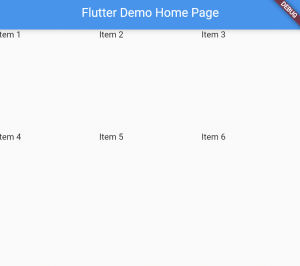
Now you can proceed to run the code by pressing F5. The result should look like this:
Notice that we're displaying the items in a list instead of a grid in this case. You can adjust this by changing the crossAxisCount in the gridDelegate property to any number you prefer.
Now let's explore the customization options available in Flutter.
Customizing a Flutter GridView
The first thing to understand about GridView customization is the basic properties you must set to display it. We specified both the gridDelegate and children properties in our previous example. Let's explore them.
The gridDelegate property in a GridView controls how it displays the items in a list. By default, the scroll direction for any list is vertical. This is why, in this simple case, the GridView is showing items horizontally. The children property, on the other hand, refers to the list of items the GridView is to display. For example, this property accepts a list of widgets, so you can show pretty much anything in this view. Beyond these basic properties, we can configure the spacing, scroll direction, and item number, to name a few.
Let's explore each of these configurations.
.png)
Item Number
To control the number of items to display, you must first modify the GridView constructor.
We'll use the build method of the GridView, which allows us more control over the widget's properties. Then remove the children property, which explicitly specifies each item, and instead use the itemBuilder and itemCount properties to create the items dynamically. The itemBuilder property allows you to specify a function that prototypes the widgets for the GridView items. In this case, you'll be using the text widget in conjunction with a padding widget to properly space out the item text.
Spacing
Now, let's say you want to space out your items to avoid them looking cramped. To do this, you can use the crossAxisSpacing and mainAxisSpacing properties in the gridDelegate. Then just set the padding in an integer, and that's it.
This change will result in the following code:
Which should produce the following:

Notice the childAspectRatio property, which dictates the GridView item aspect ratio relative to the screen.
Scroll Direction
To modify the scroll direction of the current GridView, all you need to do is specify the proper axis value in the scrollDirection property. To make the GridvVew scroll horizontally, add the Axis.horizontal value.
Simple!
What's Next?
The learning curve for development can be challenging for fresh developers trying to learn a new technology. This is especially true when you want to provide a robust and secure application for your clients.
Developing complicated features and test cases to manage the increased complexity can become unmanageable for small, inexperienced teams. This is why we recommend our behavioral replay engine at Waldo. Our solution can handle your app's dynamic screen, variations in load time, and other common flakiness issues to provide your team with real-time, reliable insights into your product.
You can check it out here.
Automated E2E tests for your mobile app
Get true E2E testing in minutes, not months.


