


One of the features that make Android development pleasant is the option to automate testing. Without automation, if you need to test your application, you would have to deploy it to an emulator or actual device and manually use every feature you wish to test. But thanks to automation, you can run several tests by writing a test script one time.
Android provides different tools for automated testing, two of which are UIAutomator and Espresso. In this article, we'll compare UIAutomator and Espresso to help you determine which is best for you and your specific use case. Before we continue, let's take a broad look at each tool.
What Is UIAutomator?
UIAutomator is a test automation tool for Android that can run and interact with apps, even if you don't have access to the source code. That is, you can use UIAutomator to perform end-to-end (UI) tests on almost any application. For example, you can use UIAutomator to open and navigate through the stock settings app on an Android device.
What You Can Do With UIAutomator
There's so much you can do with UIAutomator and here, we list just some of the top uses.
- Interact with a device regardless of the application or activity currently in focus: You can use the UIAutomator tool to control an Android device or emulator with any app active on the screen. For example, you can navigate to the home screen and then the app drawer, or simply jump to another app, all with the UIAutomator API.
- Interact with visible UI elements: With UIAutomator, you can write scripts that perform various actions like clicking on a UI element, such as a button, or even typing new text into an EditText.
- Write automated tests: Above all, you can use the UIAutomator testing framework to eliminate the need to manually open an application and use each feature in order to verify that they perform as expected. Instead, you can write a script that UIAutomator will use to perform such tests.
What Is Espresso?
Espresso is another UI testing framework for Android. With Espresso, you can write automated end-to-end tests for your application that mimic normal user interactions like clicking buttons, scrolling through a list, and so on.
What You Can Do With Espresso
- Automate of interaction with UI elements: You can use Espresso to launch your application and perform various UI interactions, like clicking on a view and scrolling.
- Target specific UI elements: Espresso has methods like onView() that make it possible for you to target specific UI elements by some unique identifier, like the ID of a view. Once you have a reference to a view, you can then perform a series of operations on it.
- Verify the state of UI elements: You can use Espresso to verify the state of a view. For example, you can use the check() method to verify if a TextView is present on the screen and contains a specific text.
Advantages of UIAutomator
- It enables interaction with almost every application, even without access to the source code.
- It makes UI testing fast, more accurate, and easy to repeat using scripts.
Disadvantage of UIAutomator
- Since you may not have access to the source code for the application under test, it's harder to find out the unique identifier for selecting a UI element.
Advantages of Espresso
- Espresso makes performing end-to-end testing easier through its expressive, short, and friendly syntax.
- Unlike manual testing, Espresso tests are consistent and you can run them multiple times by just running the test script.
- Espresso can wait for resources like data from network calls or databases.
Disadvantages of Espresso
- Espresso tests are instrumentation tests, meaning that they require a physical device or emulator to run. As a result, Espresso can be slow, especially on low-end devices.
- Tests run using the Espresso framework can be flaky. For example, a test that depends on network calls may pass or fail due to internet speed.
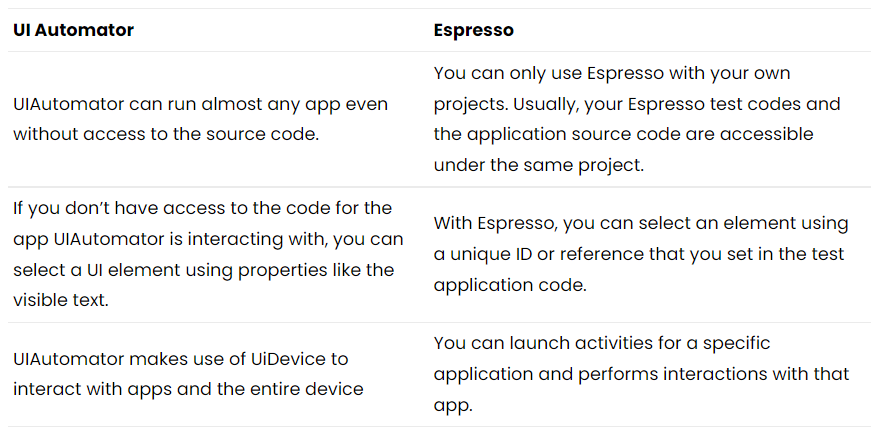
UIAutomator vs Espresso
The following table shows a side-by-side comparison of UIAutomator vs Espresso.
How UIAutomator Works (Example)
The following steps show how to use UIAutomator to perform automated tests on any Android app.
For this example, we'll use UIAutomator to control the UI of an Android device. We'll write a script that opens the recent app screen and then switches back to the last opened app.
Step 1: Add UIAutomator Dependency to Project
For this step, you can use an existing project or a new empty project. It is from this project that we'll be running UIAutomator.
Add the following code to the dependency section of the app-level build.gradle file:
Then, hit the Sync Now button so that Gradle can download the dependencies.
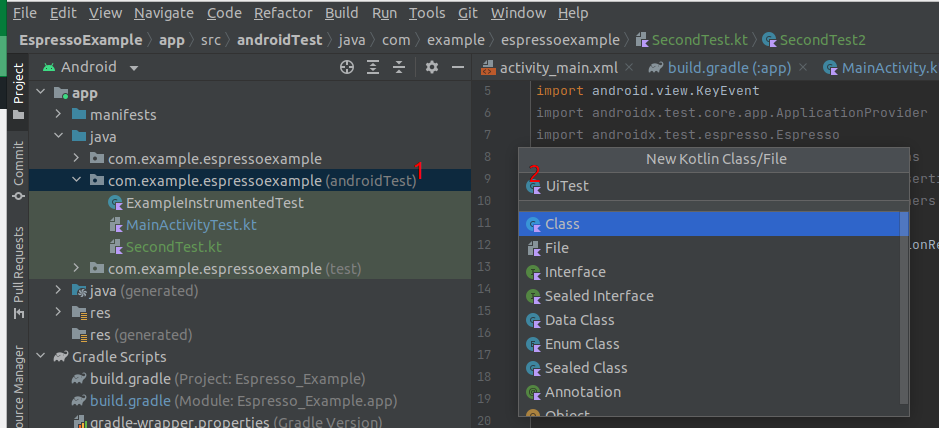
Step 2: Create a Test Class
Now, you’ll create a file under the androidTest source set. You’ll write your test in this file.
To create the file, right-click on the androidTest folder, select New>Kotlin Class/File then enter UiTest as the file name and hit the Enter key.
Step 3: Write the Test
As we mentioned earlier, your test will open the recent apps screen, and switch focus back to the last active application. To write the actual script that will cause UIAutomator to perform these actions, open the UiTest.kt file you created in the last step and replace the entire content of the file with the following code:
This code creates a new UiTest class. UIAutomator tests run as AndroidJUnit4 tests. Hence, we annotate the class declaration with @RunWith(AndroidJUnit4::class). Next, we have a setup() method that initializes a new instance of UiDevice and starts an interaction with the device by pressing the home key. As a result, your test will always start with the device on the home screen.
Finally, your actual test is the showRecentApps() method. This method simply presses the app switch button (or recent app button) to show currently opened apps. It then presses the button for a second time to make the last active app visible again.
Step 4: Run the Test
To see the code for our test in action, hit the green double-play button next to your class declaration and wait for Gradle to build. Once everything is ready, you should notice your phone or emulator performing the actions specified in the code from the previous step.
How Espresso Works (Example)
Some of the steps for using Espresso are similar to those of UIAutomator that we described above. In this section, we'll walk through an example of how to use Espresso to test your application.
Step 1: Add Espresso Dependency to Project
Open your Android Studio project and add the following code to the app-level build.gradle file under the dependencies section:
Step 2: Write the Test
The normal practice for writing Espresso tests is to have a dedicated test class (file) for each activity. Let's write a test that launches the MainActivity screen for an application and performs a click interaction with a button.
The code for this type of test looks like this:
The above code launches the MainActivity screen using the activityScenarioRule. Next, the test looks for a button with the specified ID, using the onView() and withId() methods. Then it performs a click.
Step 3: Run the Test
You can run your Espresso test by clicking on the green Play button next to the class declaration. Wait for Gradle to build and you should see the result running in your emulator or physical device.
.gif)
Final Verdict (Which one is Better?)
In this post, we explained UIAutomator vs Espresso as tools for automated testing. Then, we walked through examples of how to use each. Now, the answer to the question of which is better depends on your use case.
Since UIAutomator creates a UiDevice instance that can navigate through the entire device, it’s ideal for automating tasks on the Android platform, especially tasks that run on applications for which you don't have the source code.
Espresso, on the other hand, has robust APIs to perform end-to-end tests on your application at different phases of the development process. So, it’s perfect for quality assurance tests that teams perform before releasing their application to the public.
Waldo is a mobile testing tool that you can use to test your mobile application. Waldo is easy to use, supports collaboration, and requires less configuration than manual testing.
Automated E2E tests for your mobile app
Get true E2E testing in minutes, not months.


