


Apple provides a few options for structured data storage, including JSON files, property lists, local SQL databases, Core Data, and CloudKit. All of these, except the local SQL database, have nice Swift interfaces. Apple includes SQLite in the iOS system libraries, which you can use as a local SQL database, but you have to deal with C-style functions to use it.
Then FMDB came along. FMDB stands for Flying Meat DataBase, from Gus Mueller’s Flying Meat Software, an indie macOS app company. FMDB provides an object-oriented interface on top of SQLite’s C API, adds multithreading support, and more. In fact, some of Flying Meat apps' file formats are SQLite database files.
This article aims to help you get started with SQLite and FMDB using Swift to target iOS. You’ll learn how to create a database file, update it, query it, and perform transactions on it. This post is not a complete reference to SQL, SQLite, or FMDB. I wrote this article assuming you have prior knowledge of SQL and Swift (the programming language, not the singer 😅).
Installing FMDB
The easiest way to install FMDB for your project is via the Swift Package Manager, accessible from Xcode’s GUI. Open Xcode and follow these steps.
- Open the File menu and then select Add Packages…
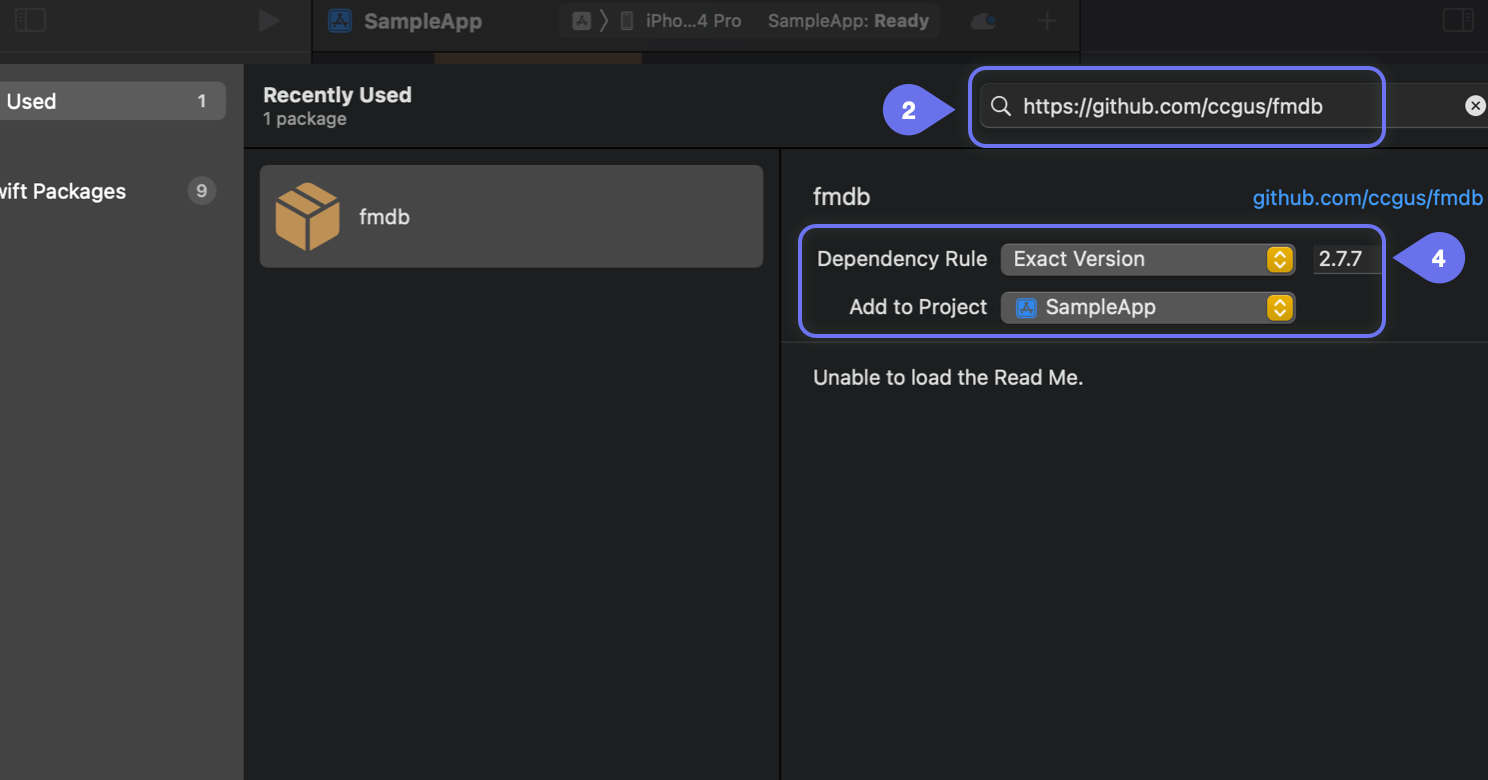
- In the dialog box that appears, paste FMDB’s URL (https://github.com/ccgus/fmdb) in the upper-right corner (in the search box).
- Wait for Xcode to load FMDB’s package information.
- In Dependency Rule, select Exact Version and then enter version 2.7.7. This locks the version of FMDB to the same one used in this article.
- Click Add Package to add the FMDB package to your project.
- In the Choose Package Products for fmdb dialog, add the FMDB package product to your app target(s), and then click Add Package.

- FMDB is now installed in your project and ready for use.
Creating a Database
To open or create a database file, instantiate FMDatabase and give it a local file path. Then call that instance’s open() method. The object will create the file as required, but it won’t create any directory for it.
For example, the following Swift snippet creates opens an SQLite database file named myMusic.sqlite within the application support directory. It starts by ensuring that the directory exists and then creates or opens the database file there.
Setting up Tables
Once you have a database open, use the executeStatements() method to create database tables or populate a database with an initial set of sample data. This method accepts multiple SQL statements. Hence, it’s perfect for use with SQL scripts read from a file coming from your app’s resources.
The above snippet creates the table that we’ll use for our subsequent examples. SQLite has a “… IF NOT EXISTS” parameter to CREATE TABLE that won’t error out if the table already exists. Hence, you can use this parameter in the SQL DDL script you run each time the app opens the database.
Inserting Rows
Use the executeUpdate(, values:) method to insert, update, or delete rows. Provide this method with one SQL statement. This method throws an error.
Use the executeQuery(, values:) method to query data. This method also throws an error. On success, it will return an FMResultSet object that is an iterator to the rows of the query results. Initially, this iterator points to before the first row. Thus, you need to call next() repeatedly to fetch the result rows. In turn, next() returns true when it fetches a row but false when it has no more rows in the result to fetch.
Now let’s try inserting two rows into the database and querying it. Take a look at the following code snippet. It has two calls to executeUpdate(, values:) and each inserts a row. They’re followed by executeQuery(, values:) and a while loop to iterate through the results.
The example above obtains the column value through the string(forColumn:) method of FMResultSet by specifying the album column by name. This method has other variations, one for each SQLite data type.
You can see the result of that snippet below. Remember that SQL doesn’t order result sets by default; thus, you might have the results reversed when you run it yourself.
Getting Results
In addition to rows, FMResultSet can also return columns of the result. Use its columnCount property and retrieve the column names via their indices using the columnName(forColumnIndex:) method. Likewise, FMResultSet supports retrieving column values via their indices.
The following code snippet applies that capability to print a markdown table from a result set. First, it iterates through the column names to print the table header. Second, it iterates through the result set by indexing column values.
Insert and Update
Now let’s try inserting rows and updating them. First, we insert a row. Second, we update that row. Third, we query the results.
Initial Data Set
As before, use executeUpdate(, values:) to insert a row into the database. The next snippet shows how to retrieve the identity of the most recent row insert with lastInsertRowID. You can use this value by matching it with the hidden column _rowid_ in SQL queries.
As expected, the query returns the row we just inserted:

Updated Data Set
We now use the executeUpdate(,values:) method to update a row. Afterward, we query the results to check our update.
Notice the SQL UPDATE statement above has duplicated single quotes, namely, the new suffix “… (Taylor’s Version)” of the updated song title and album. That’s how you escape quotes in SQL statements, not by using backslashes, but by doubling single quotes. If you don’t escape those quotes, SQLite will think that the string has ended and interpret the characters after that as part of the SQL statement (which will create syntax errors in our example). Later you’ll see how to avoid escaping quotes safely.
As expected, the code snippet above correctly updates our record, analogous to how Taylor Swift updated her old songs to regain distribution rights… 😉

Sanitizing Data
The previous code examples show SQL statements with embedded string data. I deliberately used that style to keep the examples simple. However, this is not the way to write production applications. The problems are twofold:
- The hassle of escaping those strings — quotes, newlines, and tabs, and the like
- The risk of SQL Injection attack
Production-grade SQL strings would use parameterized queries. That is, SQL strings do not contain data values. This has double benefits:
- It’s safer and less error-prone, that is, sanitized.
- It’s potentially faster since SQLite can parse and compile those statements once to run them many times.
Inserting Rows
Use the method executeUpdate(, withParameterDictionary:) to use parameterized database updates. The first parameter is an SQL statement having placeholder values instead of real data values, whereas the second parameter is a dictionary that maps those placeholder values with real data values. An example follows.
The code snippet below inserts a row using a parameterized SQL statement. Have a look at the INSERT INTO statement and notice that the values are placeholders. These placeholders are identifiers prefixed with a colon. Then we provide the actual data values in the initialRowValues dictionary of the code snippet, keyed by those placeholders sans colons.
Running the snippet above will insert data from the initialRowValues dictionary into the database.

Updating Rows
The parameter dictionary given to executeUpdate(, withParameterDictionary:) has arbitrary keys. These keys do not need to match any column name. They only need to match the parameters as defined in the SQL script. I want to point out that the delta_play_count parameter in the example below does not correspond to any column name in the songs table.
Querying Rows
Parameterized queries work similarly. Use executeQuery(, withParameterDictionary:) and provide it with a parameterized SQL query and a dictionary containing the parameter values.
Running the code snippet above shows that the play_count column has been updated correctly.
.png)
Transactions
You use transactions when you need several operations run as a single group. It allows a group of insert, update, and delete statements to all take effect or to be canceled as a single group. Furthermore, SQLite allows database schema changes as part of transactions.
Transactions end with either a commit or a rollback. When a transaction commits, all changes are applied to the database. If not explicitly specified, FMDB will implicitly create a transaction around each SQL operation, commit it upon success, and roll it back upon failure.
To begin a transaction, use the beginTransaction() method of FMDatabase. This method returns a boolean value indicating success or failure. In the event of a failure, more information is available in the lastError property.
To commit a transaction, use the commit() method of FMDatabase. Similarly, the rollback() method rolls back transactions. These methods also return a boolean value and leave error information in the lastError property.
Before we start our transaction examples, let’s define a method to print the songs table for subsequent snippets.
This section will show how transactions are committed or rolled back in two similar sample code snippets. The main difference between the two samples is that one commits, and the other one rolls back.
Sample Data
Let’s define a method to populate the songs table for our examples in this section. This time it fills the table with two songs from different albums and their respective play counts.
The Happy Case
The following code snippet shows an example of a successful transaction. It starts a transaction, updates the play count for a song, and then commits the transaction.
The following table shows the table from before the transaction began. It shows the initial set of rows.

The next table shows a committed transaction post update. Notice that the song Keep Being You has a play count of 17, increased by six from its initial value of 11.

The Failure Case
You can roll back to undo updates when something goes wrong in the middle of database operations. The following code snippet is similar to the previous one, but the transaction ends with a rollback. Hence, we undid the change.
The following table shows the initial table contents, unchanged from the previous section’s example.

The following table depicts what it looks like during the transaction. Notice that the song Keep Being You has an updated play_count of 17.

In contrast, you’ll see the following table after rollback. Notice that the song Keep Being You has its play_count value reverted to 11.

Next Steps
You can download the source code for all the code snippets above from my Github project. I’ve provided those code snippets as unit tests you can run independently of one another.
Regarding tests, remember that FMDB does not syntax-checked the SQL scripts you write until they’re run. Therefore, you would need to have proper unit tests for each SQL statement to ensure that they would function correctly as you evolve your app. One good way of doing this is to utilize Waldo’s test suite organization solution.
Automated E2E tests for your mobile app
Get true E2E testing in minutes, not months.


